Tag: Aircraft

  • VF-33 F-14A: Cockpit

    VF-33 F-14A: Cockpit

    Tamiya’s F-14 has been on my Wishlist for some time now and only recently have I gotten the chance to build it. I decided to go all out for this build and opted to pickup a load of aftermarket for this project.

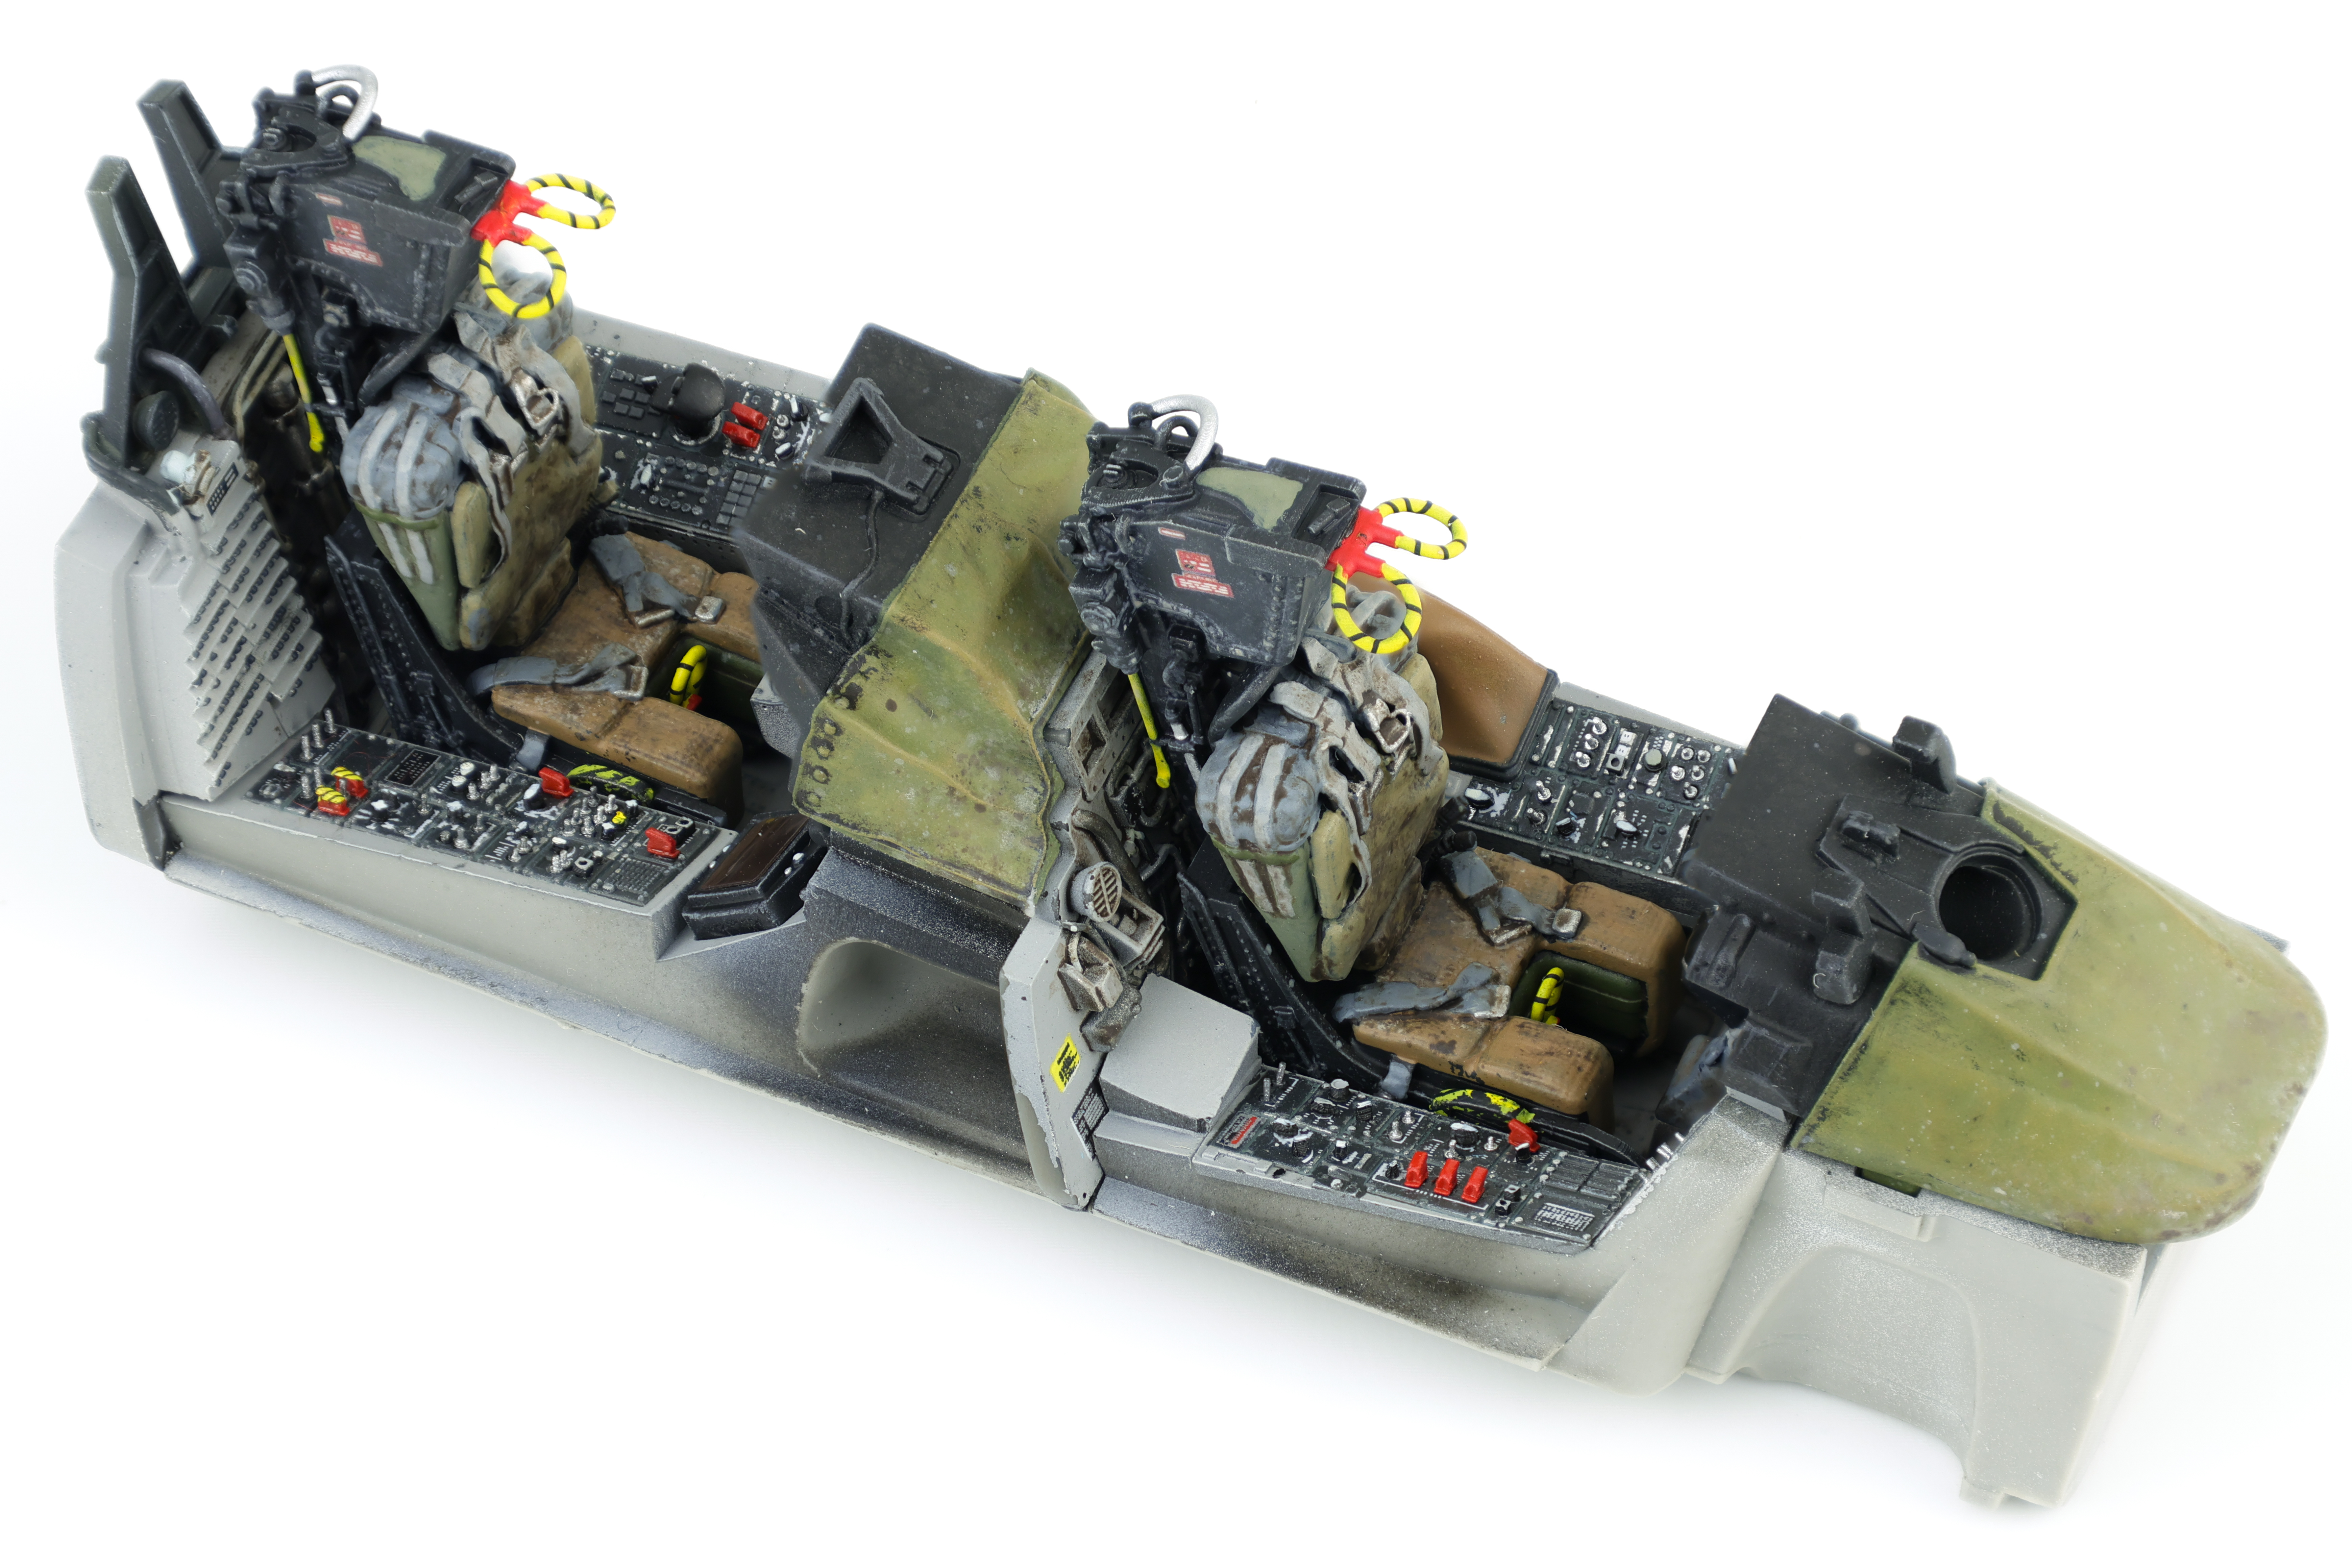
    Like all aircraft, construction started with the cockpit. The Eduard set is very well detailed and a definite upgrade over the already fantastic stock cockpit. I also chose to include Master Craft Collection (MCC) 3d printed seats as the Eduard set does not include the later model GRU. 7A ejection seats. Work started by drilling out the side consoles in preparation of adding Anyz switches and dials. I’ve found that adding decals over top the molded on switches is difficult and I preferred to remove the all together.

    Unlike my Phantom project, the addition of the resin cockpit meant that I needed to complete no scratchbuilding work. This was a welcome change and it meant that work quickly progressed to the painting phase.

    After a coat of black primer and a silver chipping coat+hairspray, I applied Tamiya Sky grey for the majority of the cockpit with the side panels emphasized with Nato black. I then did some cockpit chipping by soaking the cockpit in water before rubbing a stiff brush over the areas where I wanted wear to accumulate. On my recent Phantom project, I chose to use sponge chipping instead of the hairspray method and I wasn’t super pleased with the results I managed to achieve. I found that using the Hairspray method here was far better and got the result I was after. That said, It was still important not to overdo this effect, especially on the side consoles as the chips were particularly visible.

    I then moved on to working on the front and rear instrument panels. These were somewhat less straightforward than the cockpit tubs as the paintwork required for them required some delicate masking. As indicated by the instructions and reference photos the instruments themselves were painted black with the panel itself finished in grey. I chose to try out a new technique for painting the instrument panels and I opted to first paint them black, followed by hairspray chipping, with grey following over top.

    This would allow me to use the raised detail of the instruments to chip off the grey, revealing the black underneath. I think this approach worked ok, although there is some definite improvement to be found. I finished the panels with a medium grey drybrushing to highlight details.

    With the paintwork completed, I then moved on decals. I chose to use decals from Anyz and Jira-Gio to placard the side and instrument panels. This really helps to bring the cockpit alive and is a really key step in finishing the cockpit. After the decals dried, I applied a grey wash in-between the panels and a dark brown wash on the cockpit floor. After sealing the cockpit in a matt varnish, I decided that I wanted to try something new when it came to the main displays. I chose to use photography film to recreate the displays as they provide a really nice reflective finish.

    Next up, I decided to work on the ejection seats. These were 3d printed from MCC and are very well detailed. After a primer coat of Mr. Surfacer 1500 black followed by a layer of Tamiya Nato Black, I got to work brush painting all the various elements of the ejection seat. This meant painting the seat cushions/belts in the appropriate browns and greens, along with the various wires and cables attached to the seat.

    Weathering the seat was done with oils to recreate years of staining and discolouration on the seat cushions. I chose two shades of oils, a dark brown shade and a lighter dust colour. I first flicked on each of the two colours before blending them with oil paint thinner. This helped to create random shapes and intensities of both colours and really helps to achieve a weathered look in the fabric which is what I was looking for. I utilized this same technique for the fabric coverings behind the instrument panels as I wanted to recreate what the fabric looked like after sitting in the sun for some time.

    With the completion of the ejection seats, the cockpit on the F-14 was more or less completed. I added the Anyz swtiches along with the required cockpit parts (Control sticks and throttle). I was really quite happy with the end result here and I think it was a definite improvement over my previous Phantom cockpit. Next up: the Gear bay!

  • RF-4E Phantom II: Painting

    RF-4E Phantom II: Painting

    After several months on the bench, it came time to apply paint to the model. As with the majority of the models I build, I utilized the black basing technique to apply pre-shading to the model.

    After the initial coat of Mr. Finishing surfacer black 1500, I used a generic light grey to serve as the initial marble coat. I wanted to make sure that my marble work was sufficiently light enough as if the base layers turned out too dark, the final paint coats would also appear too dark and require too much paint to bring the colour back into the final finish.

    I then got to work adding some variation to the pre-shading, opting to scatter some different colours on select panels. In the end this effect was not as apparent as I had hoped but It’s still fun to play around with new approaches to techniques. The next step would be to begin blending everything together in two blend coats. The first was a thinned down coat of Mr. Color JASDF “Light Blue Impulse” which tinted the pre shading to be more in line with the final colours.

    After this was done, I then tried a new technique that I have been wanting to for some time now, the layered ink patina technique. This is done by utilizing liquidex acrylic inks to achieve even further surface variation. This technique was popularized by Modeller Kris Sieber (@Luftraum72) who has a great guide on how to utilize this approach available on his website.

    With the many pre-shading layers done, It was time to apply the final camouflage coats to the model and see if all the prior work was worth it. To do this I utilized two main shades, the first was SMS Midnight blue, the second being the aforementioned Light Blue Impulse from Mr. Color. I applied the light blue shade first, taking care not to overlap with the darker areas so not to overpower the pre-shading. I was fairly happy with how this turned out and I think that my approach here captured the duality of this distinctive scheme, in that it is incredibly vivid and striking yet also faded and worn at the same time.

    With this initial camouflage coat down, I then turned my attention to other areas that needed to be addressed. This included adding color discoloration to selected panels, painting the markings as well as the radome and anti-glare shield. Also of note was one of the scheme decals, a triangular graphic present on the tail of this aircraft. I opted to apply this decal at this time because from reference photos I could tell that it was very faded and barely noticeable on the real aircraft. To recreate this effect, I chose to paint over the applied decal prior to sealing my work in a gloss varnish

  • RF-4E Phantom II: Major contstruction

    RF-4E Phantom II: Major contstruction

    With the two fuselage halves joined work on the Phantom progressed to a new stage. Next up was the painting of the metallic surfaces and the exhausts. I chose to start work in this area because I knew that I wanted to polish the plastic surface in preparation for paint, leaving this step later on in the painting process would have made this difficult.

    With the bare plastic giving off a nice shine, I then hit the area with a coat of GX2 Ueno Black, my go to option for gloss black.

    With this step complete, I then got to work on the actual metallic shades, selecting a mix of Mr. Color Super Metallics and Tamiya Lacquers. After playing around with the shades I had available, I was feeling pretty confident in the result I had achieved.

    After the exhaust work was completed, I was able to move on to preparing the fuselage for paint. This consisted of attaching the wings and completing work around the canopy. This also included attaching the intakes which required a significant amount of sanding and putty work to ensure that they followed the contours of the main fuselage. This also meant completing work on the cockpit area, namely the sunshield and rear bulkheads To add detail in this area, I opted to apply some aftermarket rivet decals.

  • RF-4E Phantom II: Cockpit Completion

    RF-4E Phantom II: Cockpit Completion

    Hello all! I have to admit that it’s been a while since my last post here. For those who are checking in regularly, rest assured that the year will be closed out with regular updates and new projects into the new year. Here’s how the JASDF RF-4E has progressed!

    When I left off on this project, work on the cockpit was in full swing. After applying a gloss coat I was able to add the decals for the side consoles and instrument panels. I find that this step is the first that really adds life to the model and although time consuming, is really worth it. The specific decals added here are from two companies, Anyz and Jira-Gio, both of which I am a huge fan of. I will have to make my remaining sheets from Jira-Gio last however as the owner has recently stepped away from the business and it’s not clear if anyone will be stepping in to take over that role.

    After completing the majority of work to do on the cockpit tub, I turned my attention to the instrument panels. As detailed in the previous section, I opted to completely remove the detail from the panels and replace it with my own custom made instruments. While it was a bit nerve wracking to take knife to plastic I was pleasantly surprised with how these turned out.

    I built these instruments out with thin styrene sheet, instrument dial decals, and photo etched instrument bezels from Airscale. My typical workflow for creating them is as follows:

    • Apply instrument decal to thin styrene sheet
    • remove and paint instrument bezel separately
    • glue painted bezel in position on top of decal
    • add drop of clear varnish to simulate instrument glass
    • cut out completed assembly and apply to model

    The workflow for the scopes were slightly different and I utilized photography film along with holographic film to create a highly reflective surface, mimicking a screen. To do this I cut out a section of photo film and applied the holographic film from amazon over top of it. I then painted over everything with Tamiya clear paint (I made separate pieces for red, green, and blue tinting). I added the photo-etched instrument parts from Airscale as per the previous instructions which completed the assembly. I really think they turned out amazing and look fantastic when the light hits them just right.

    With the cockpit more or less complete, I then started work on the ejection seats. While I always leave the seats out until the end of the build, I always like building and painting them up before the cockpit is cemented into the fuselage. For this project I tried out Master Craft Collection’s fantastic 3d printed ejection seats for the F-4.

    After removing them from their supports, I applied a primer coat of Mr. Surfacer 1500 black as a base for further work. These seats were a real test of my brush painting ability as they almost entirely had to be brush painted. One downside of these 3d printed seats is that there’s no opportunity to paint the various parts of the seat separately, everything is attached in one part. After priming, I got to work painting the various seat sections and cabling. From my reference photos I could tell that the seat padding was primarily green/brown colours and that the upper section was typically grey. I finished off the belt buckles in silver and applied a gloss coat for decals, of which there were several that needed to be applied. With the decals in place, I then sprayed a matte coat over the completed work in preparation for the next stage of weathering, oils. I chose to avoid relying on an oil wash as my primary method of weathering for the seats. While I did still apply a light pinwash in select areas (namely the belts), this was done to support the more general oil effects I applied to depict the discolouration and staining of the seats and fabric materials.

    Also of note on the seats was the yellow and black hatching on the various ejection handles. While the handle on the right of the seat was acomplished with Anyz black hatching decals, the work on the handles above the pilot’s head took a lot more work to “pull” off. After painting these separate parts yellow, I wrapped Anyz black line decals around the loops to create a convincing look. This took some practice to get right and I’m glad I did, the final result is much more realistic than painting black lines on these handles.

    And with the completion of the seats, that was it for the cockpit on this Phantom! After spending quite a bit of time in this area, I was ready to move on to other areas of the build.

  • RF-4E Phantom II: Cockpit

    RF-4E Phantom II: Cockpit

    After completing the necessary work on the fuselage, I could turn my attention to the cockpit assembly. The OOB Hasegawa kit has very nice detail, however I would be replacing the majority of it with custom work.

    To start, I began removing virtually all the molded on detail present so that I could drill out 0.4 mm holes for the Anyz switches and dials. I used these on my CF-18 Hornet I completed two years ago and was fairly happy with the result. Looking back now however, I felt that I didn’t commit enough to this strategy and did not drill enough holes to get a realistic cockpit.

    I also opted to remove the molded on detail from two of the included cockpit panels. The kit includes a total of 4 instrument panels, 2 for the RF-4E and 2 for a different phantom variant. I opted to use the panels for the different variant as it would allow me to revert back to the other pair if this process didn’t work out. Removing the molded on details from the panel was fairly straightforward although some modification was necessary. For the front seat I needed to adjust the shape of the lower panel right behind the control stick. The styrene piece is very triangular and the correct shape is more square. From my reference photos I could also tell that that it is angled back slightly and to represent this I glued a small piece of styrene to get the correct angle. I liked the breaker panel detail so I opted to leave it intact.

    Work on the rear seat panel was a bit more involved. To start, the part I wanted to use was not shaped correctly for a RF-4E (rightly I’ll add). It included cutouts above the pilot’s legs which would need to be filled. To do this, I cut out a piece of styrene sheet that would fill this space. I then used sprue goo to cement this piece in place on the back side of the panel. This created a very somewhat rough surface on the face of the panel. I then went back over the area with Tamiya putty to create a uniformly smooth surface, ready for detailing.

    I then got to work making the various details for the cockpit. The idea was that I will paint the instrument panels in the appropriate gull grey while these additional details will be painted black, removing any need for masking during the painting process.

    Next up was to move on to the cockpit tub and sidewalls. While the Hasegawa kit is fairly light on the details, this means it’s relatively easy to remove the existing plastic in preparation of adding custom work.

    I started with the cockpit bulkheads. Reference photos showed that these areas were really quite busy with wiring and hoses and I wanted to replicate this madness. The first thing I added was some styrene sheet along with Anyz rivets as all subsequent wiring would rest over top these details.

    For the rest of the added detail I used a mix of brass tubing, lead and copper wire along with Anyz 3d printed connectors. I think that I achieved my goal of having the area look busy why not being completely unwieldy during the painting and weathering phase.

    Like the bulkheads, the cockpit sidewalls needed some serious work to be presentable. While 3 out of 4 of the sidewalls have at least a minimal amount of detail, the right side of the rear cockpit is missing any molded on detail at all. This does present a nice opportunity however to add whatever kind of features I wanted. To start I added some styrene rod bracing to bring out some structural elements.

    Next, I wanted to try to add some padded insulation material to the cockpit to help depict some interesting textures. I did this with Tamiya epoxy putty which I rolled out into very thin slices before applying it to the model. After a few minutes I then started to sculpt the putty and added creases near the edges. This technique went surprisingly well and I can’t wait to get a wash on the painted cockpit.

    Painting of the cockpit predictably started with Mr. Surfacer 1500 Black followed by Tamiya XF-19 Sky grey. While not an exact match to the interior colour of a F-4 Phantom, this shade is close enough and was what I had on hand.

    After the grey base colour had cured, I masked off the side consoles to airbrush them black. From reference photos I could tell that some of the switches and dials were gloss black which I wanted to replicate, even at the cost of being less visually striking. To compensate I painted these side panels in a dark grey. When next to the light grey they will appear black, but the gloss black switches should stand out at bit more. I also took this time to paint up the various wires and cables present on the rear bulkheads, painting them in a variety of black, white, and metallic colours.

    Next up was work on the sidewalls, and I was pretty happy with how my scratchbuilt work had turned out. The padded material looked quite realistic and after picking out the necessary details, this area of the build was looking particularly sharp. I also took the time to complete some chipping effects to depict wear and tear on the cockpit area as these were old birds and saw a lot of flight hours. That said I do think I could have been a bit more reserved with the weathering but I think that as long as the wash and oil work is more muted, the end result will look appropriate.

    This is where I’ll leave it for this update, even though this kit has been pretty sparse on the detail in areas, I really feel that adding the detail in myself has added to the enjoyment and not decreased it. We’ll see if this sentiment still rings true in a few months!