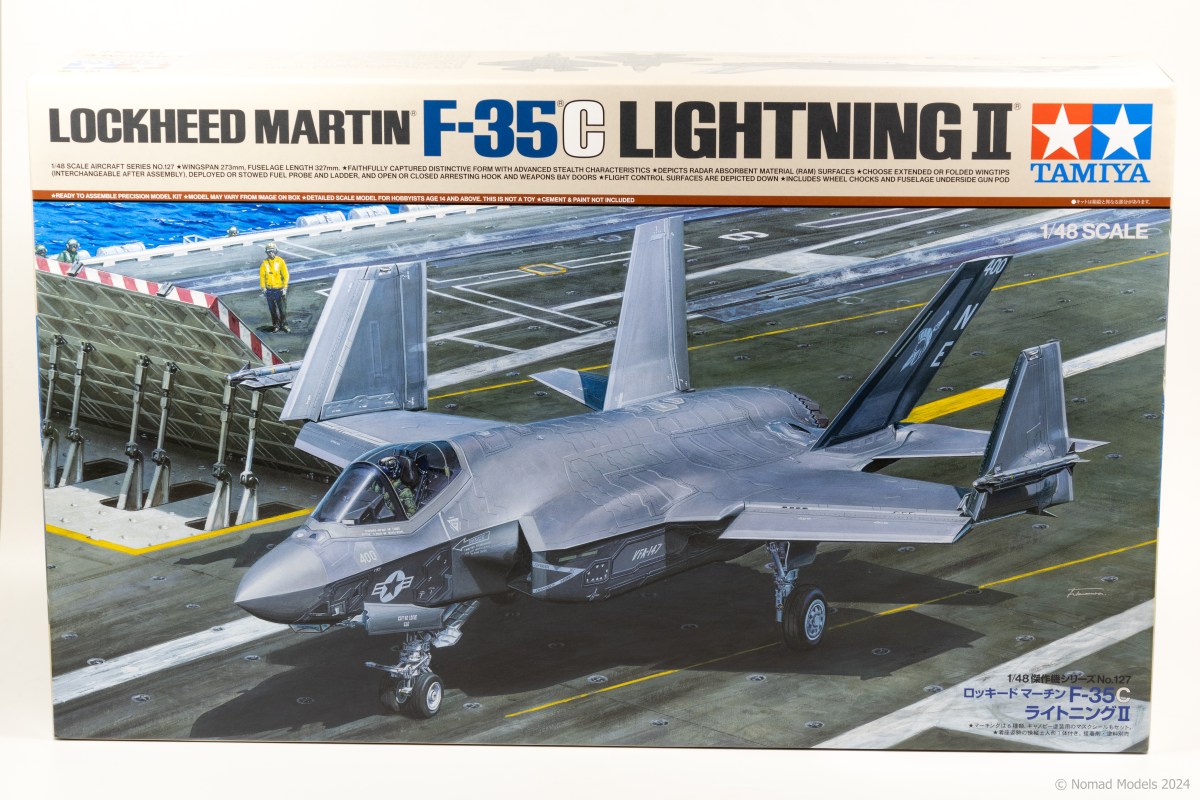
I knew when going into this review that Tamiya’s F-35C was going to be a serious challenger for the best kit I’ve ever reviewed. Both the A and B variants have recived critical acclaim since their releases in 2022 and 2023 respectively. Back in 2020 I rated Meng’s Jumbo Sherman a 92/100, will Tamiya’s latest lighting take that crown?
Kit Features 17/20
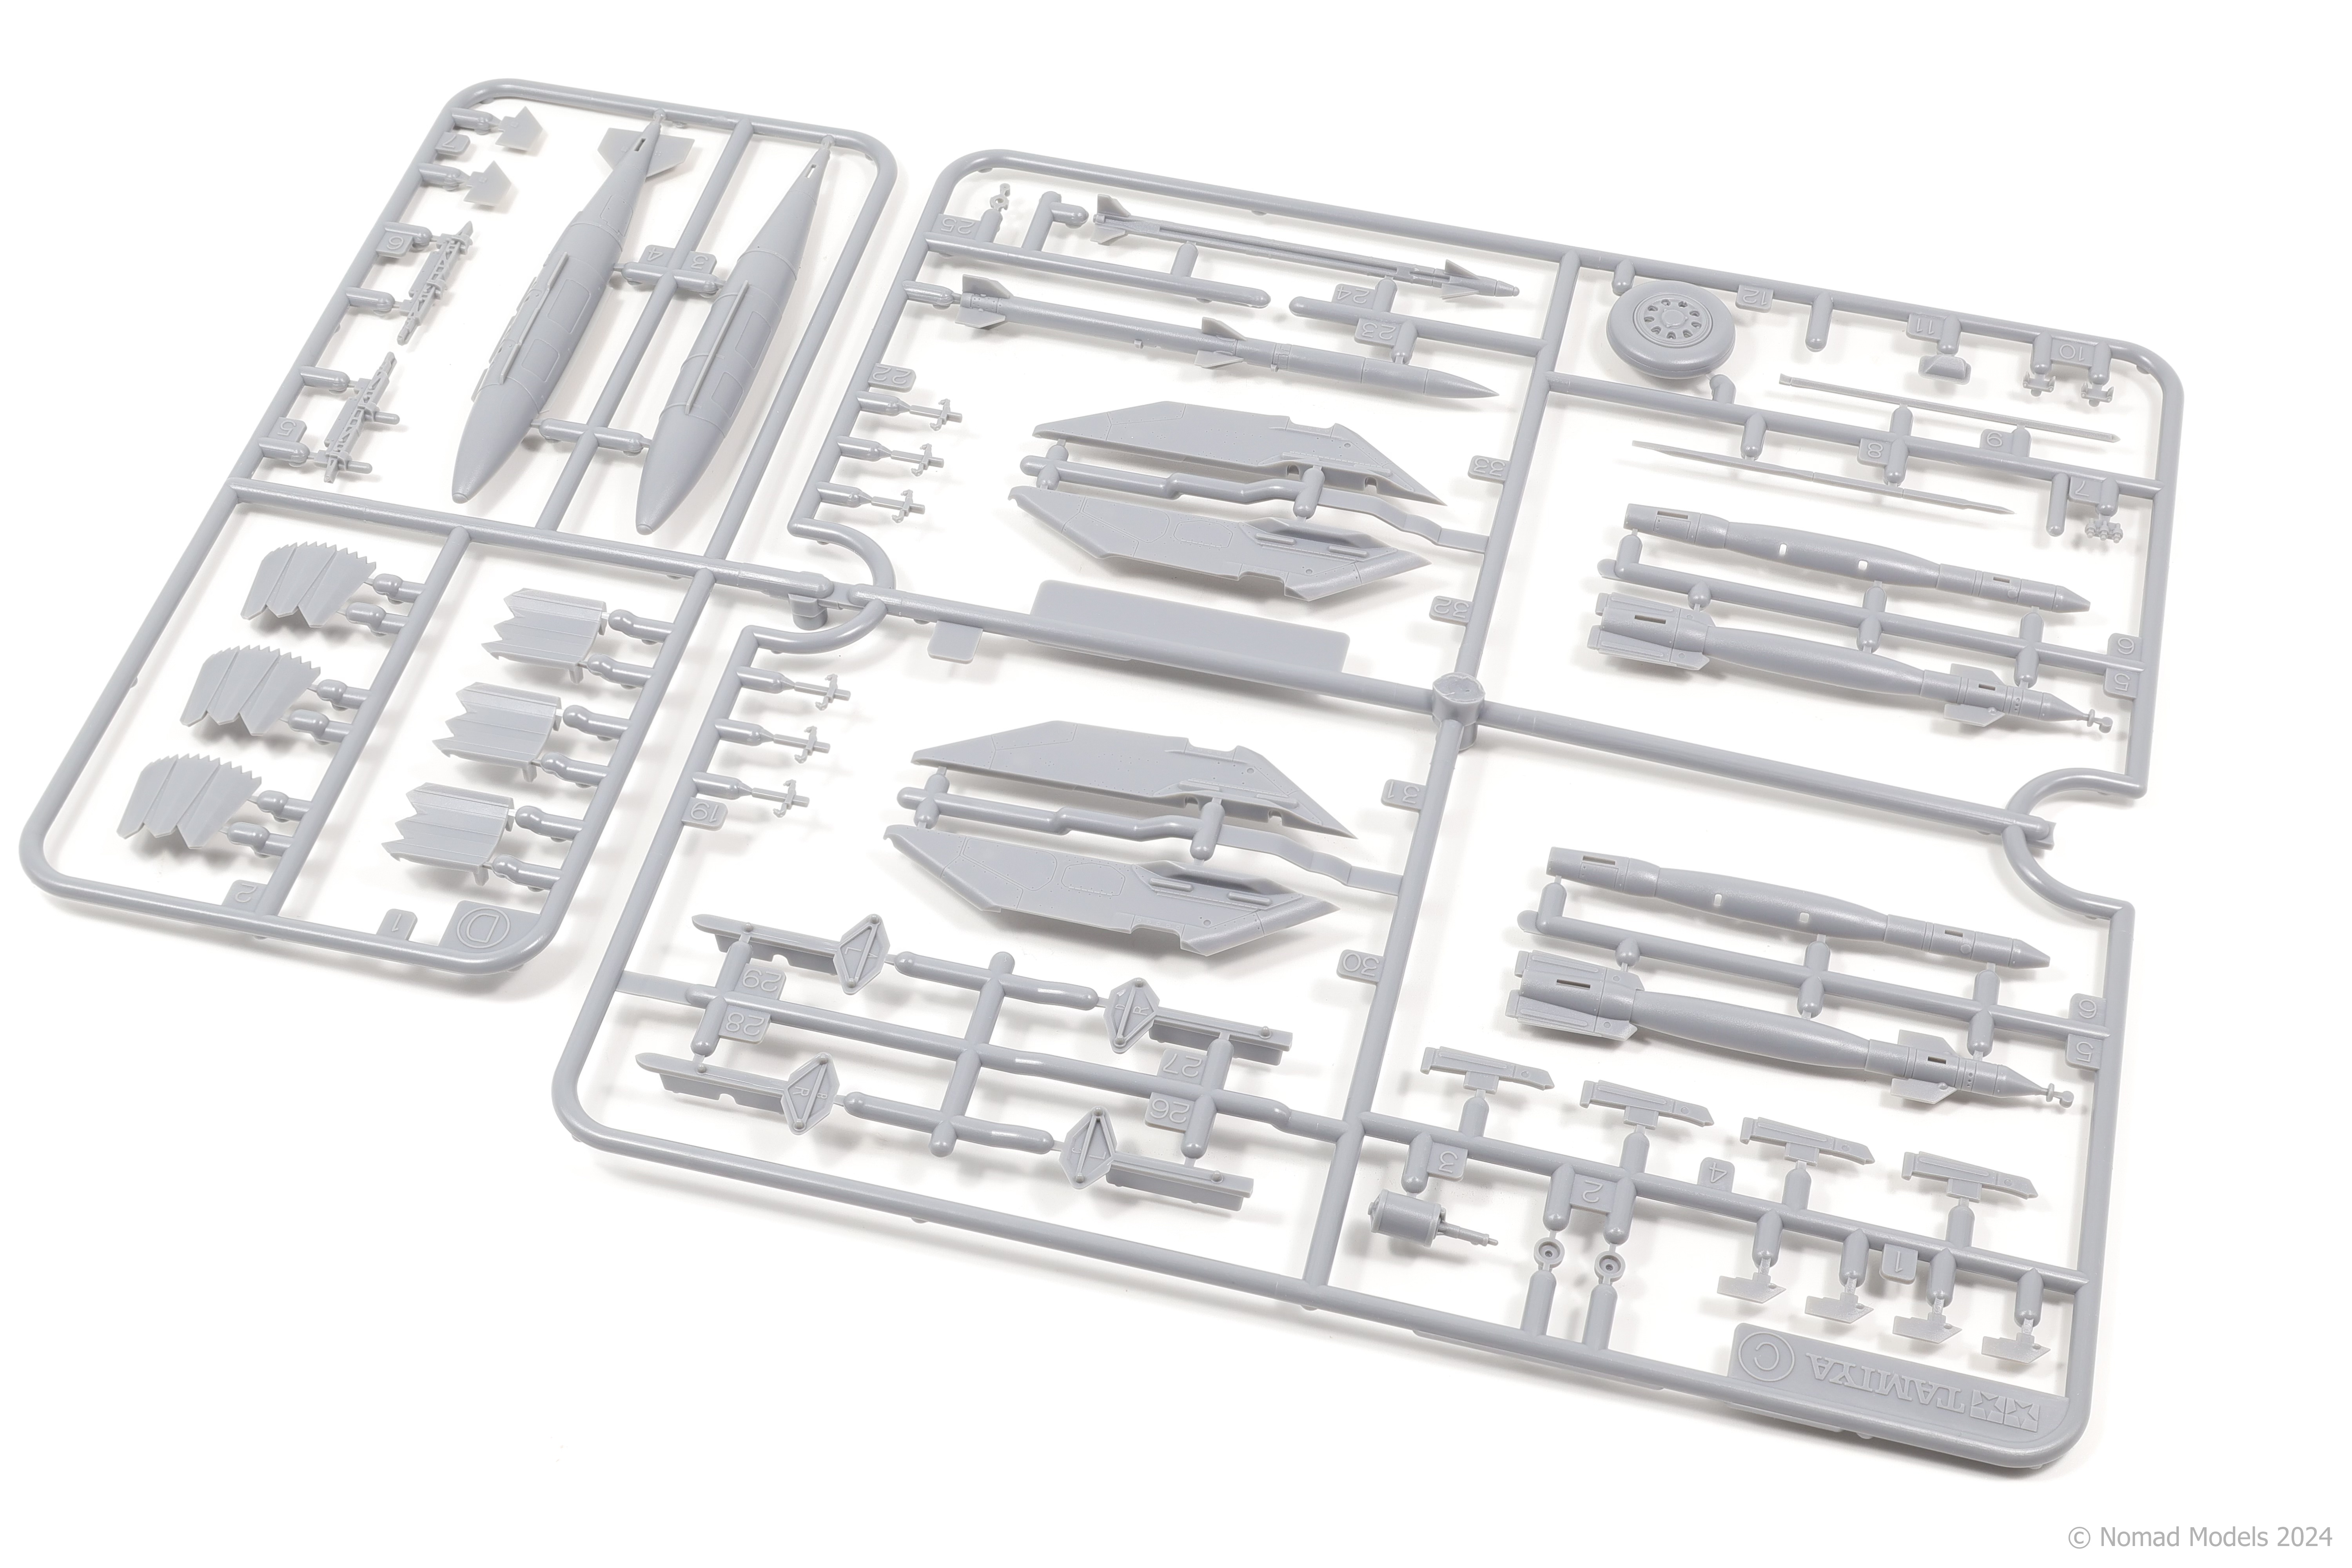
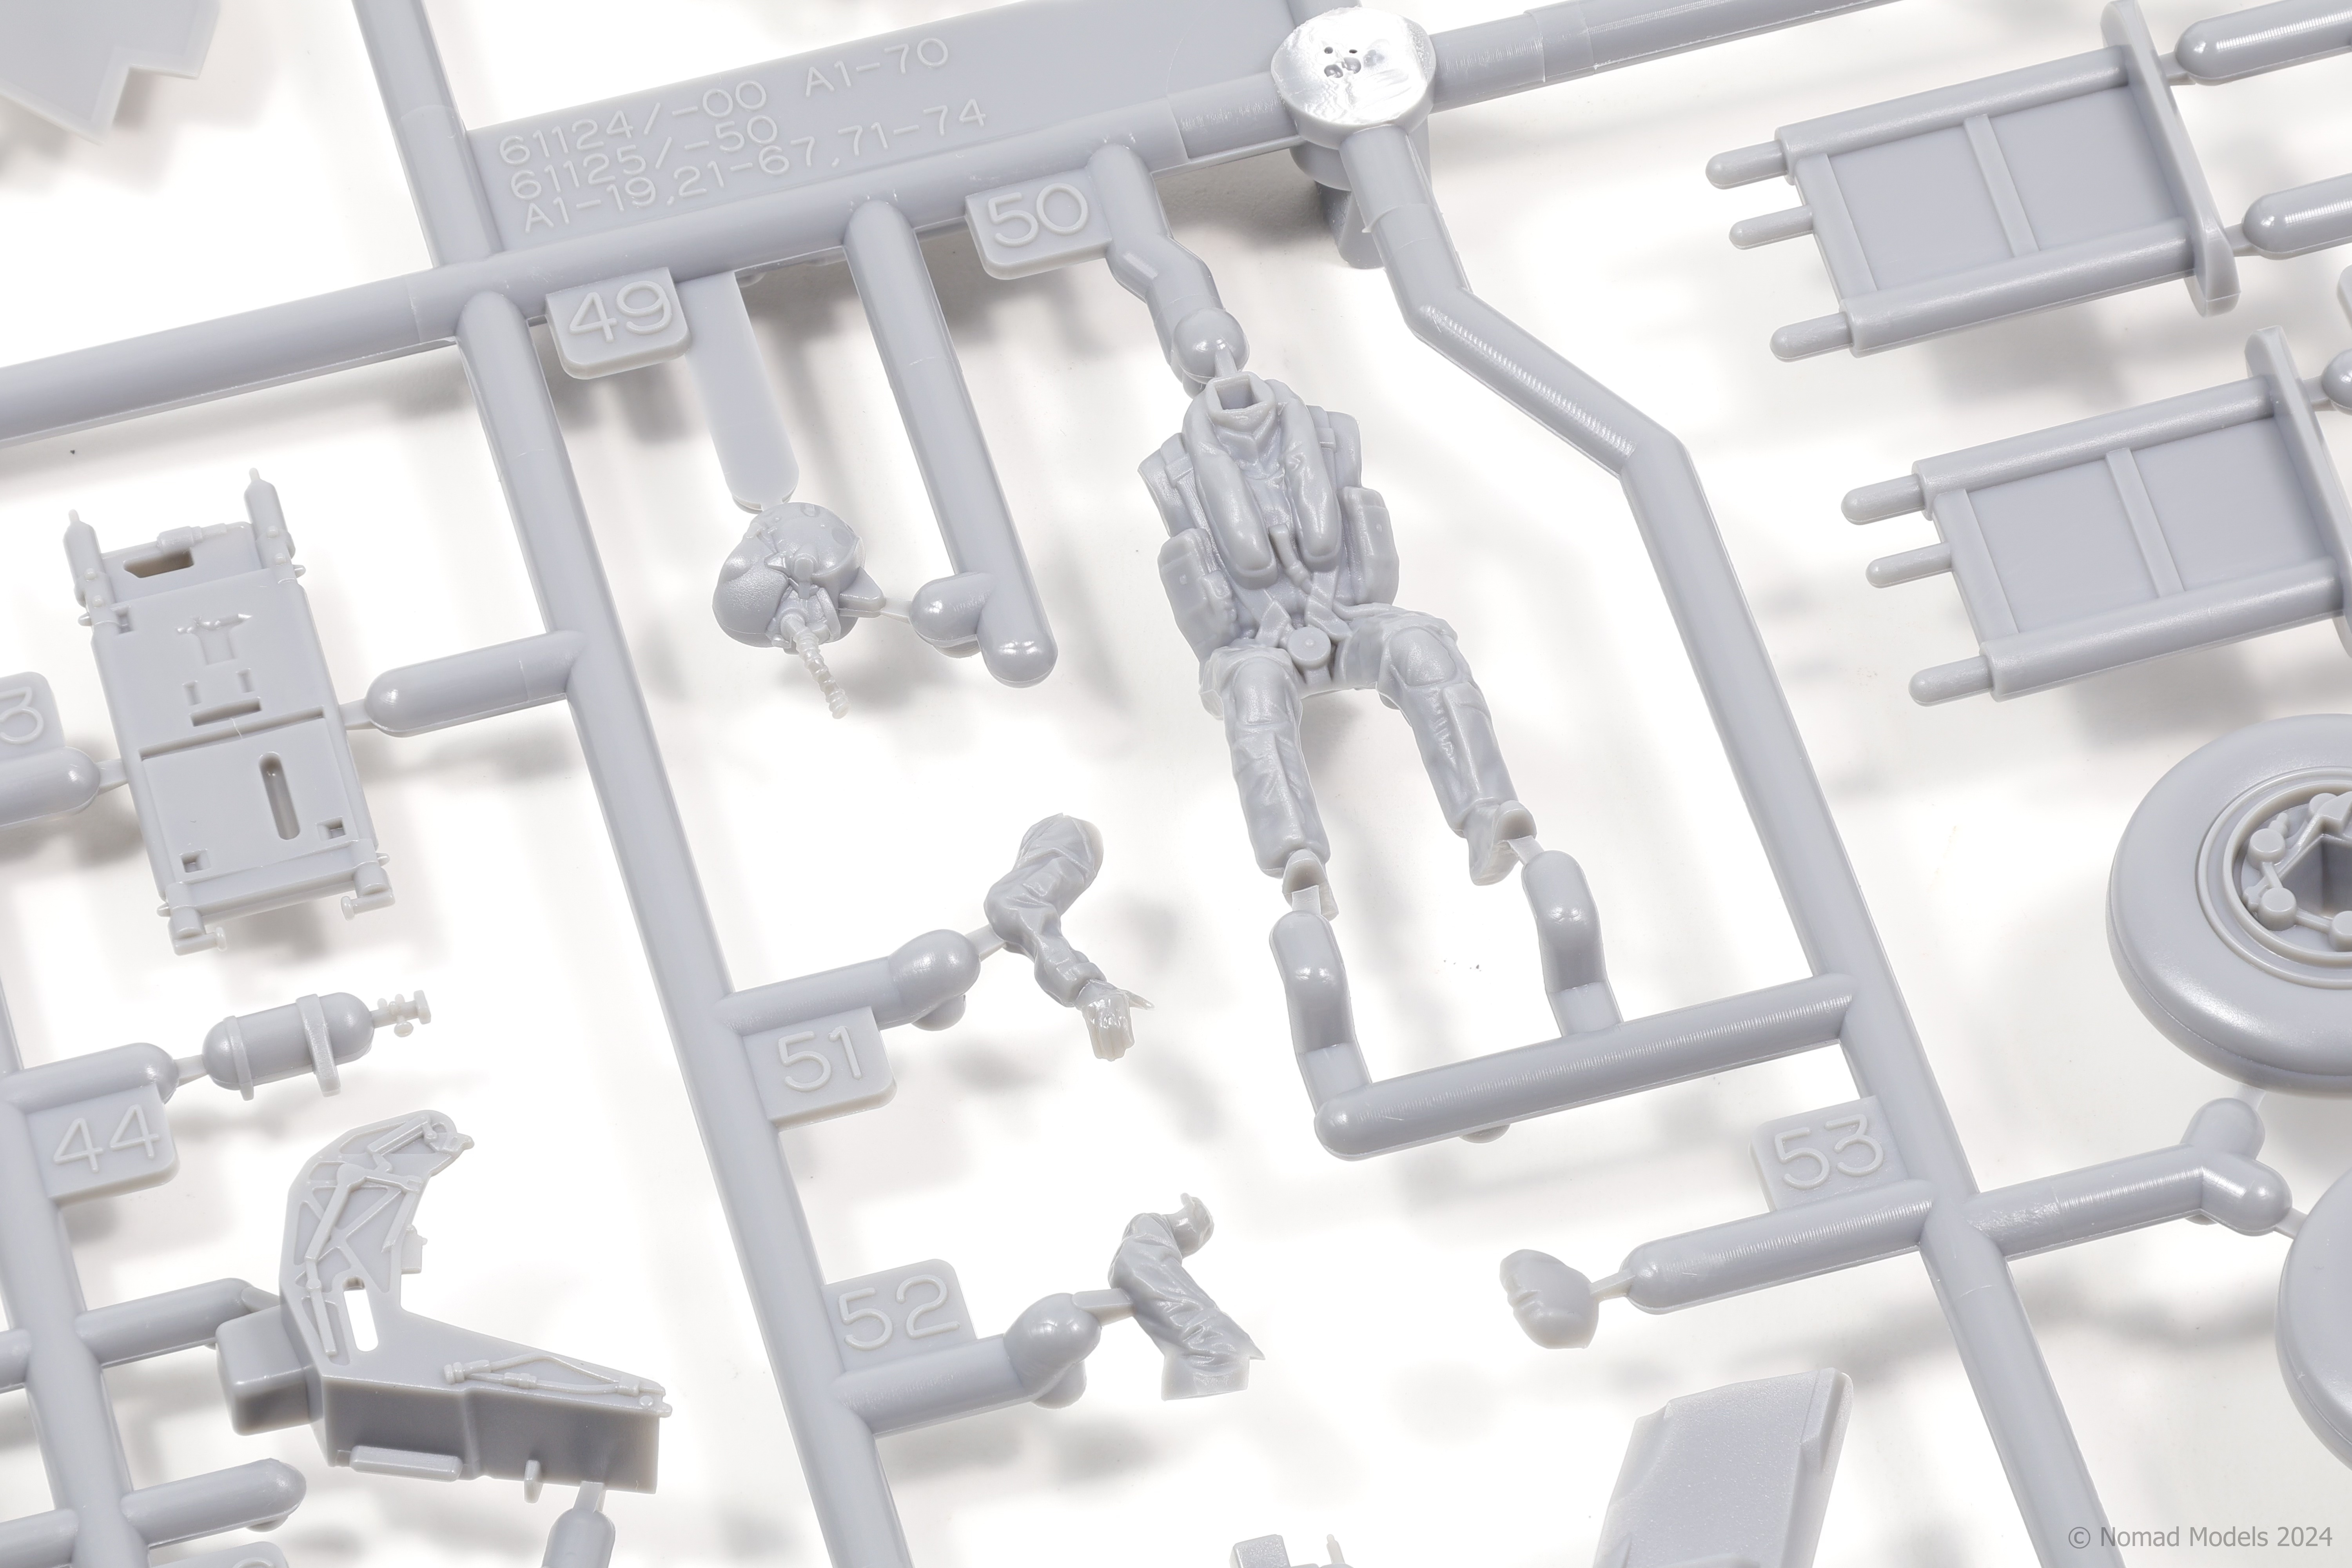
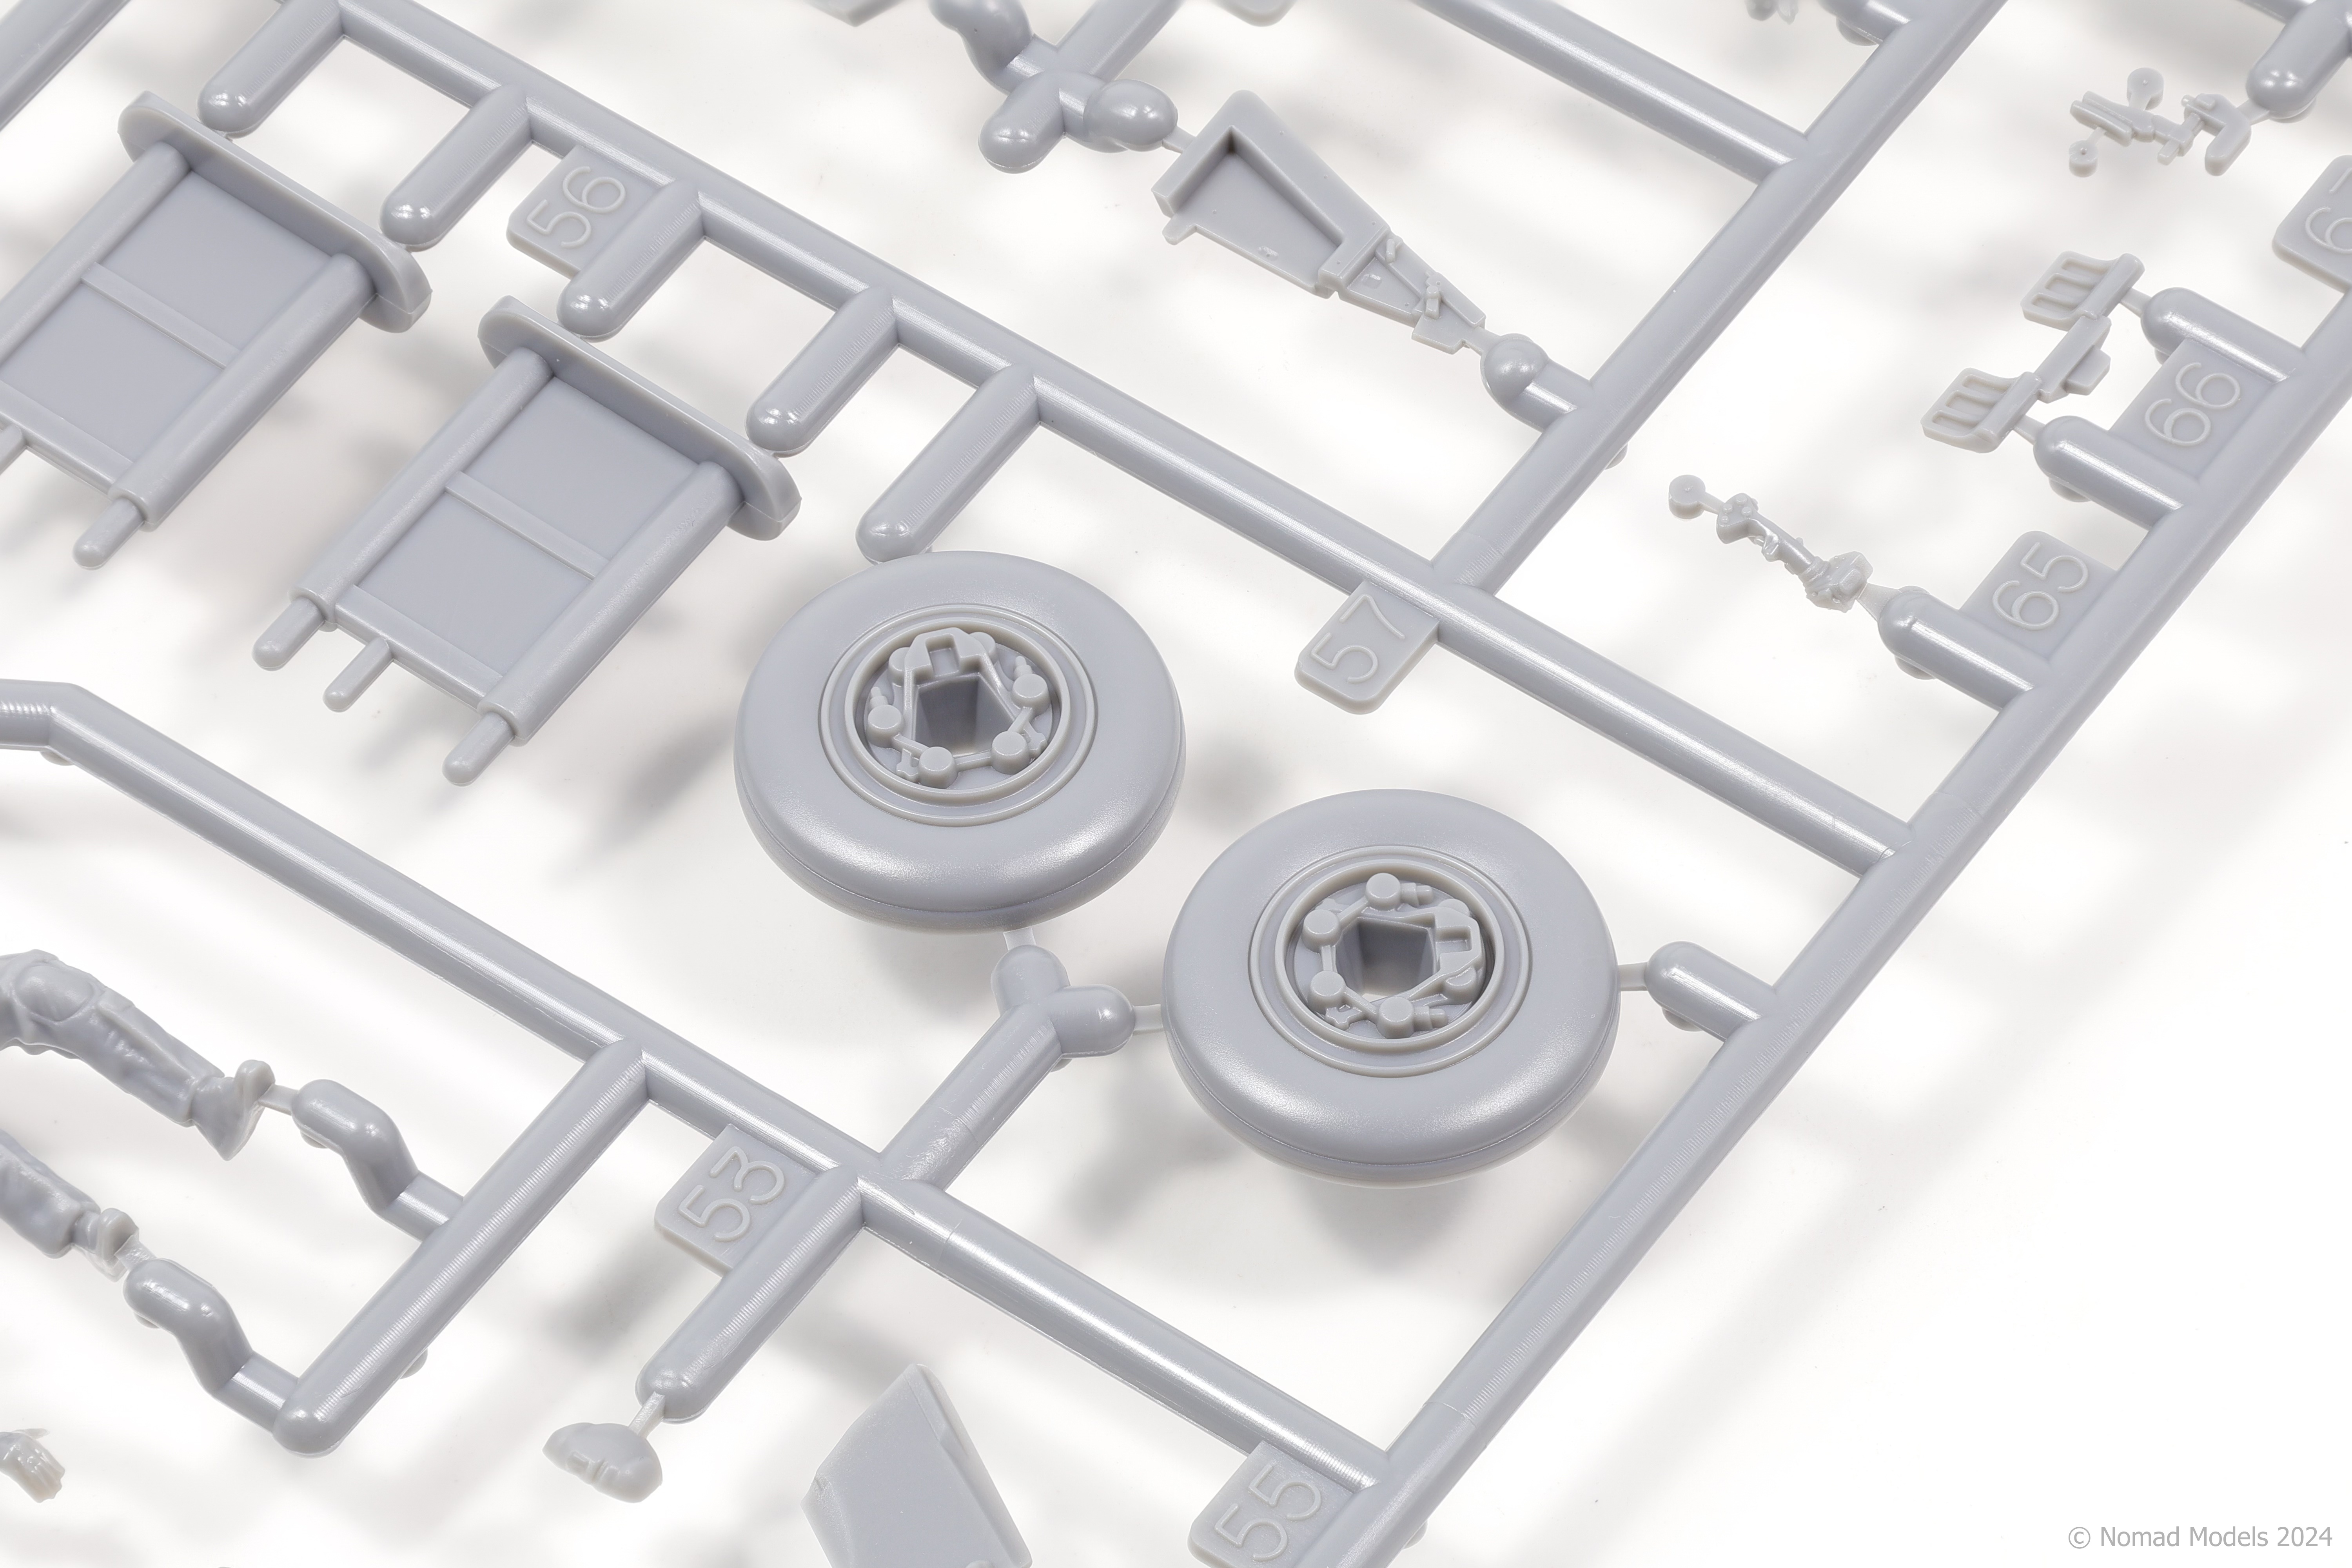
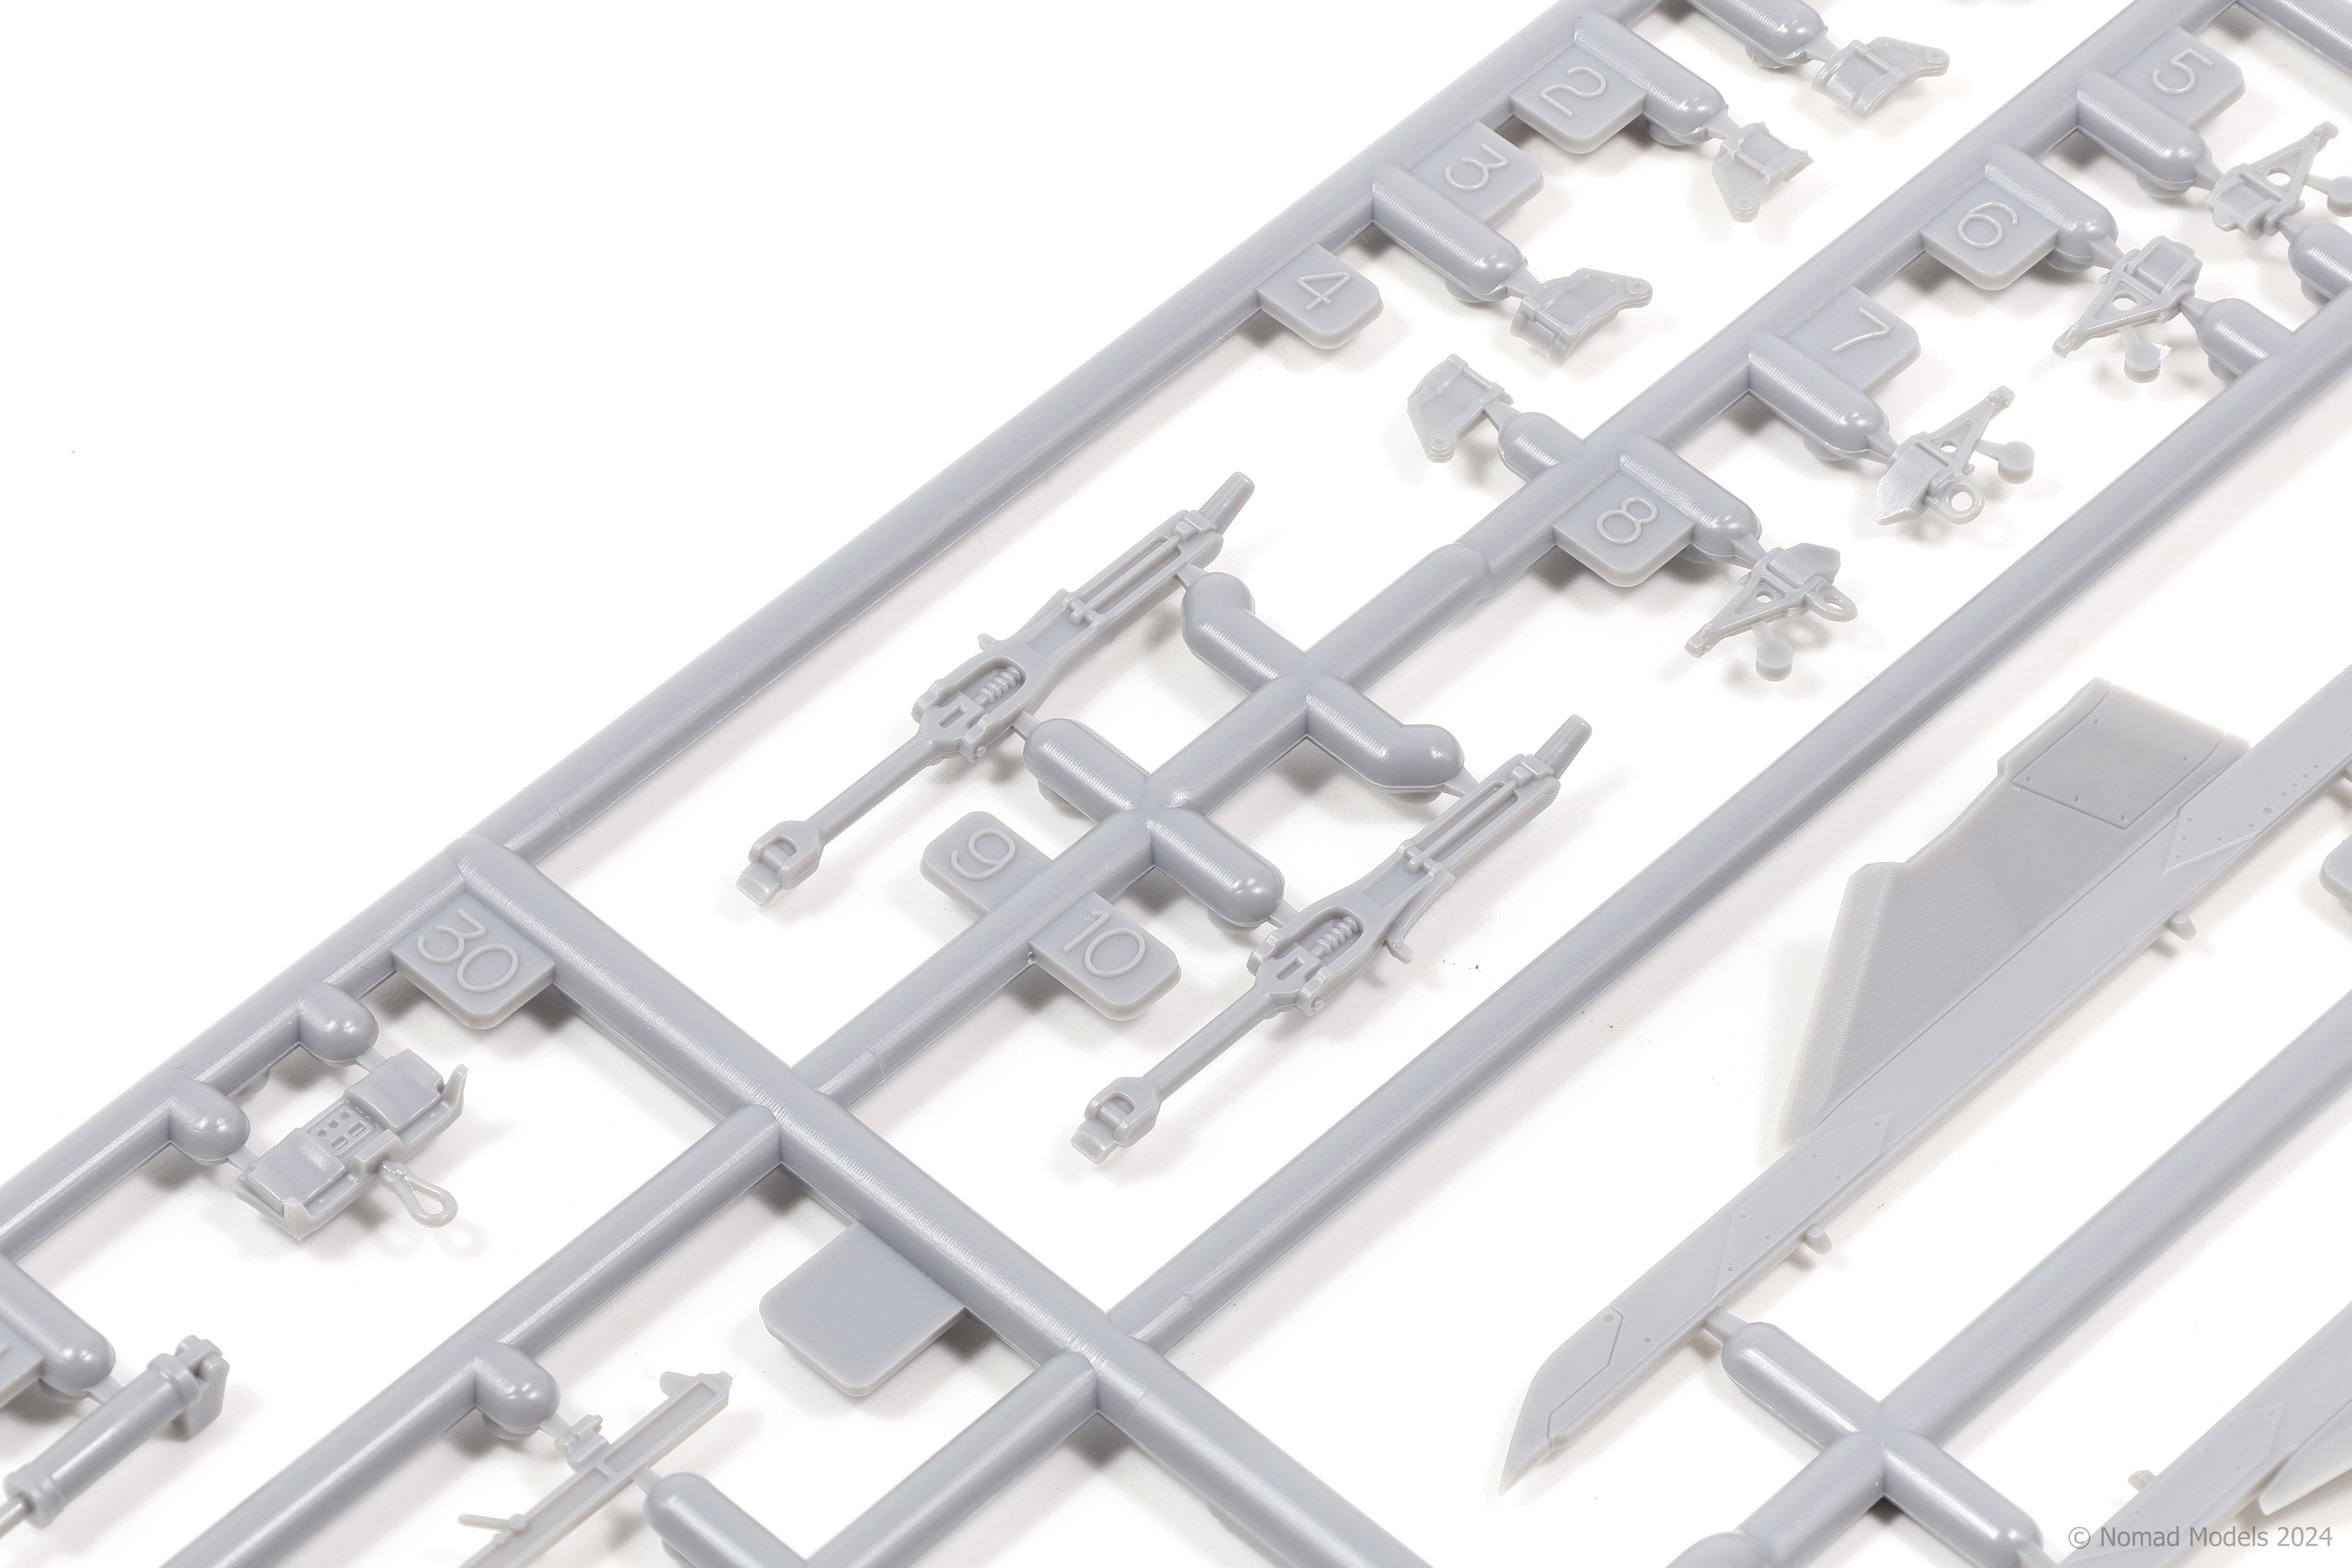
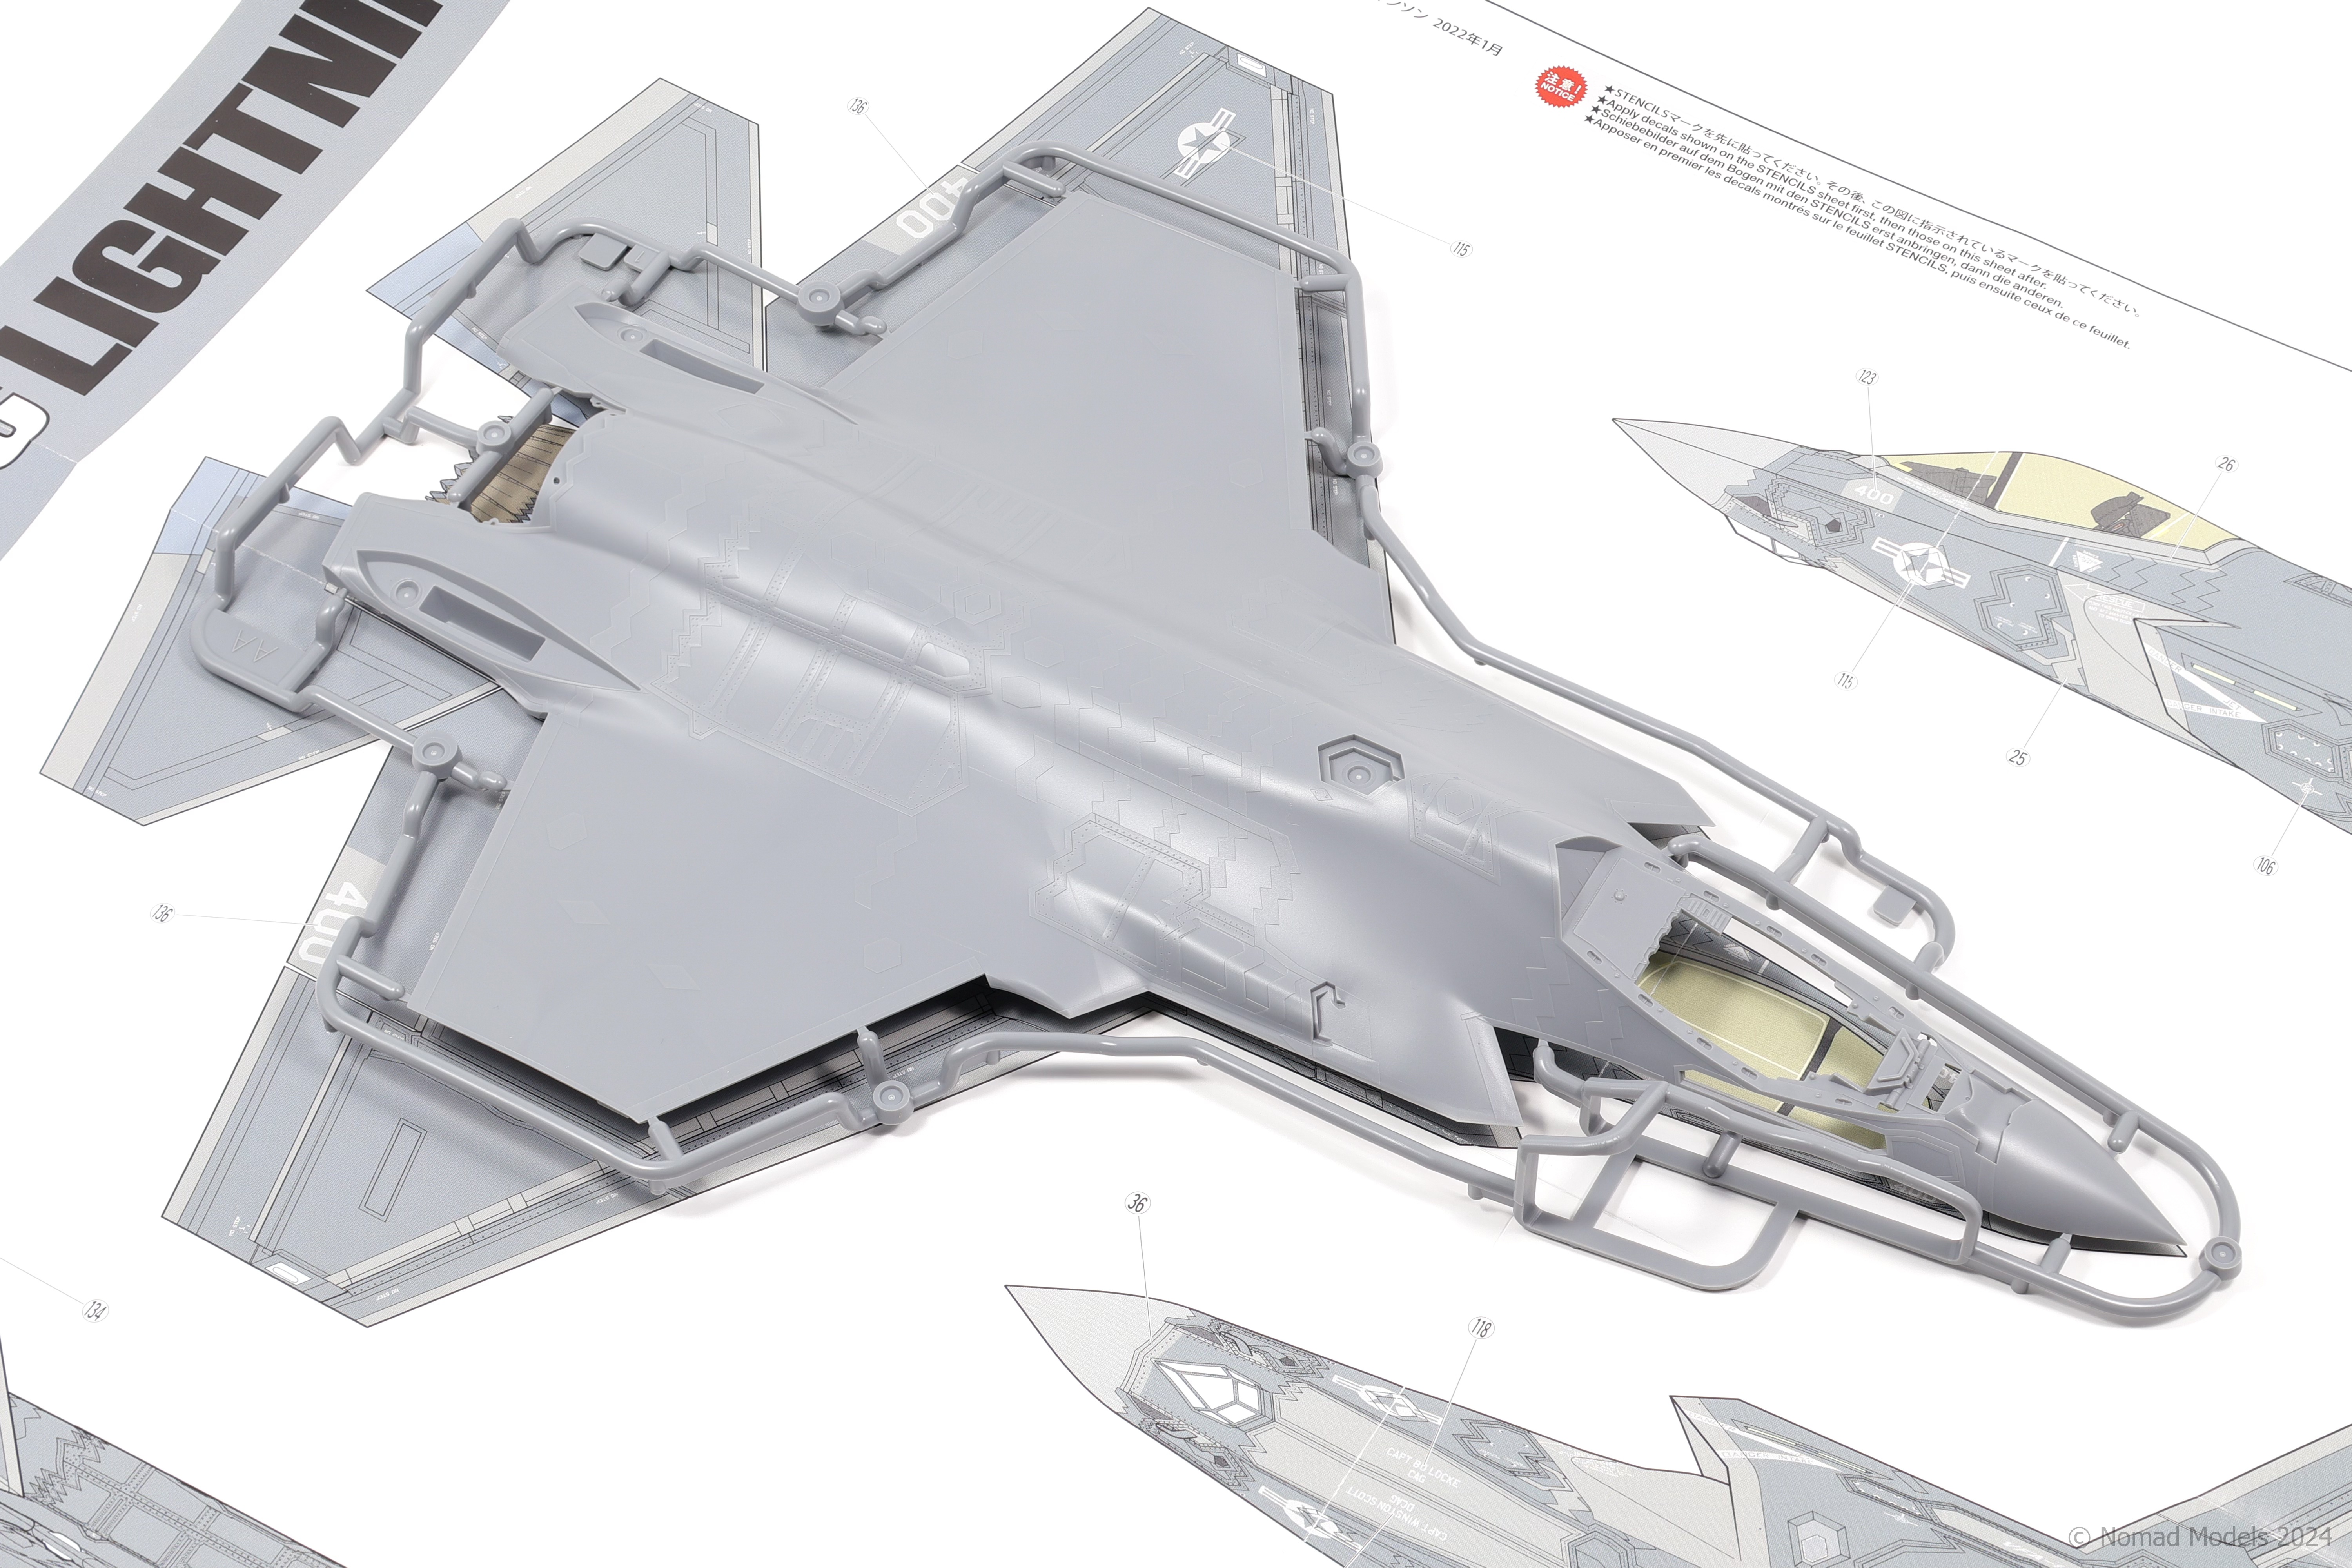
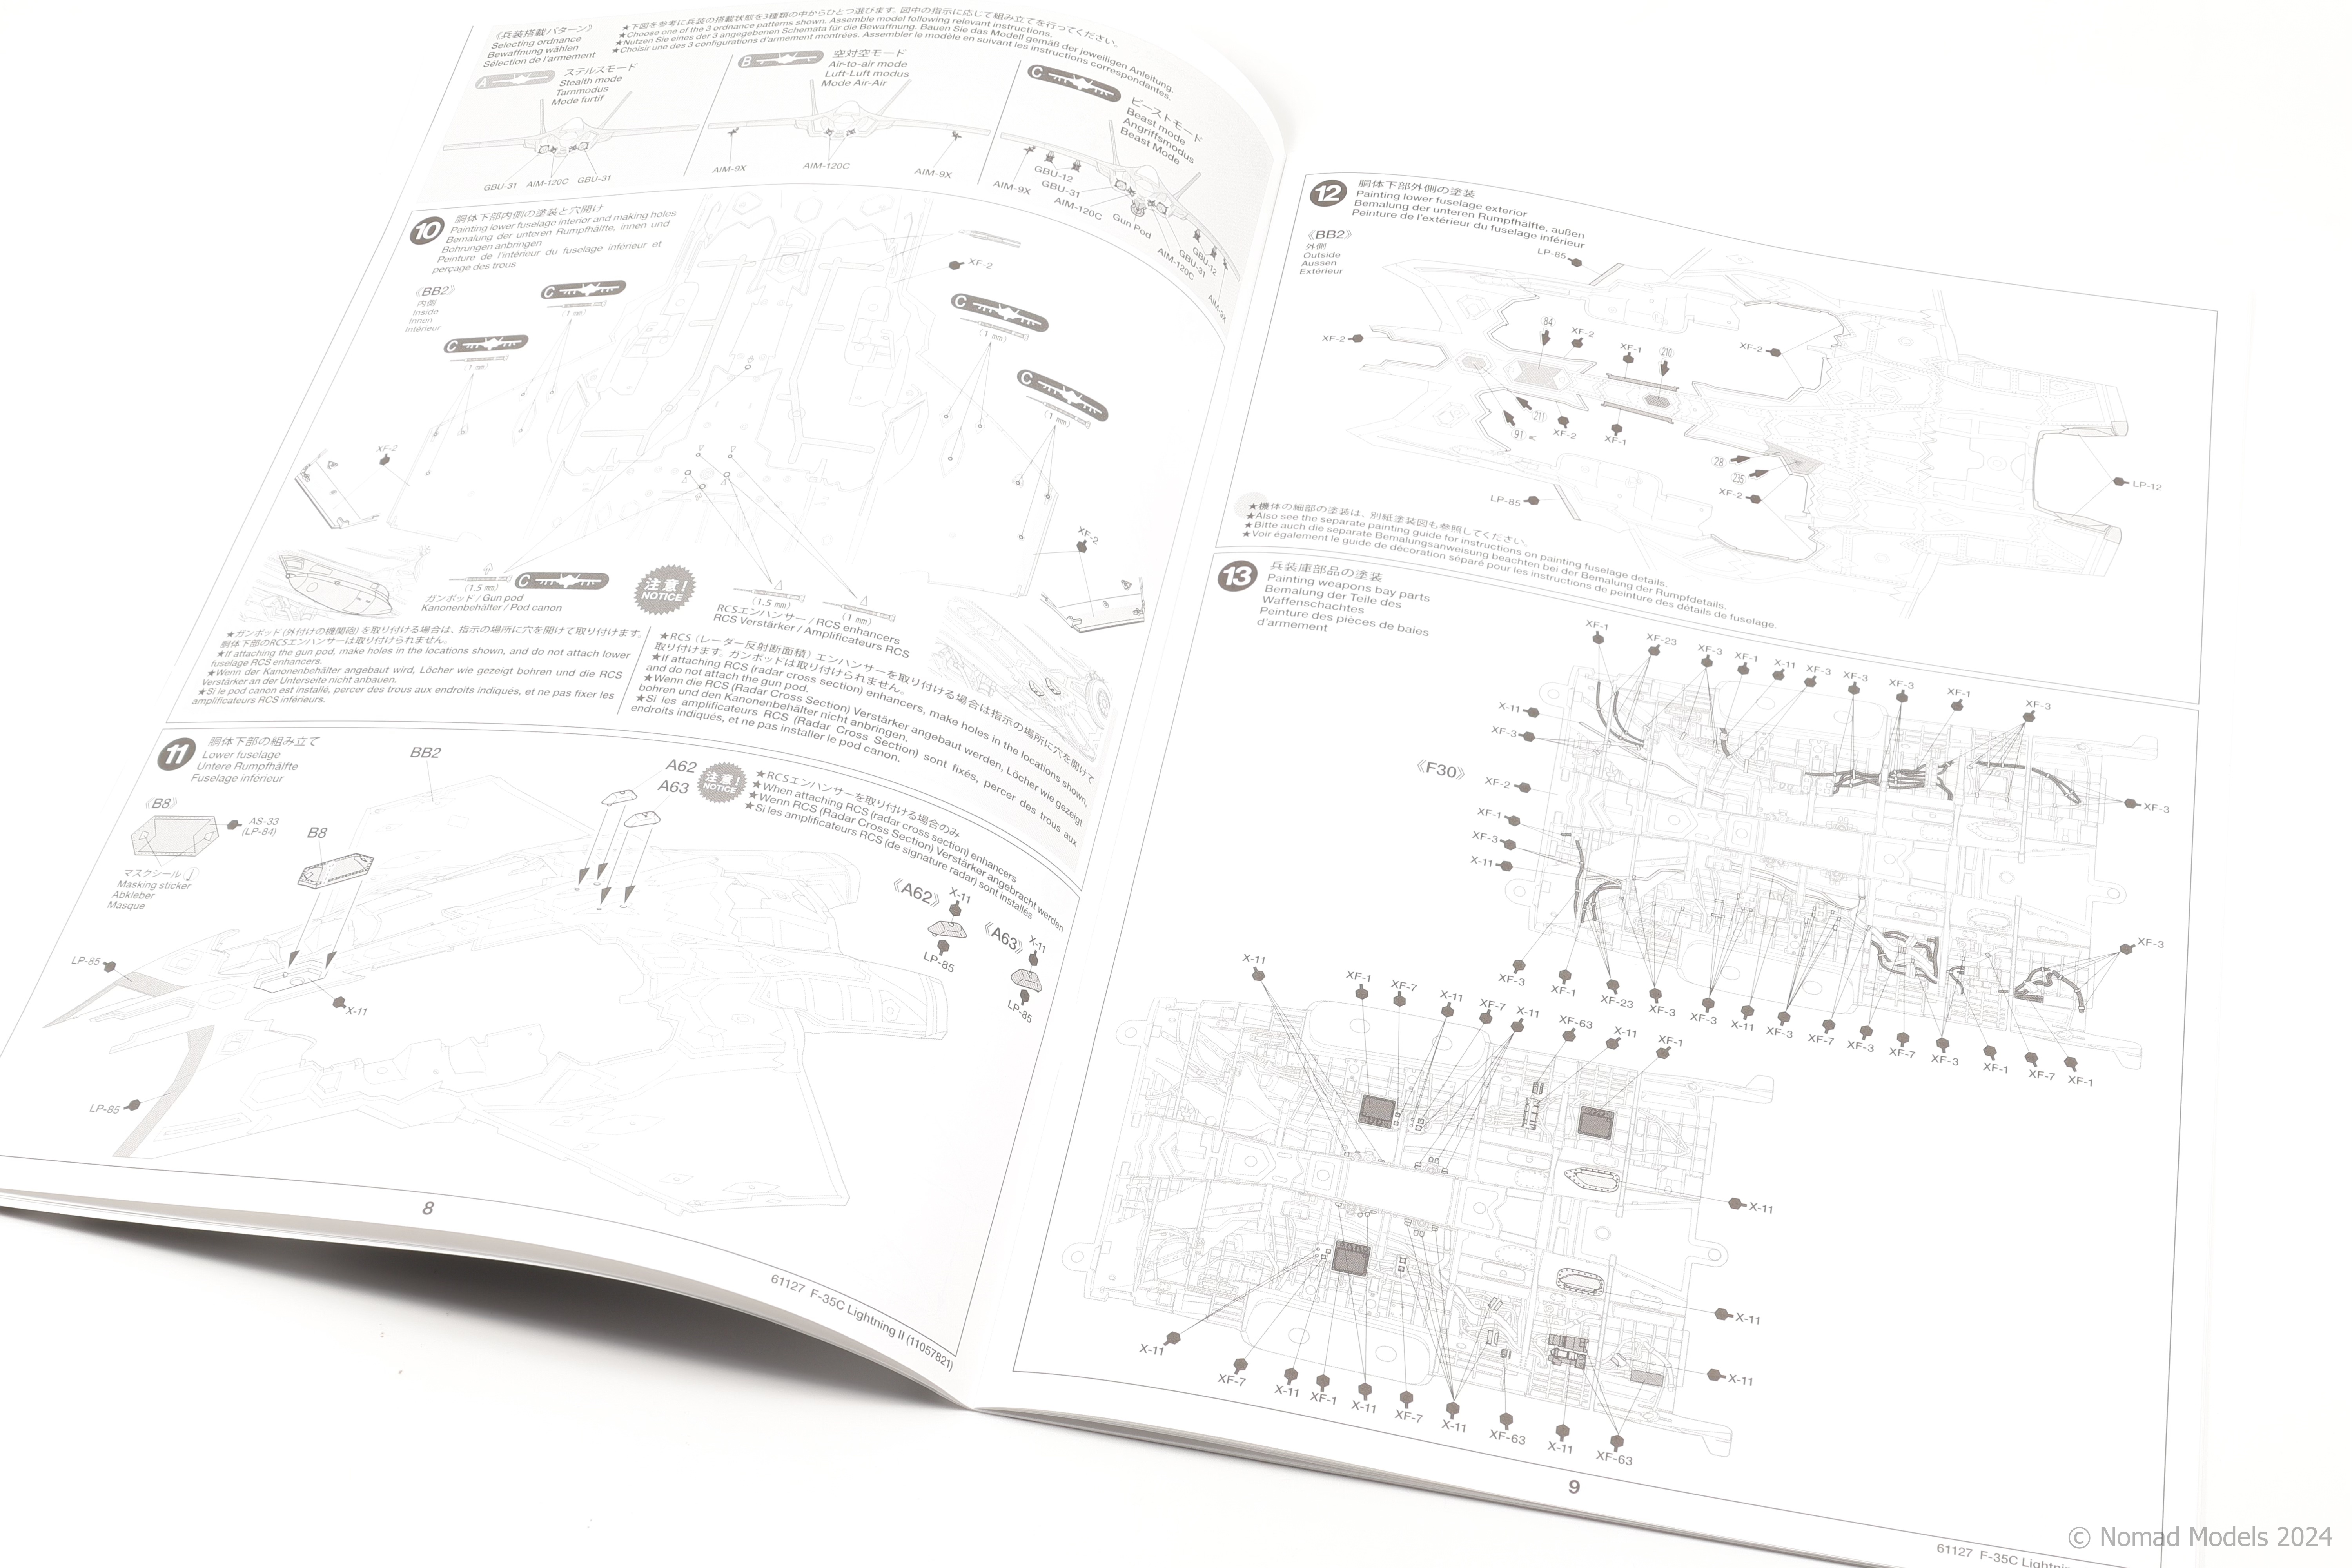
Tamiya’s F-35 offers some really nice features, some of which are unique to the subject matter here, a stealth aircraft. Modellers are offered a wide range of options to choose from in depicting thier own F-35. The canopy, wingtips, ladder, weapon bays, gun pod, arrestor hook, and fuel probe are all optional accessories to the modeller. I was also surprised to see RCS enhancers included in the kit, these are little nodules added to the exterior of the F-35 to increase its radar cross section to civilian radars. These are examples of small additions that really show how much effort went into designing this kit. The kit includes a nicely molded pilot figure along with helmet specific decals. Also included is a healthy amount of ordinance so that the model can be built in “beast mode”. Other manufacturers might skimp on the included weapons (considering that this IS a stealth aircraft) but Tamiya is not guilty of this here. The kit features various paper masks for the canopy and other parts, although you will have to cut them out yourself. Masks for the RAM panels are not included however and decals are provided instead. For modellers wanting to paint their own RAM panels the lack of masks will be felt as it’ll take some time to mask off the fine details.
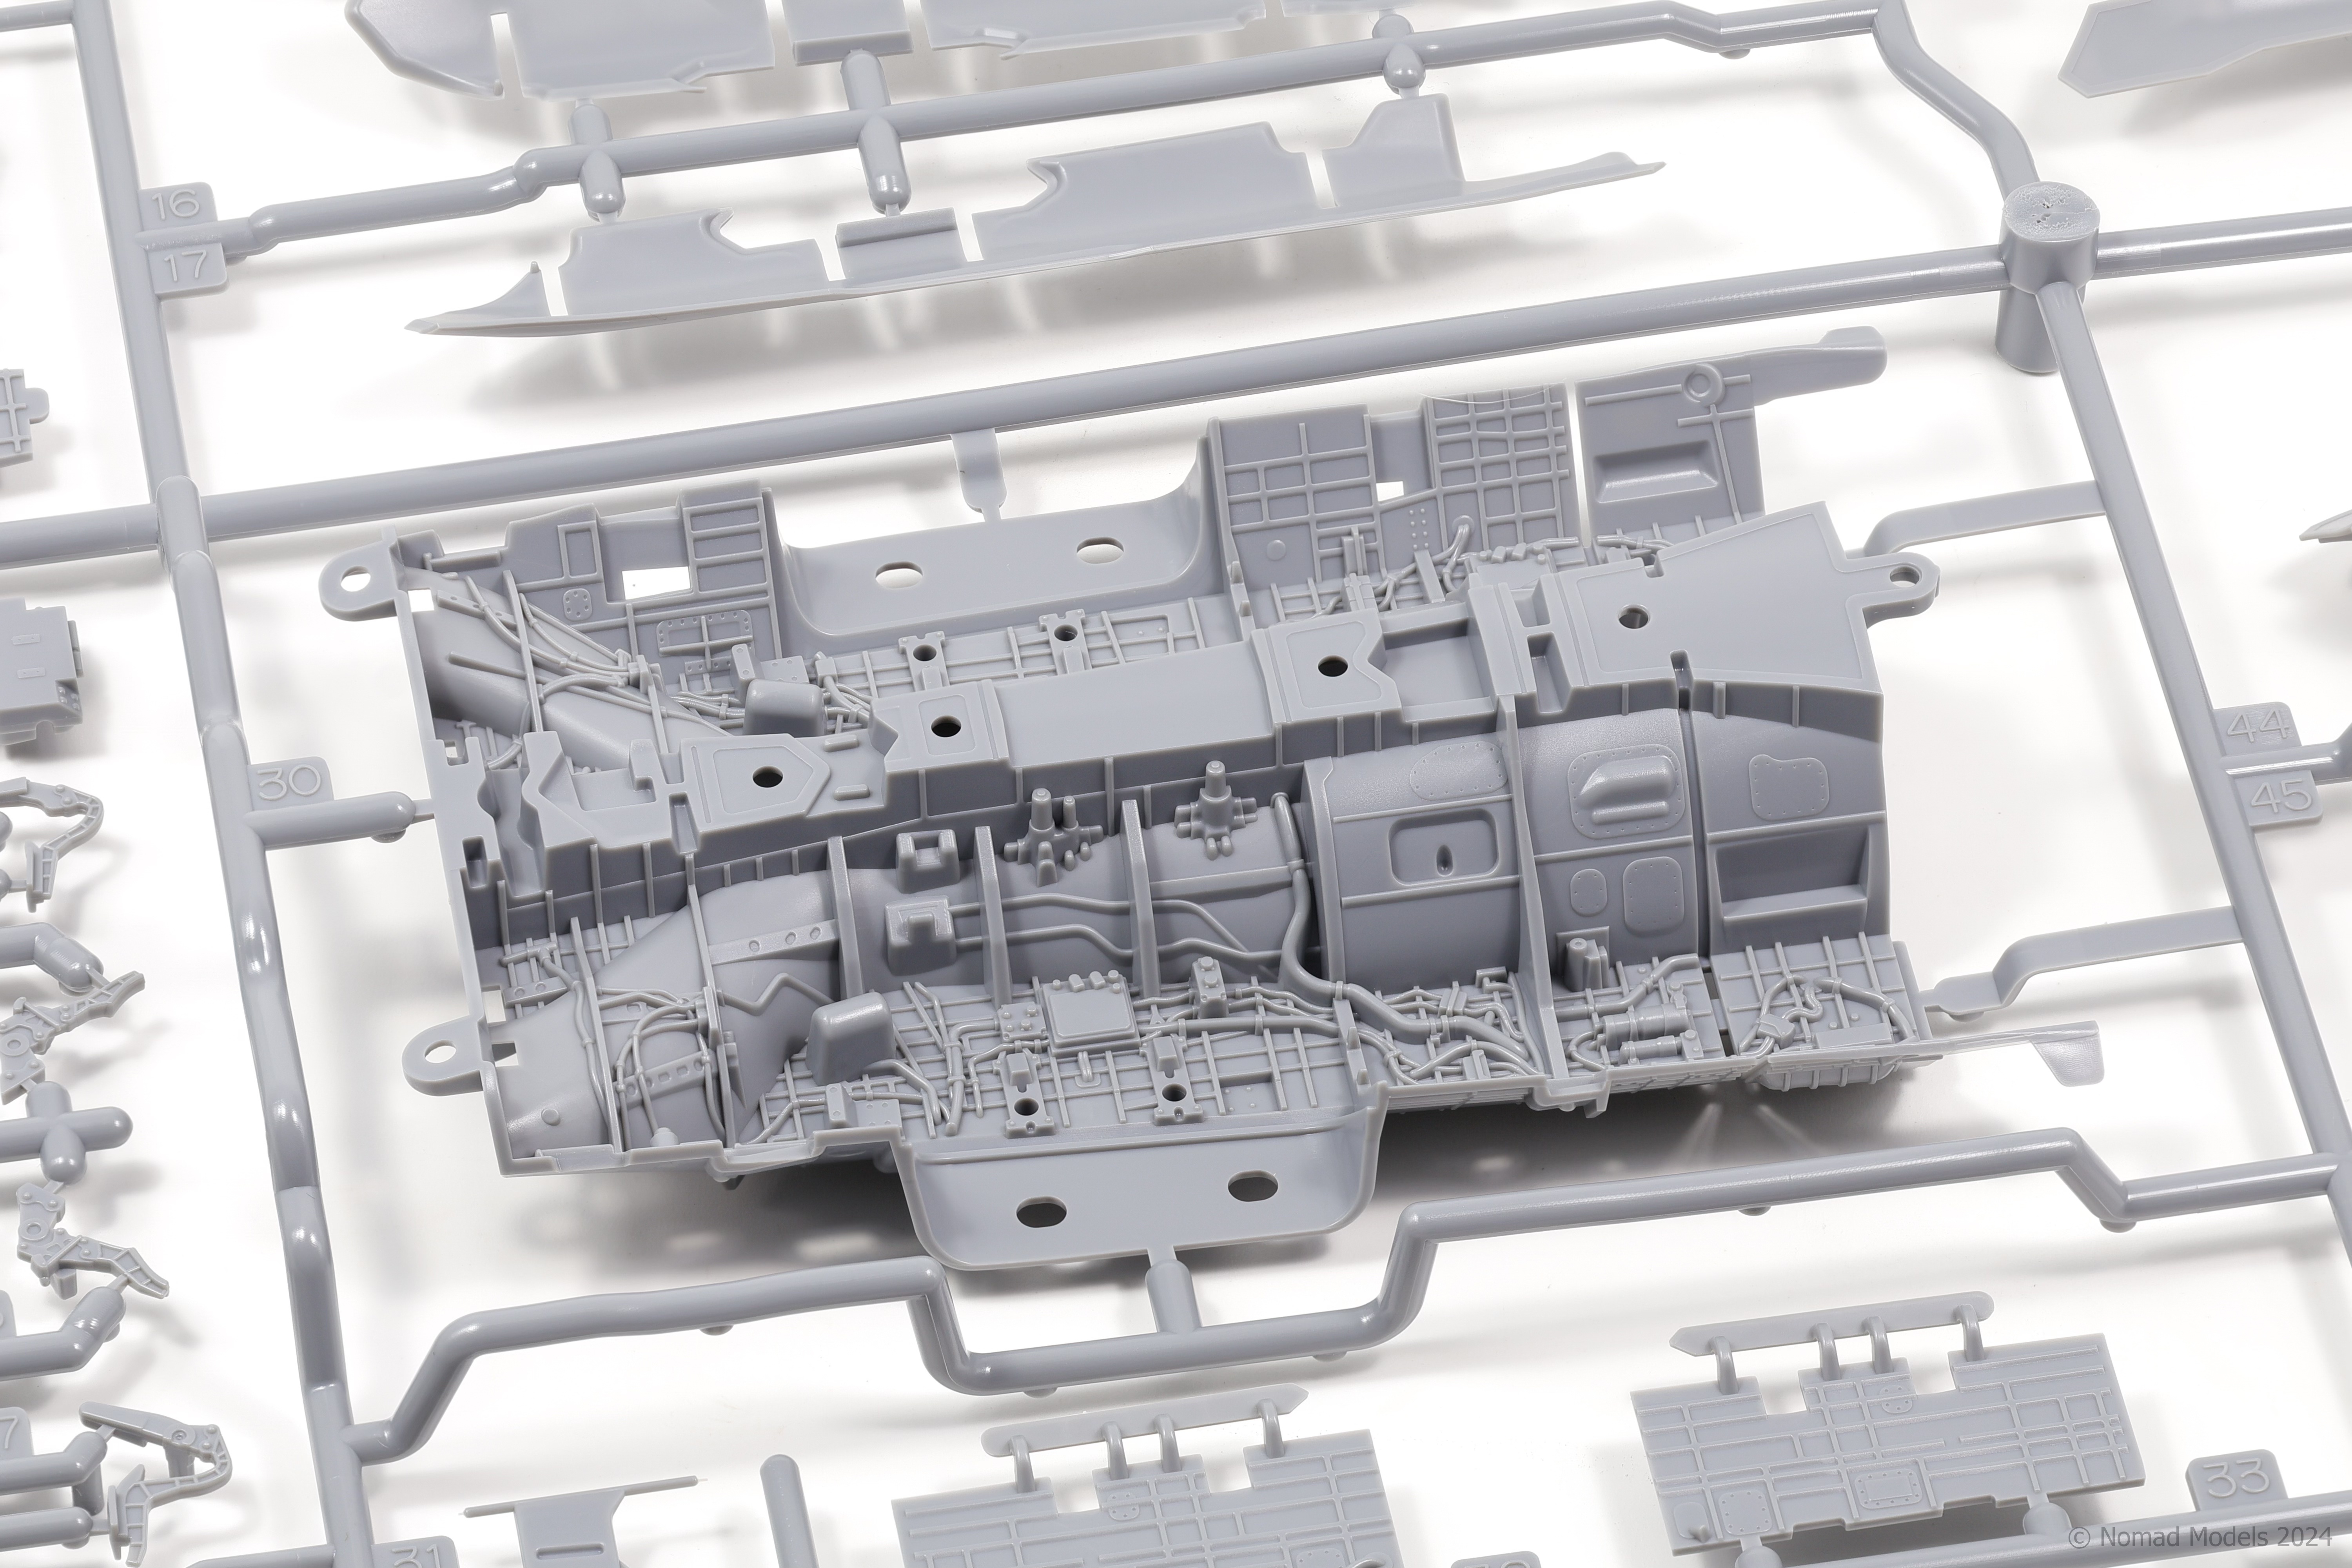
Quality of Molding: 50/50
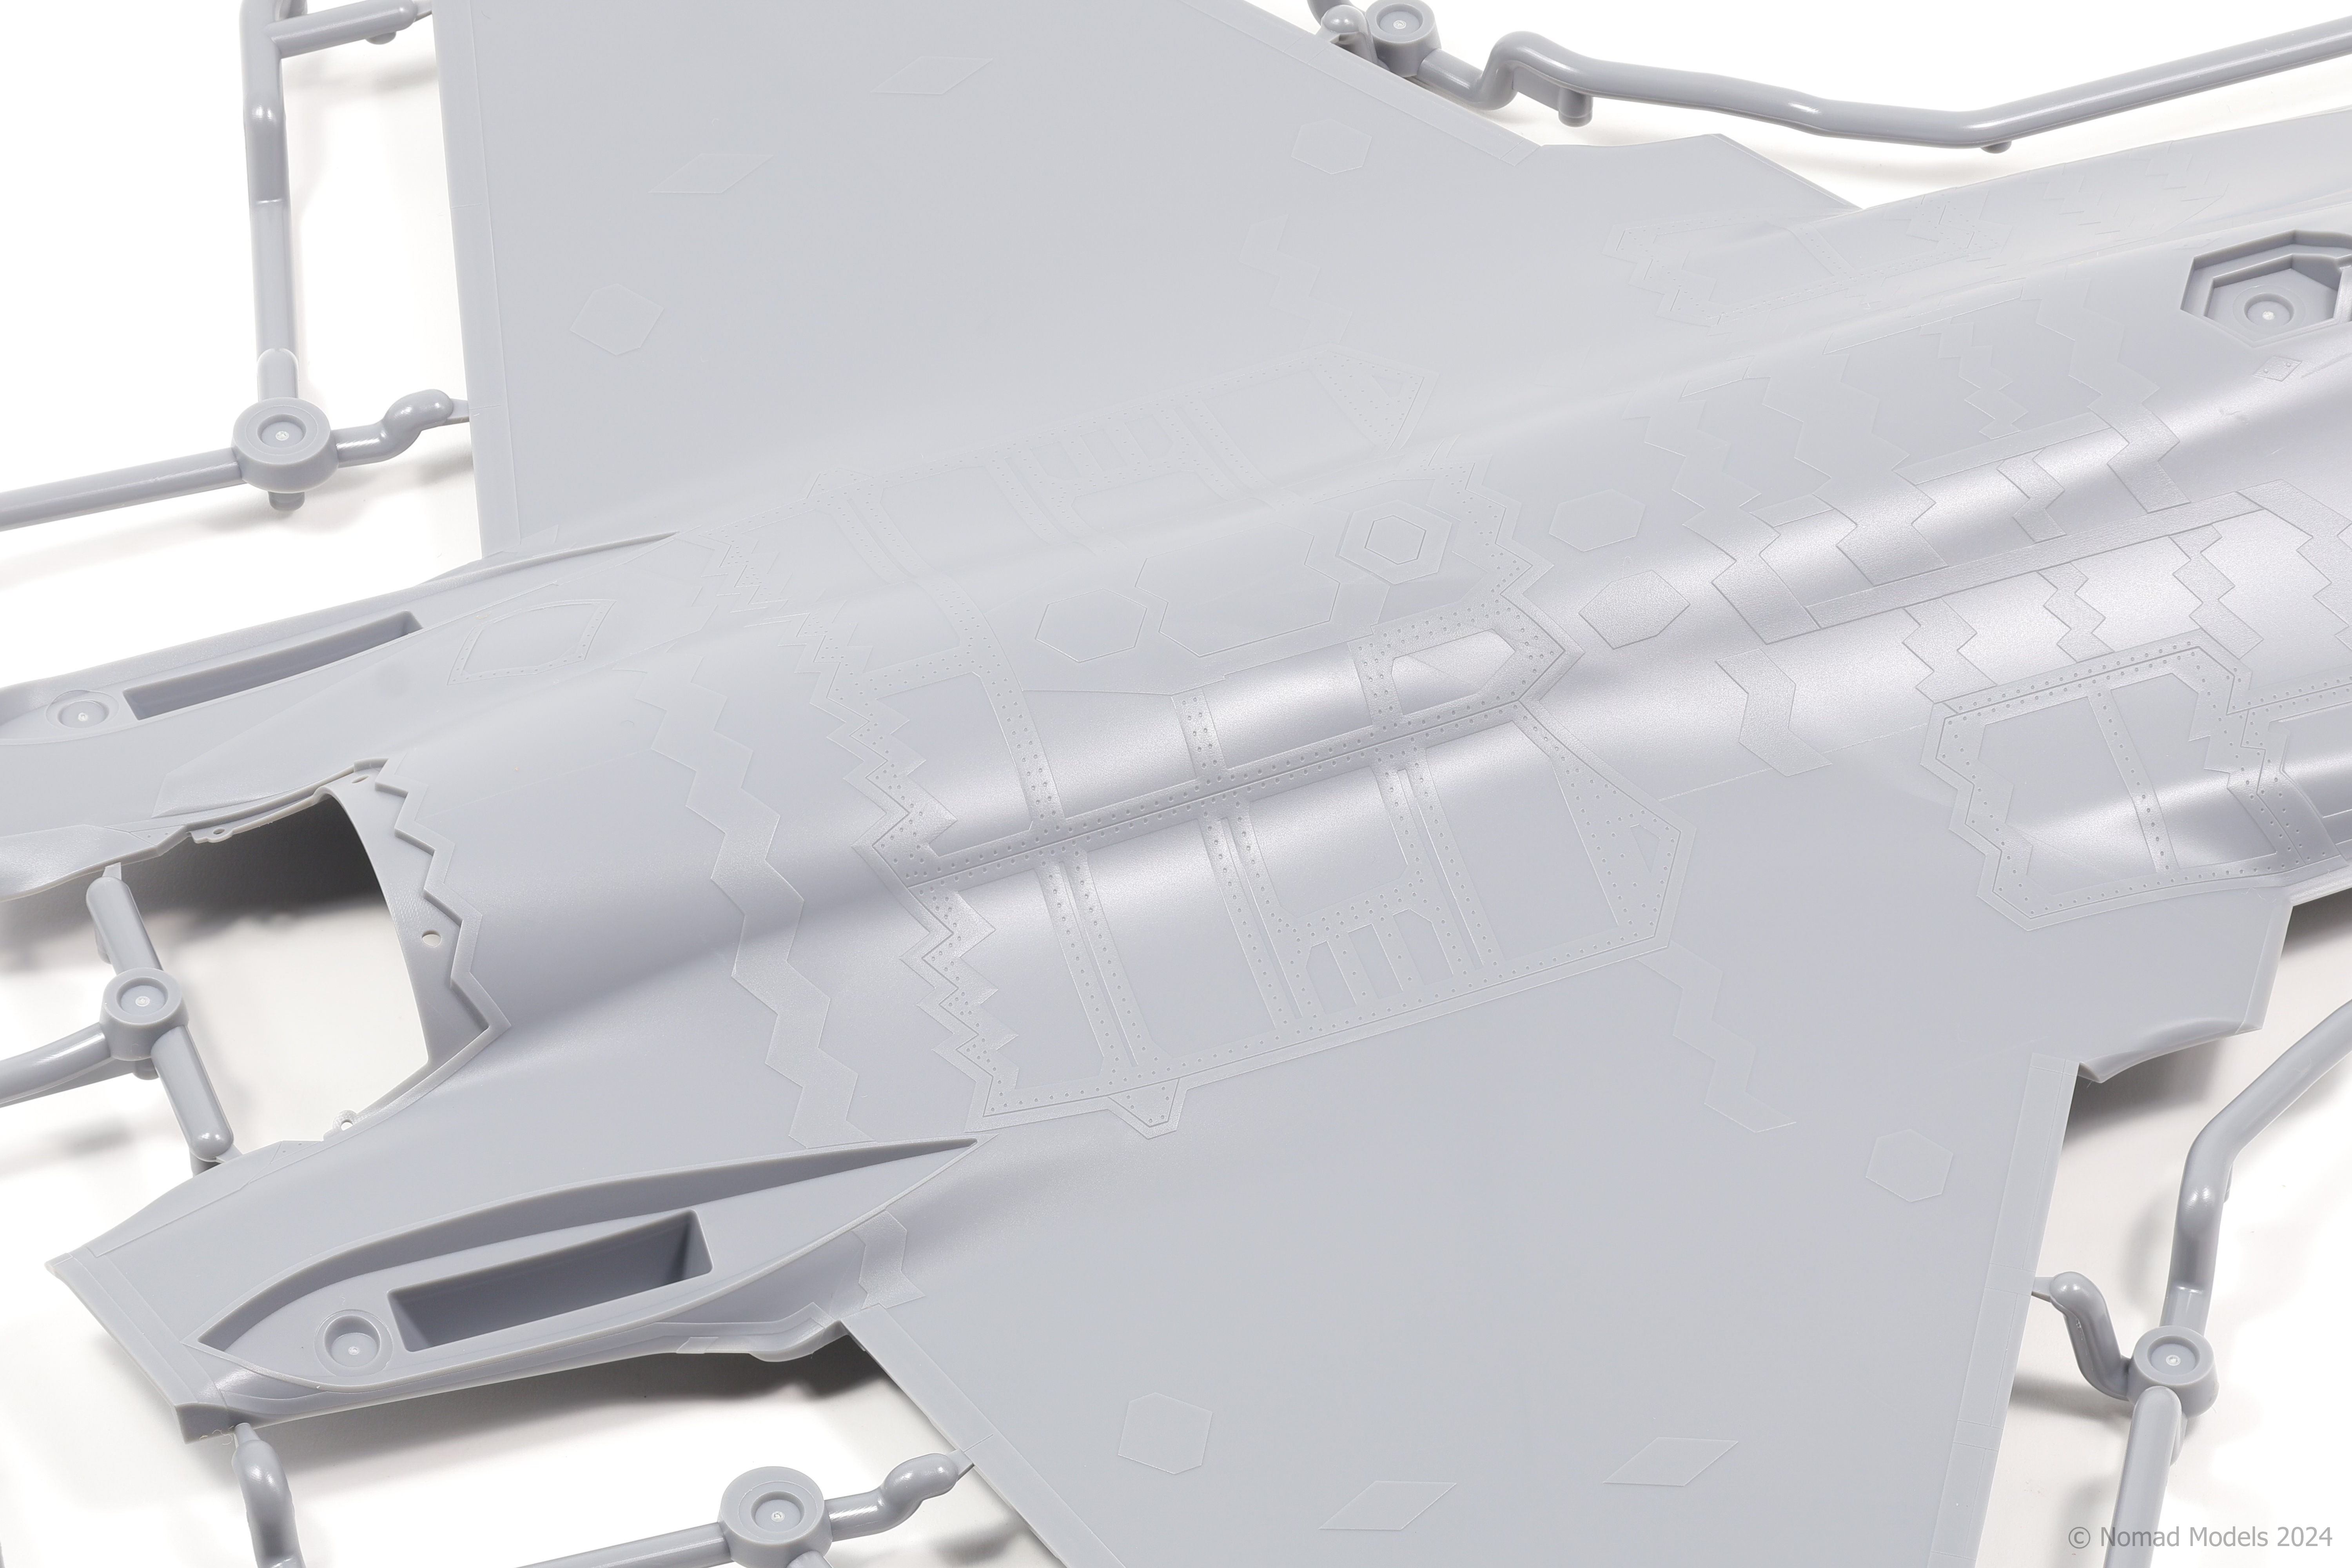
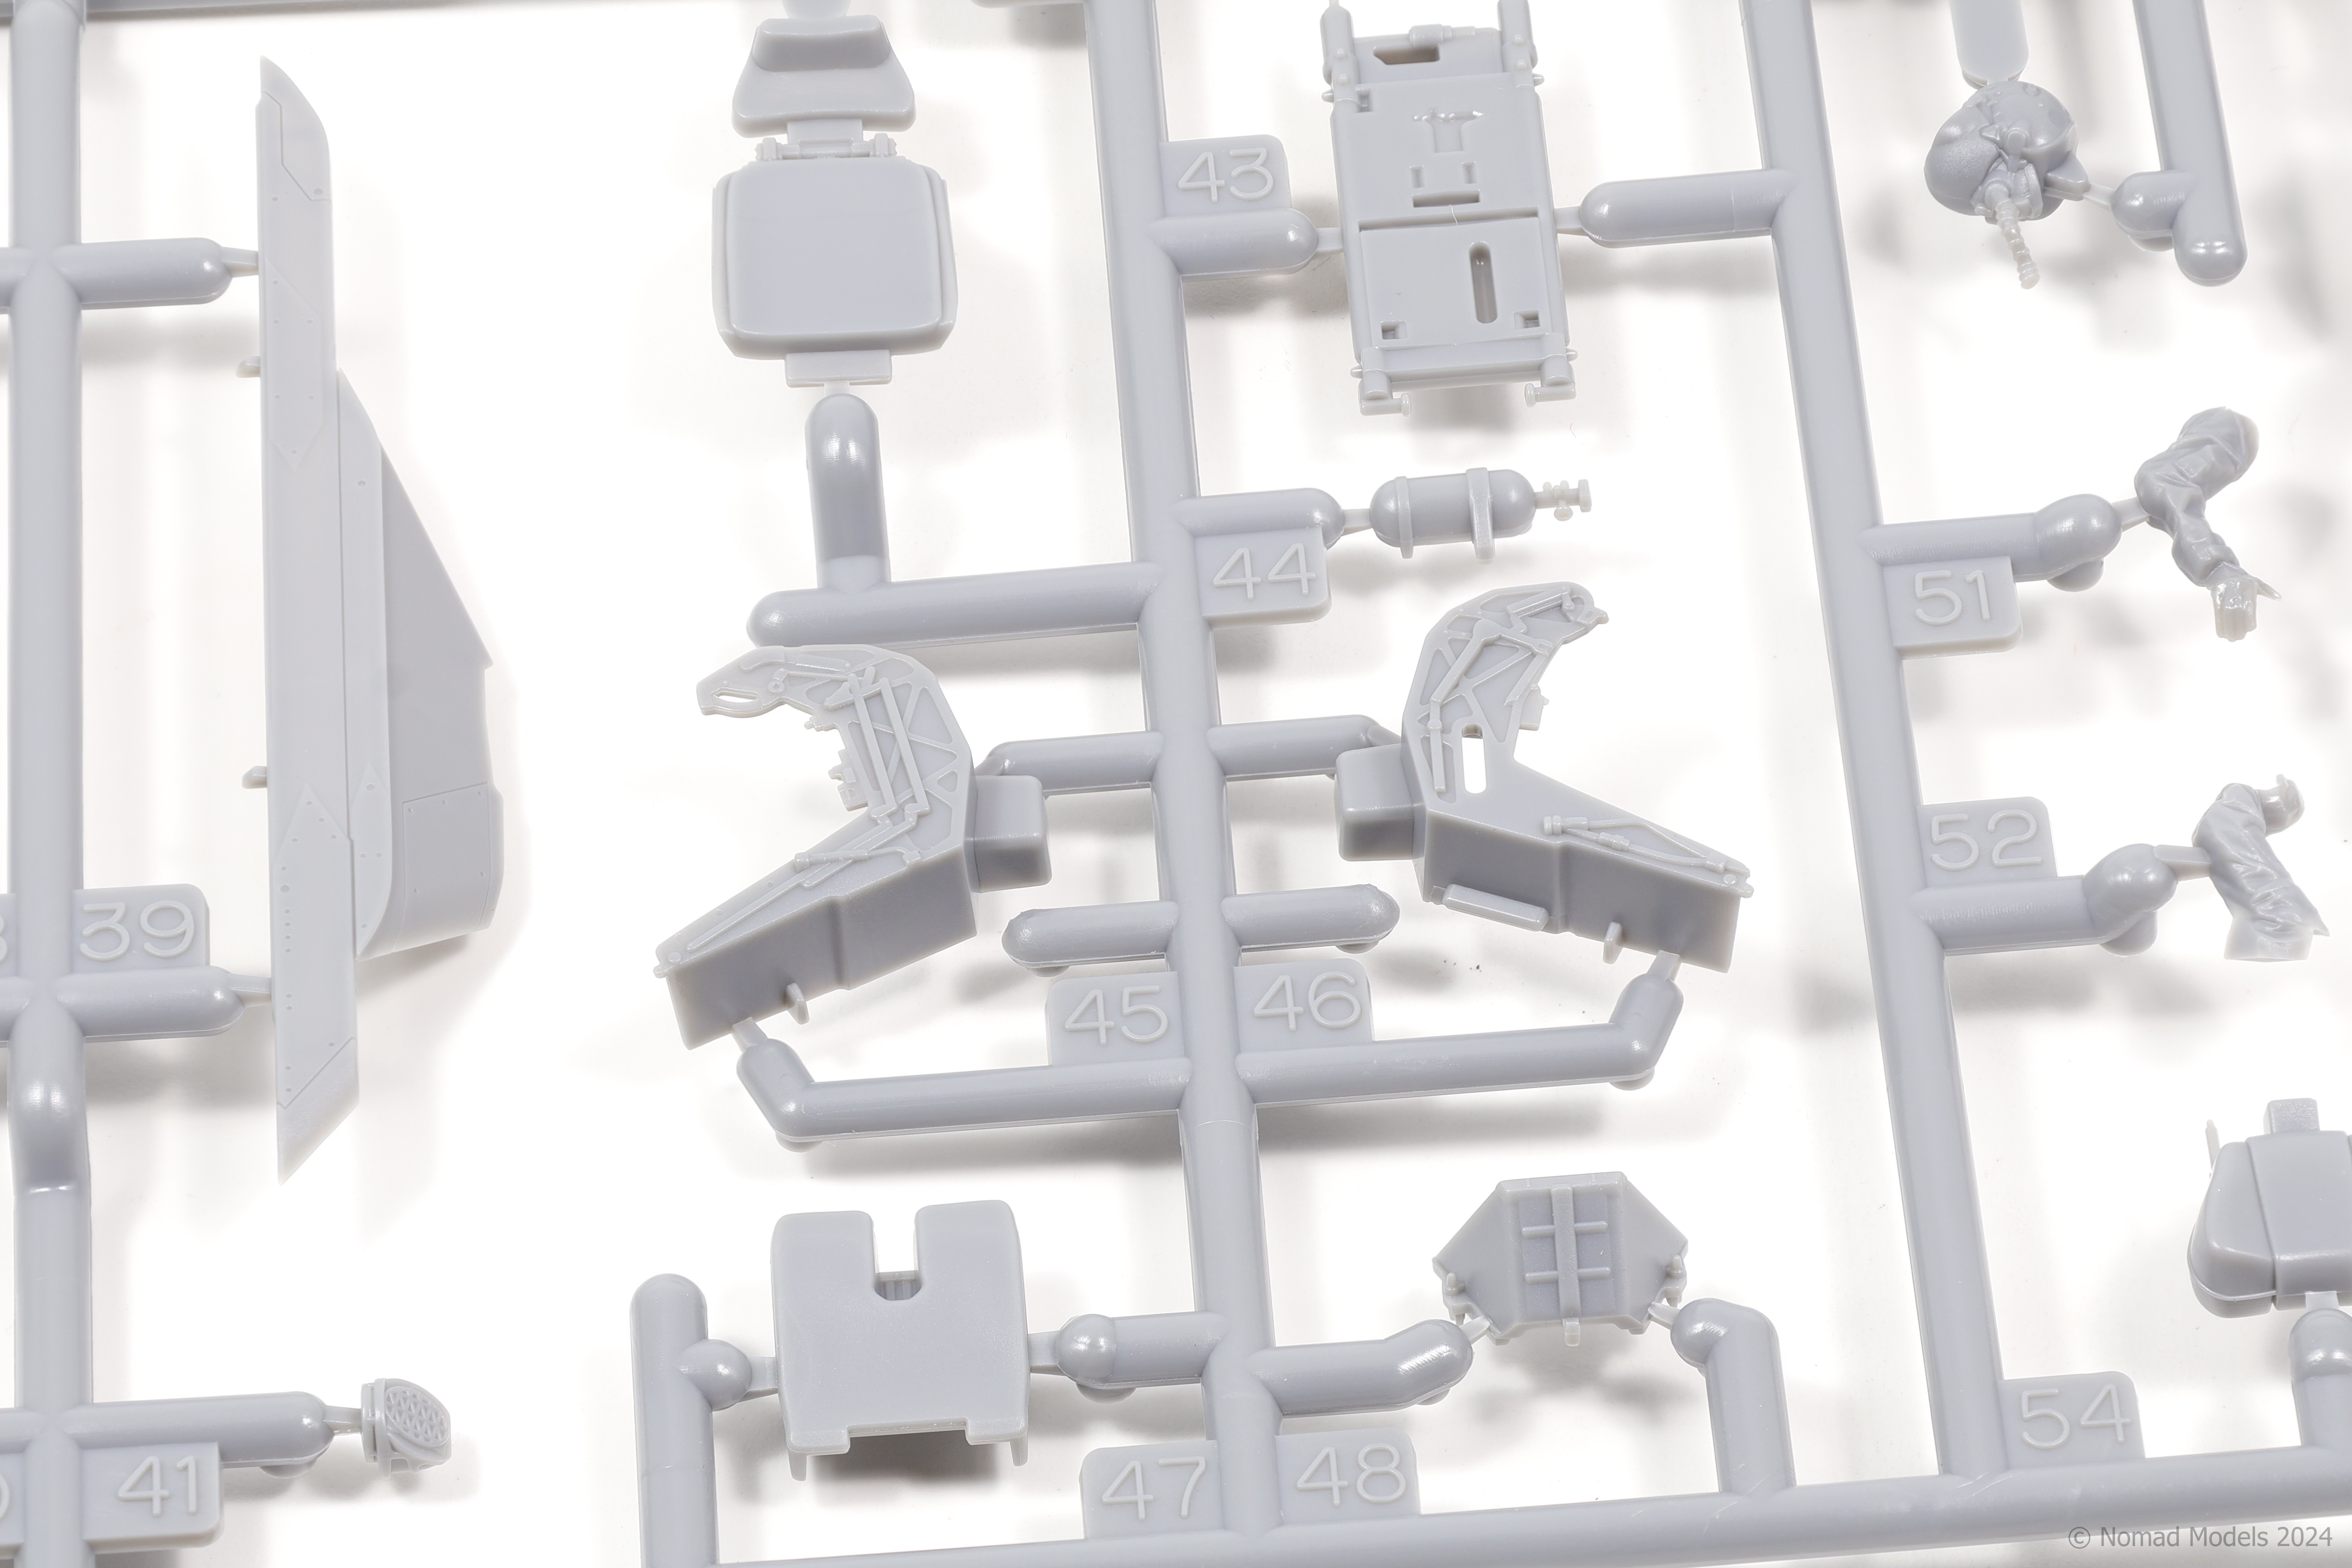
I’m hesitant to give any category a perfect score on any kit, but considering that this kit (and the rest of Tamiya’s F-35 lineup) features arguably the most impressively molded part in all of modelling there’s just no way I can justify anything less than a perfect score here. I’m of course referring to the weapons bay.
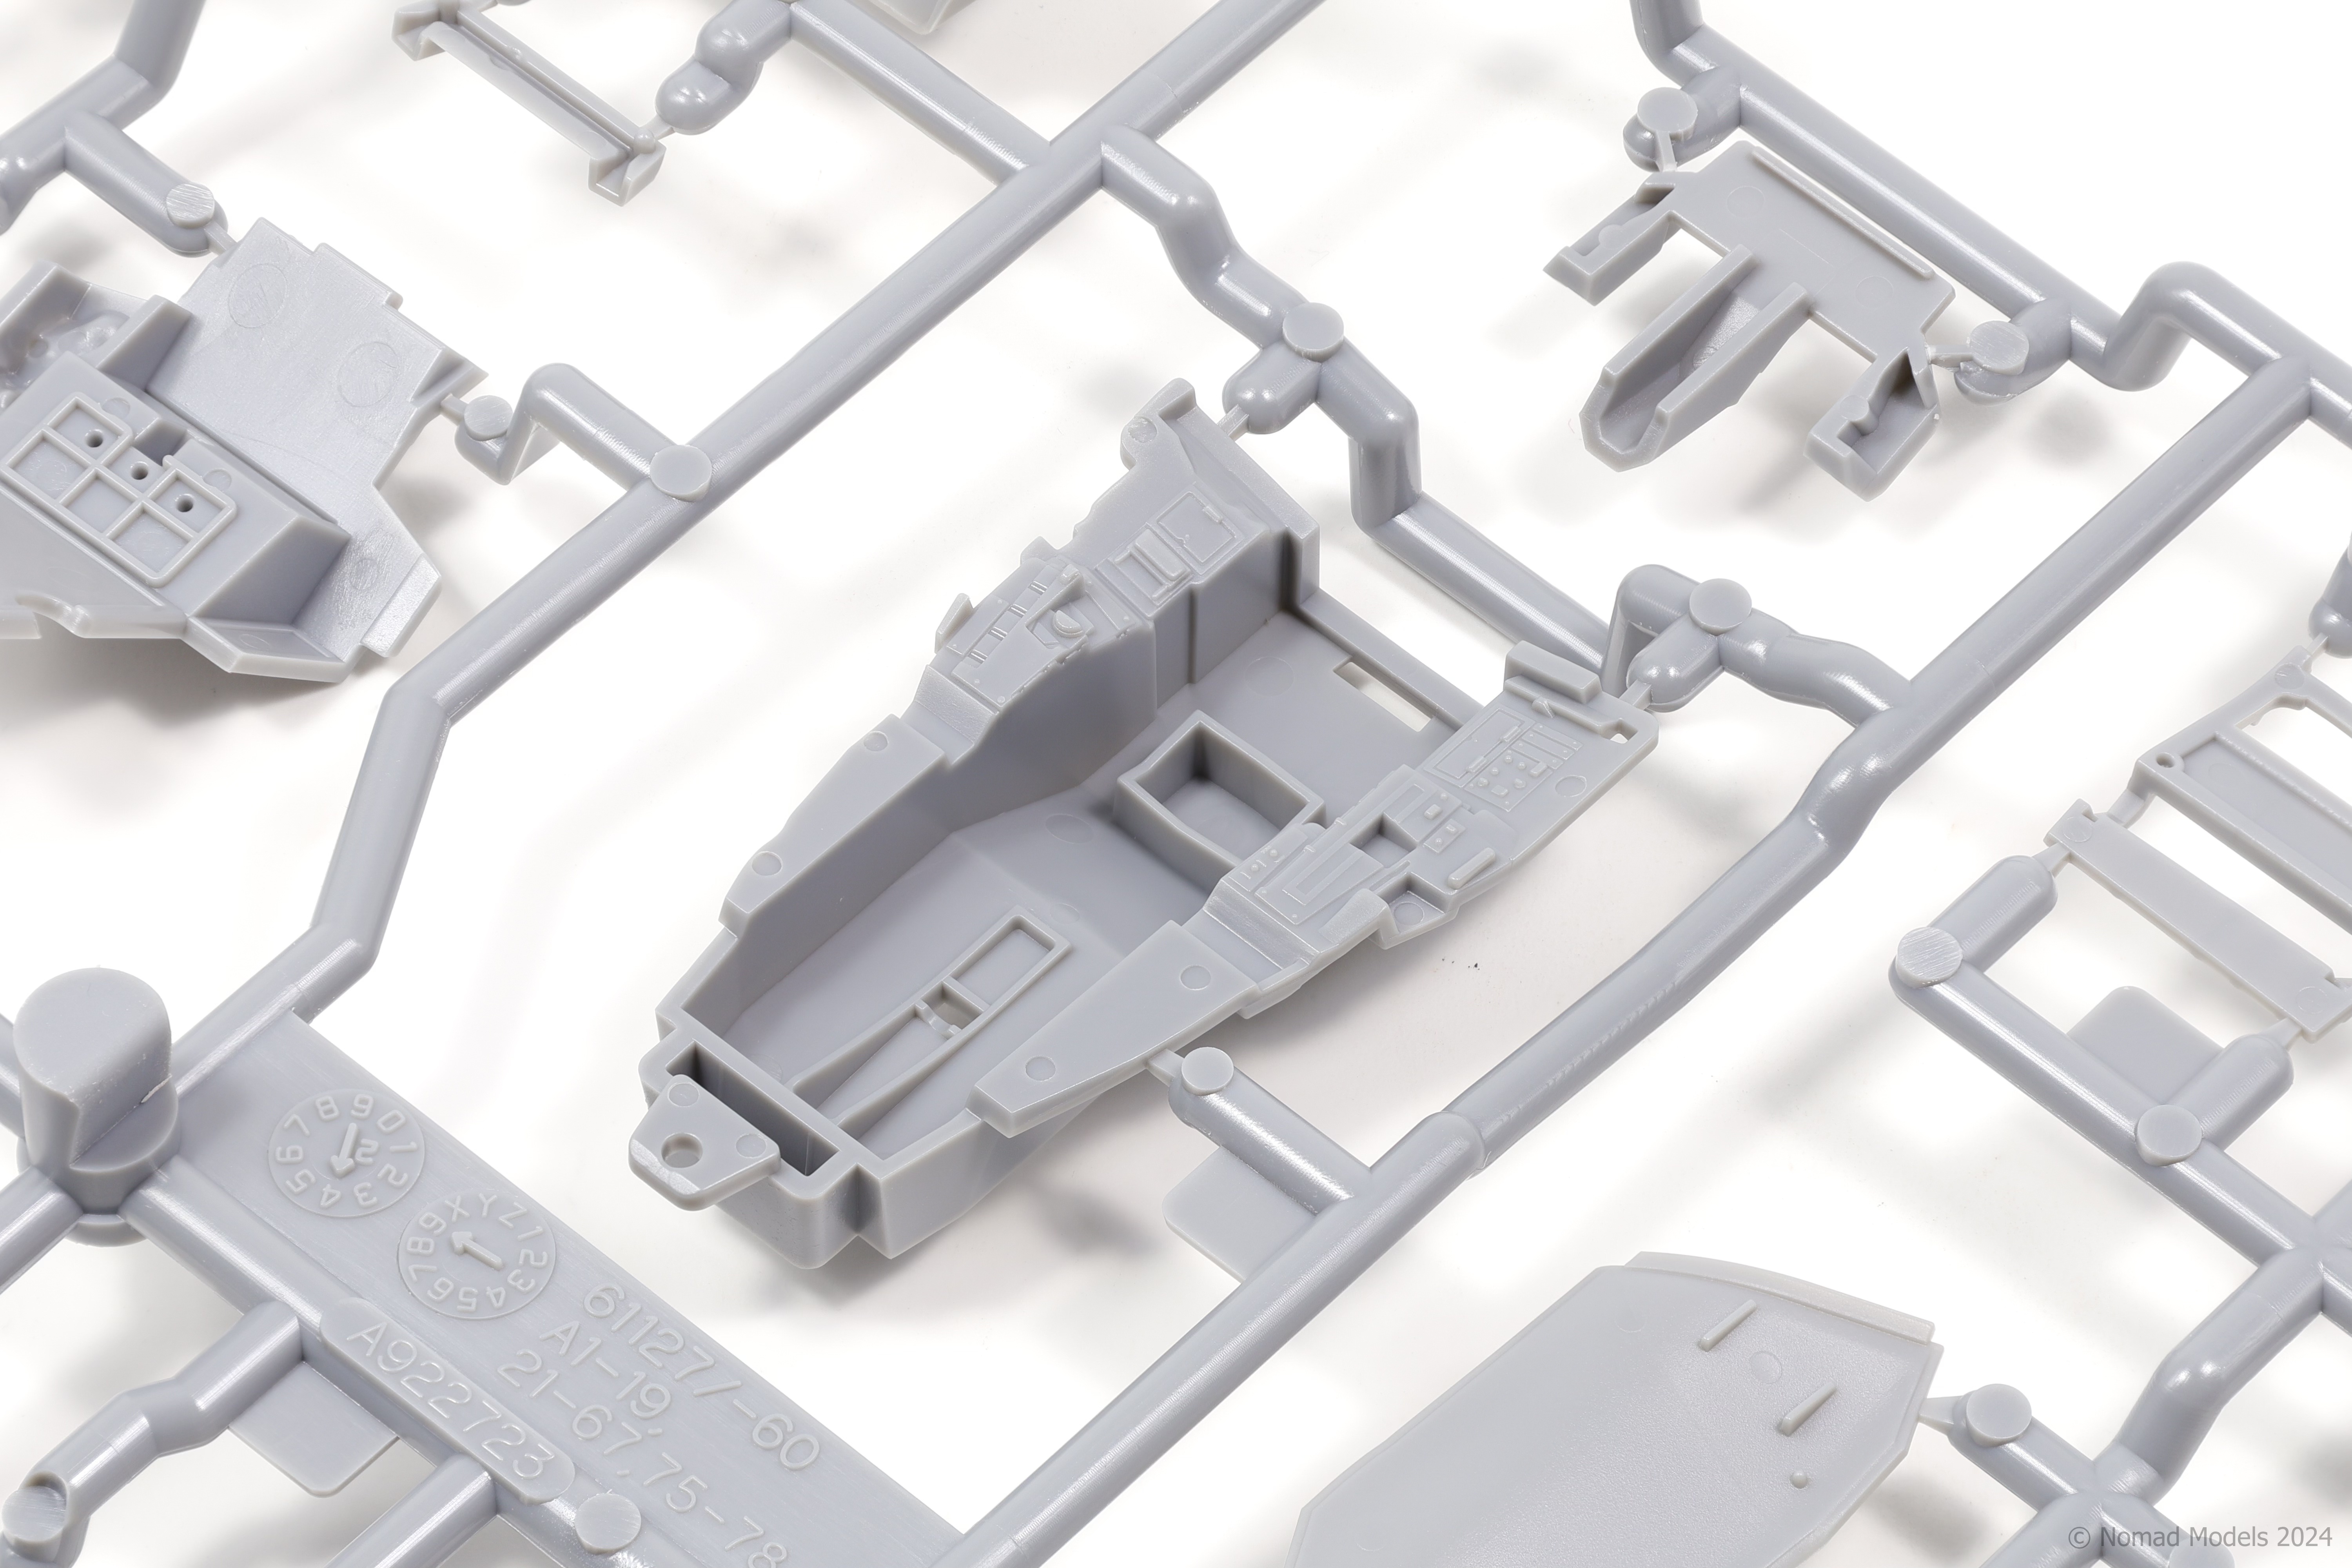
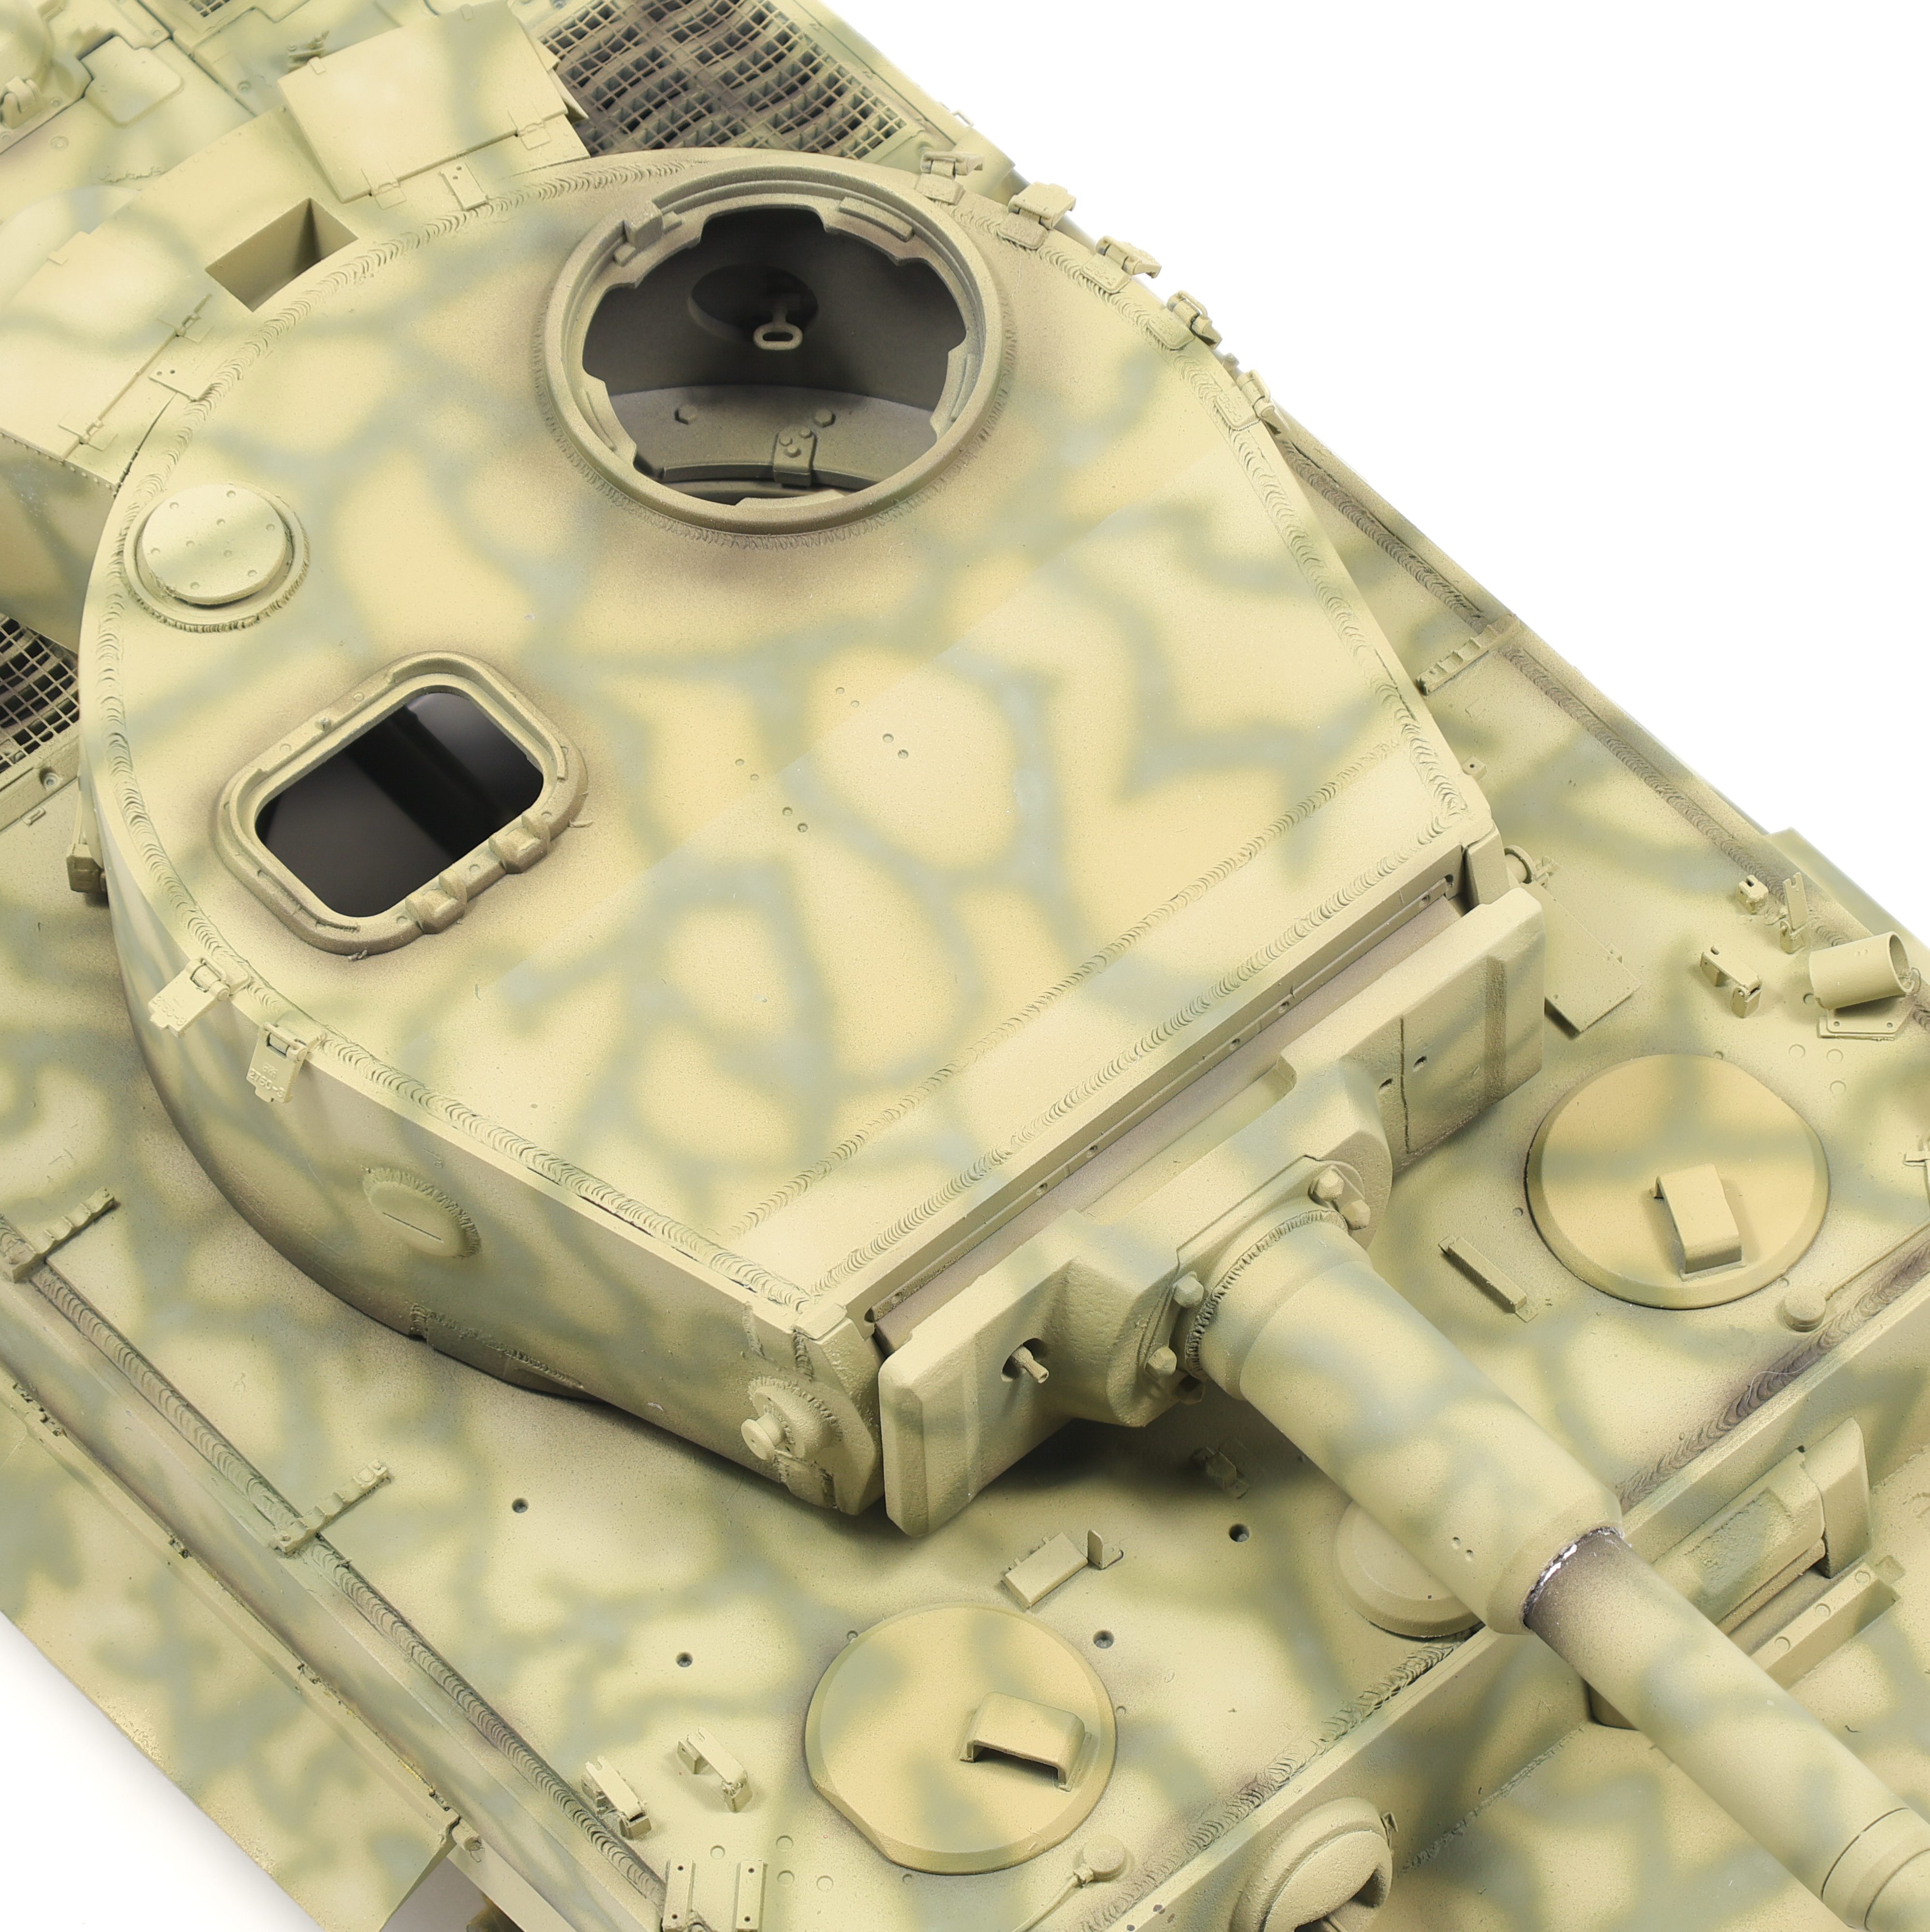
The quality of the modelling isn’t just limited to this area however as each and every part is intricatley detailed from the cockpit to the RAM panels. The detail is just so fine and impressive, it’ll be a real joy to see these parts painted up.
Instructions: 19/20
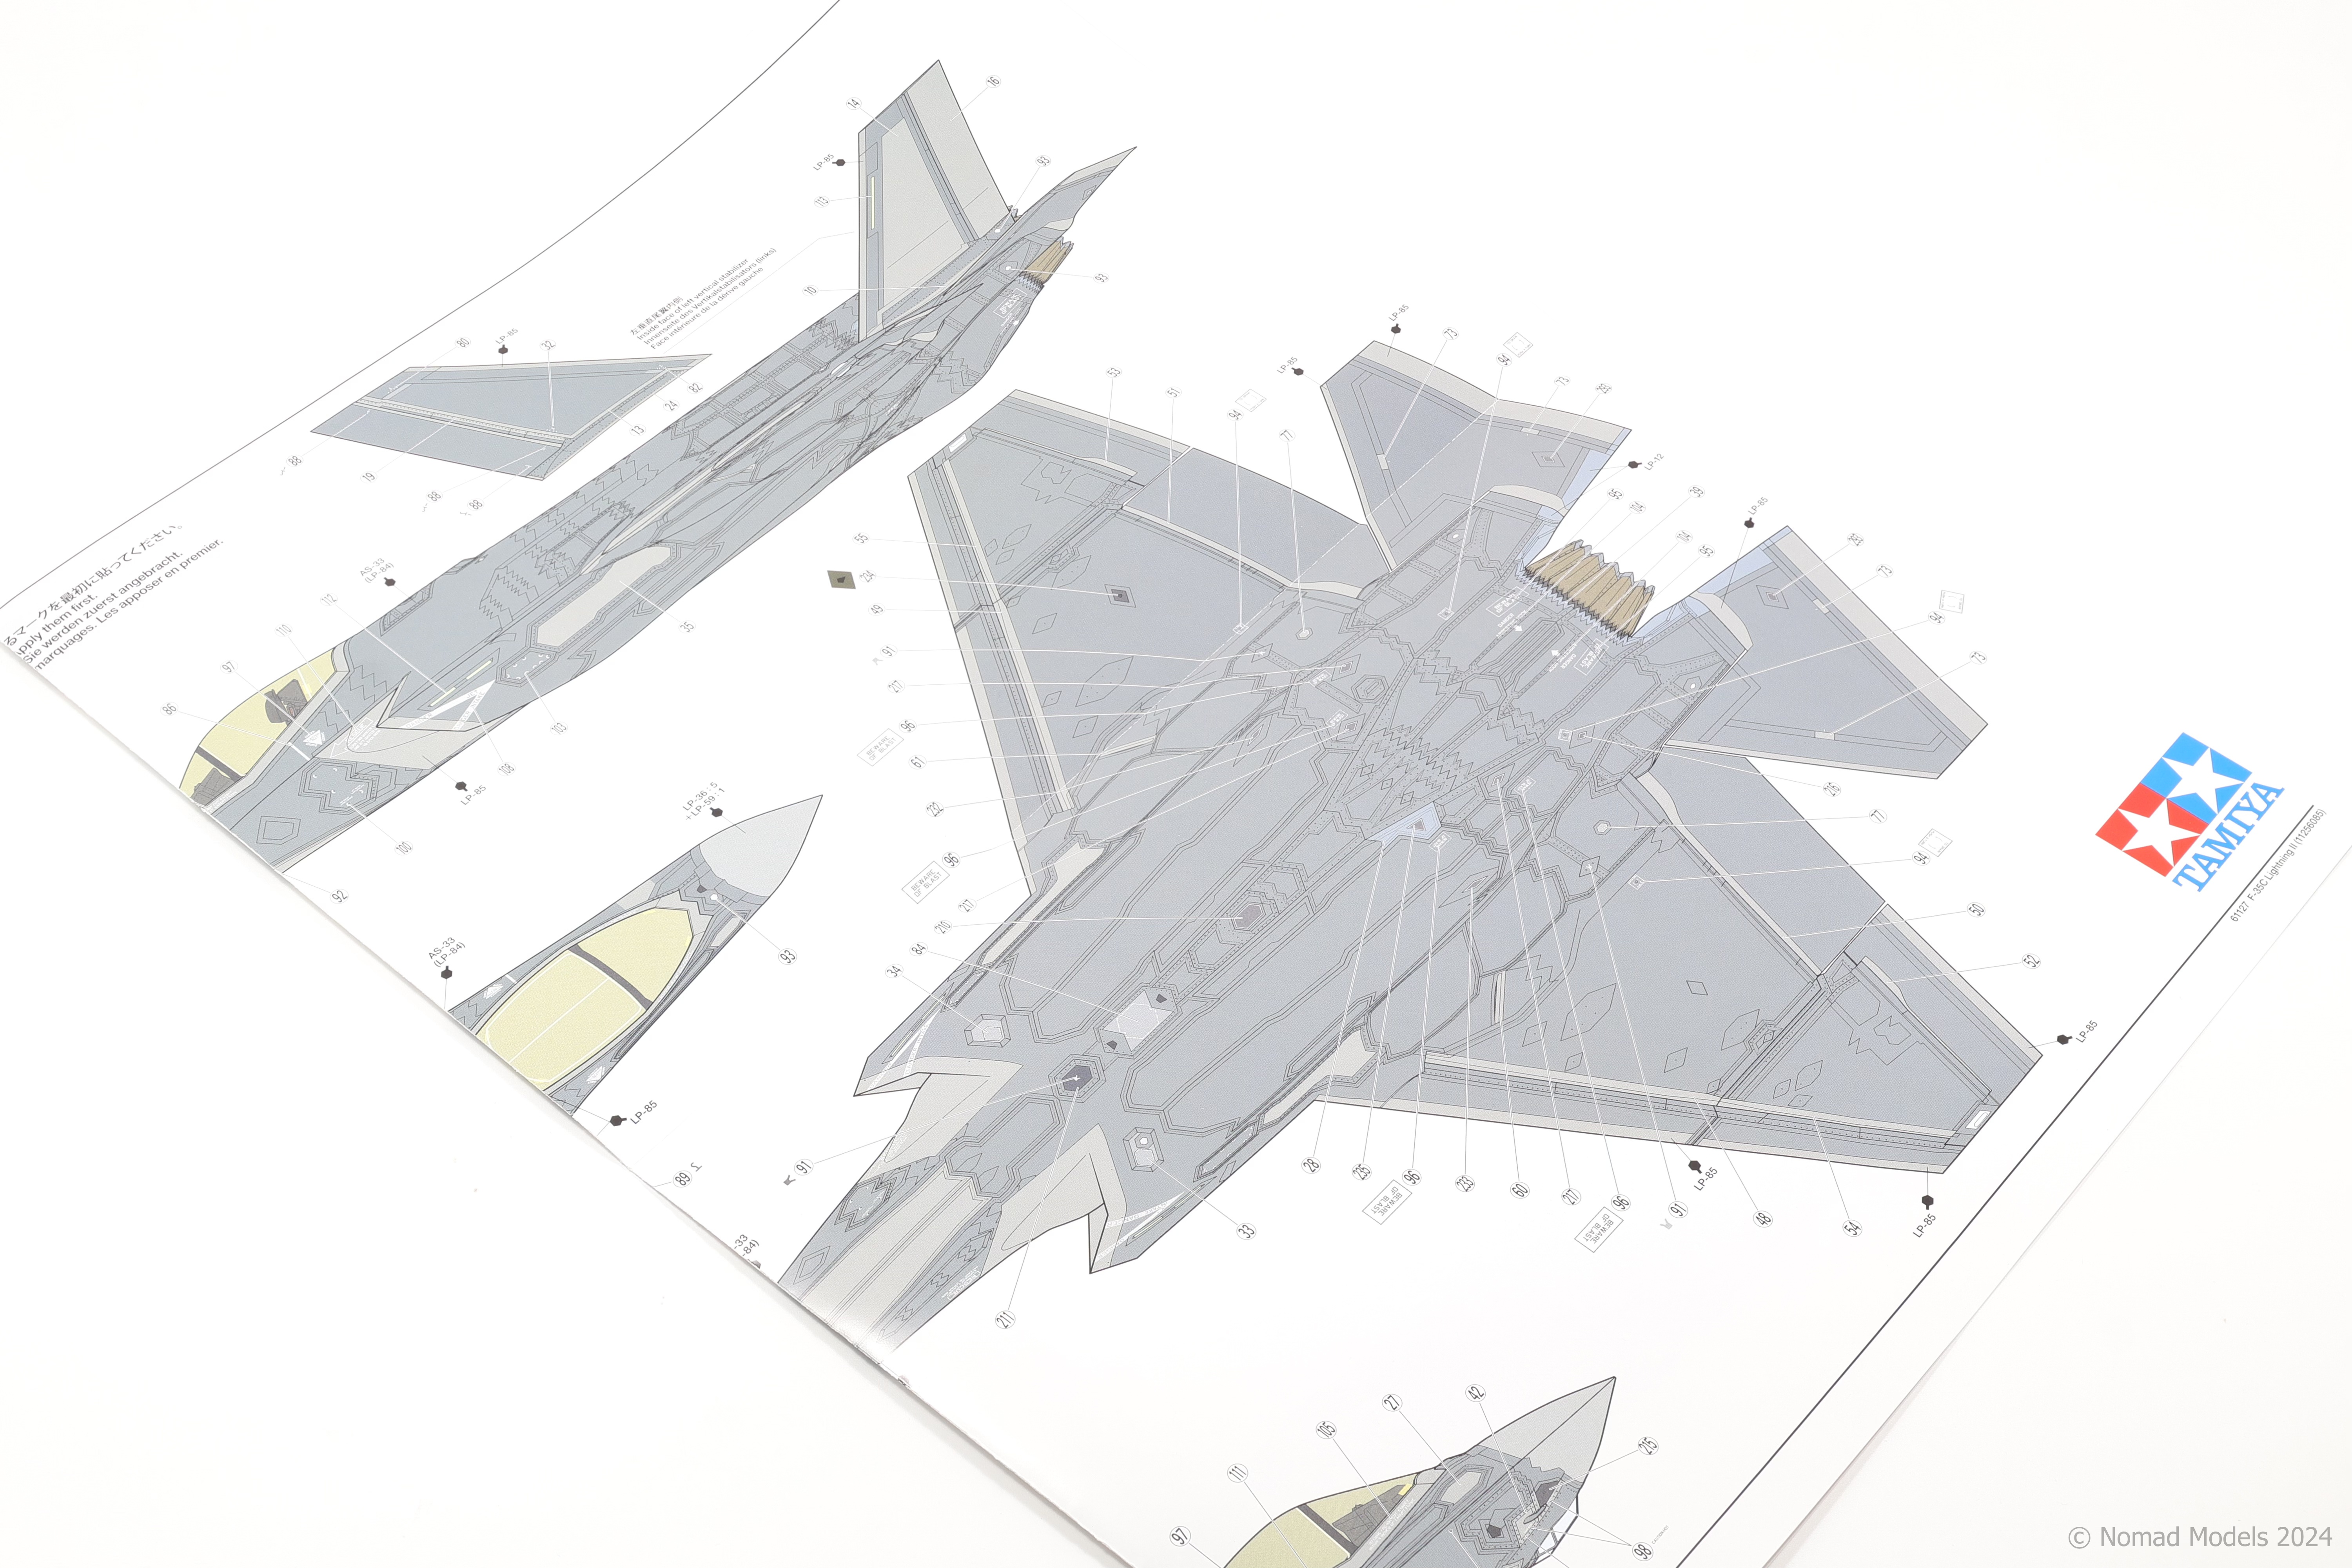
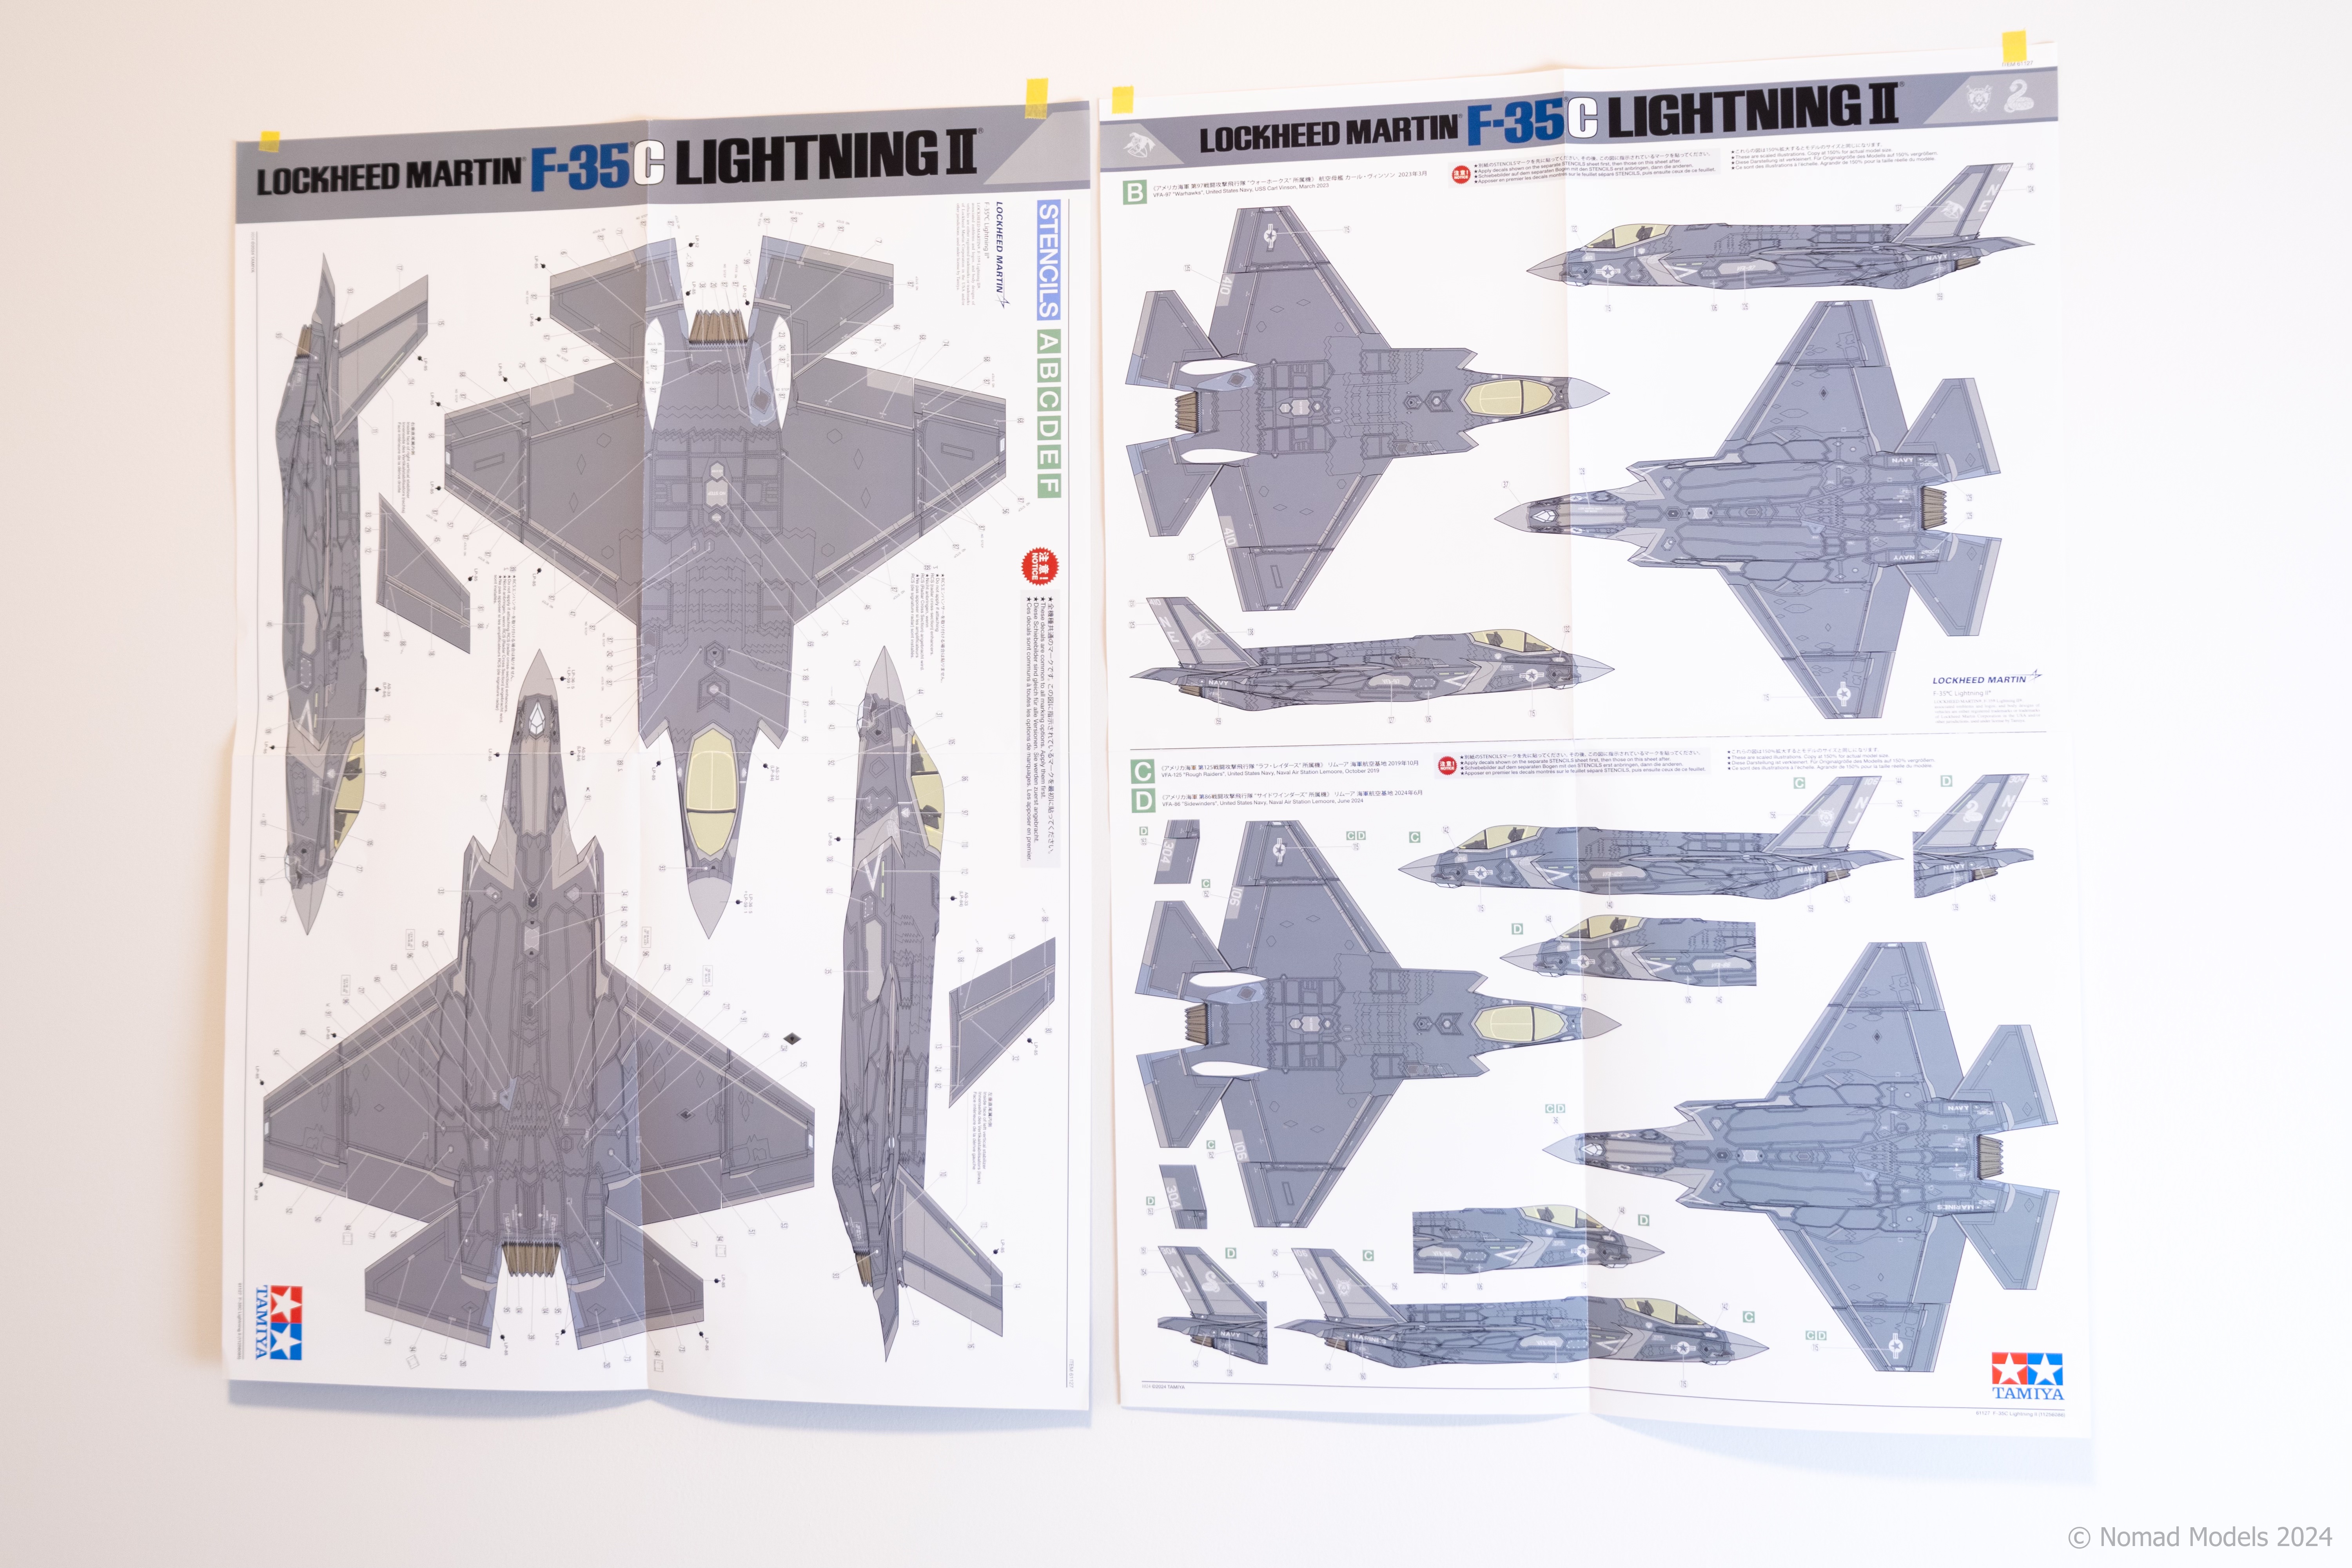
These are the most substantial instructions I have ever seen from a Tamiya kit and at first glance they guide the modeller through the build effortlessly. Make no mistake, This is a complex kit and not one I’d recommend for beginners. With the amount of options that the builder has in completing this kit, it’s not a surprise that they are filled with “Do this if A, Skip B, See steps 35-45, attach parts in numbered order.” That said, these are as clear as clear can be for indicating the significance of your choices in the build. The colour profiles included are hugely impressive and nothing like I’ve ever seen in this hobby. Included is a massive 1/48 sized poster detailing the “A” markings with full colour sheets for the rest of the 5 markings. In all the kits I’ve built I’ve never seen such impressive colour profiles included in a kit, they stand in as some serious wall art!
Miscellaneous: 9/10
A whopping 6 marking options are included in the kit, 2 Marine and 6 Navy jets. The F-35 is a pretty boring aircraft when it comes to markings so Tamiya has done their best here, you get some colour in one option but the rest are fairly similar, not that this was unexpected. The decal quality is excellent as well with very clear printing. The decal thickness may be another issue however.
Total: 95/100
Tamiya’s F-35C is undoubtedly at the apex of the hobby right now, and for good reason. It’s by no means something I’d recommend to a beginner, as there is a number of small parts and keeping focused on a specific aircraft and loadout might be a tall order for somebody new to the hobby. In all other areas however this kit excels.
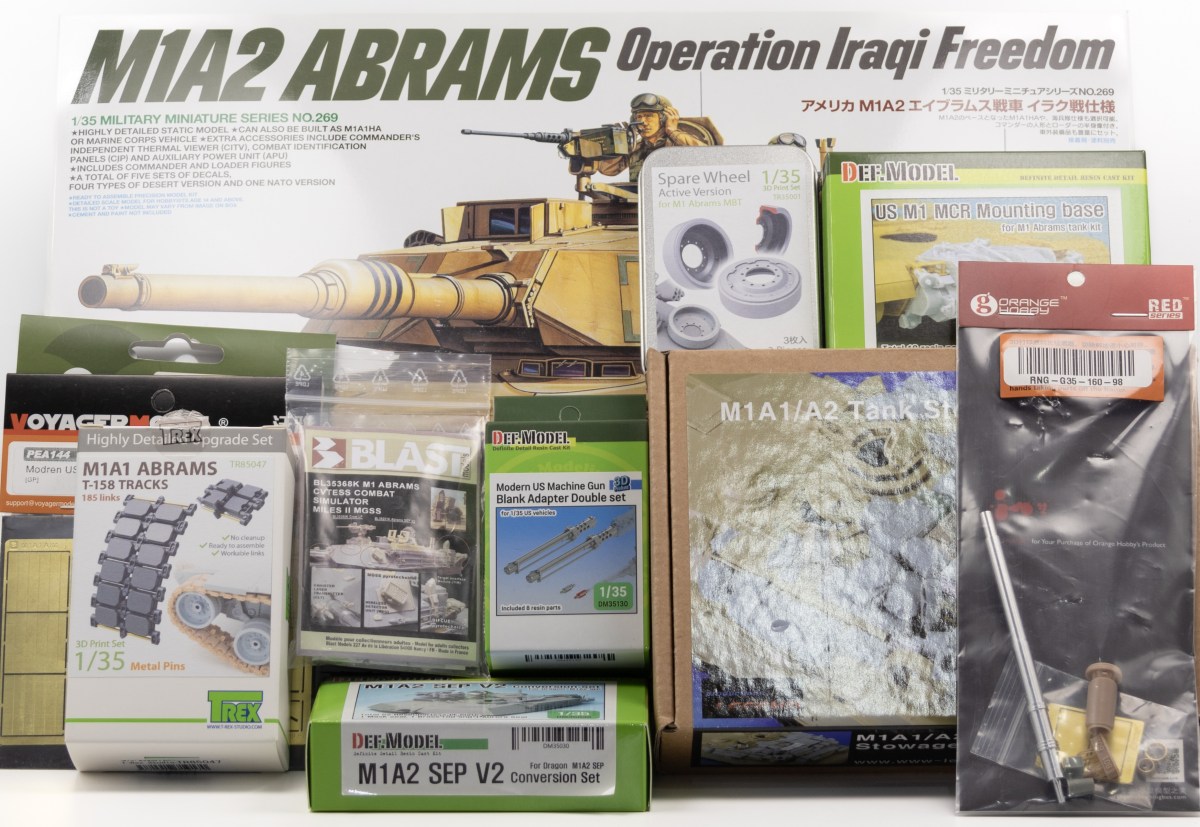
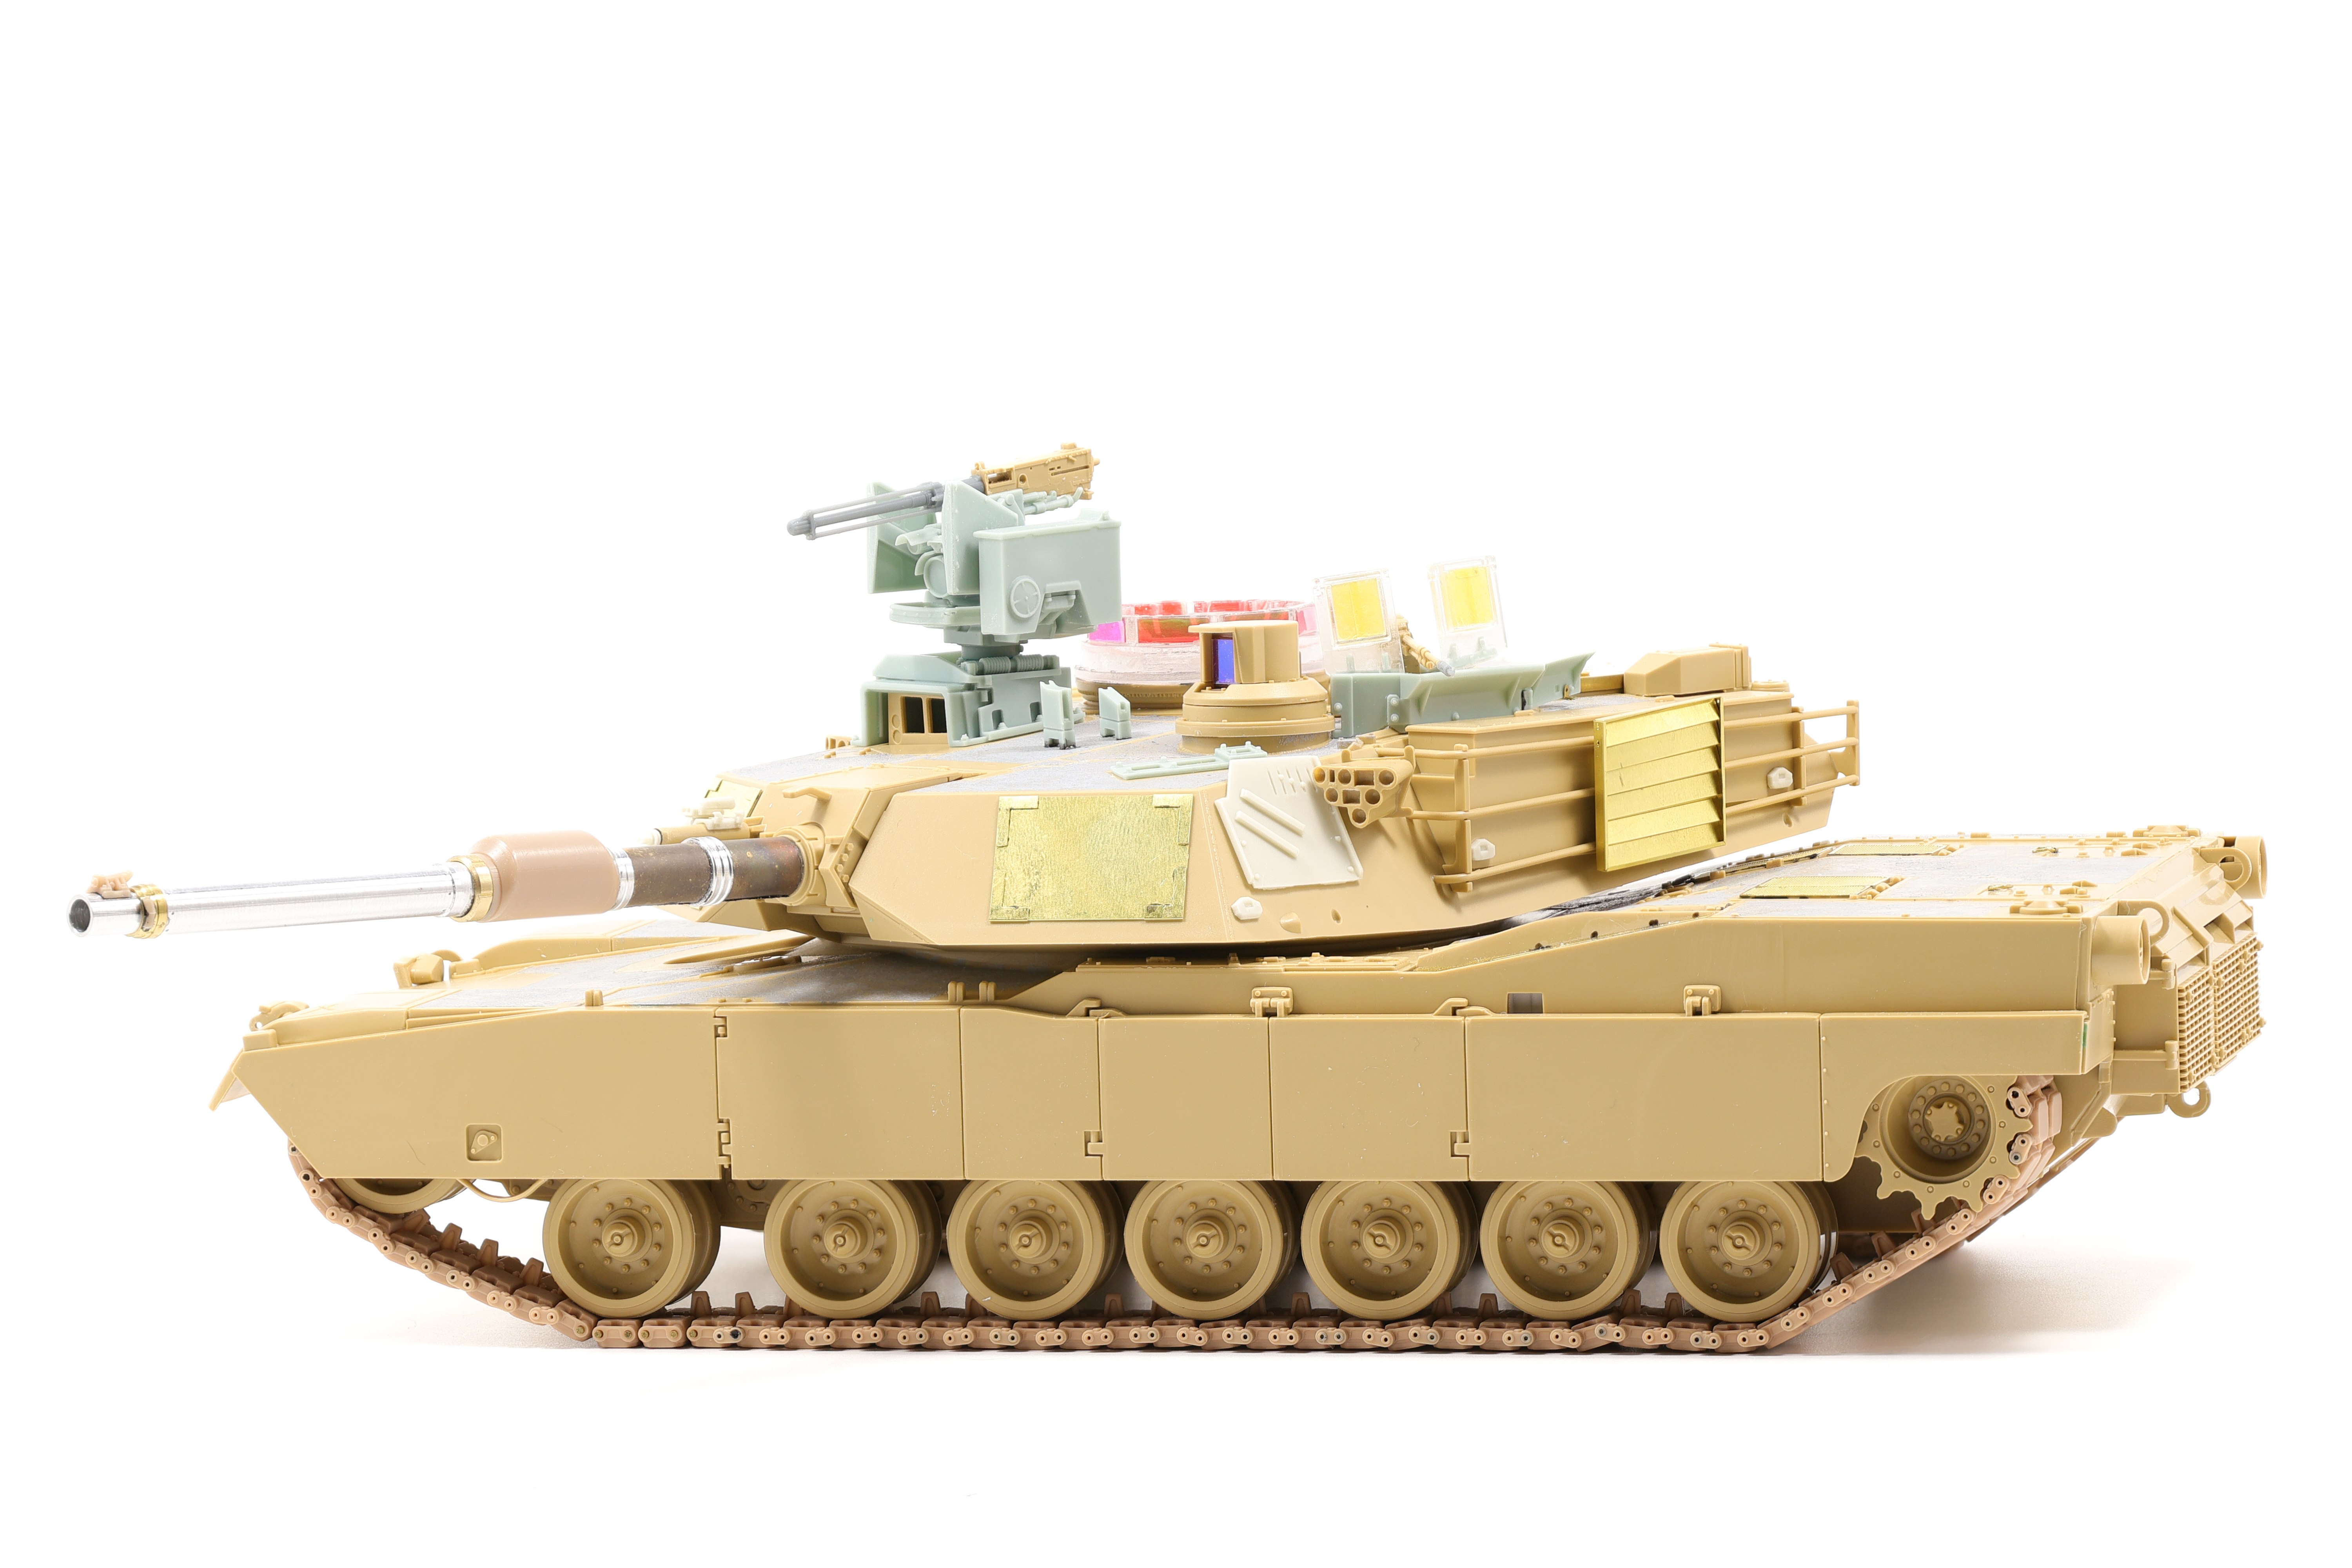
For my next project, I settled on building Tamiya’s 20 year old M1A2 Abrams. I knew from the get go that I didn’t want to build a 2003 vehicle however and that this would call for some modifications.
I settled on bringing this kit into the future by adding various upgrade parts to depict a SEP V2 vehicle undergoing training in Germany. Lots of photos have been taken of the Germany-based Abrams and there’s always one unifying factor, they look absolutley badass:
For this project, I opted to use a DEF Model SEP V2 conversion set designed for the Dragon kit along with several other pieces to make the Tamiya plastic a convincing 2024 Abrams. Also of note was the Combat Vehicle Tactical Engagement Simulation System (CVTESS) which is equipment fitted during training exercises. I picked up a resin set from Blast Models from France to depict this specialty equipment on the vehicle.
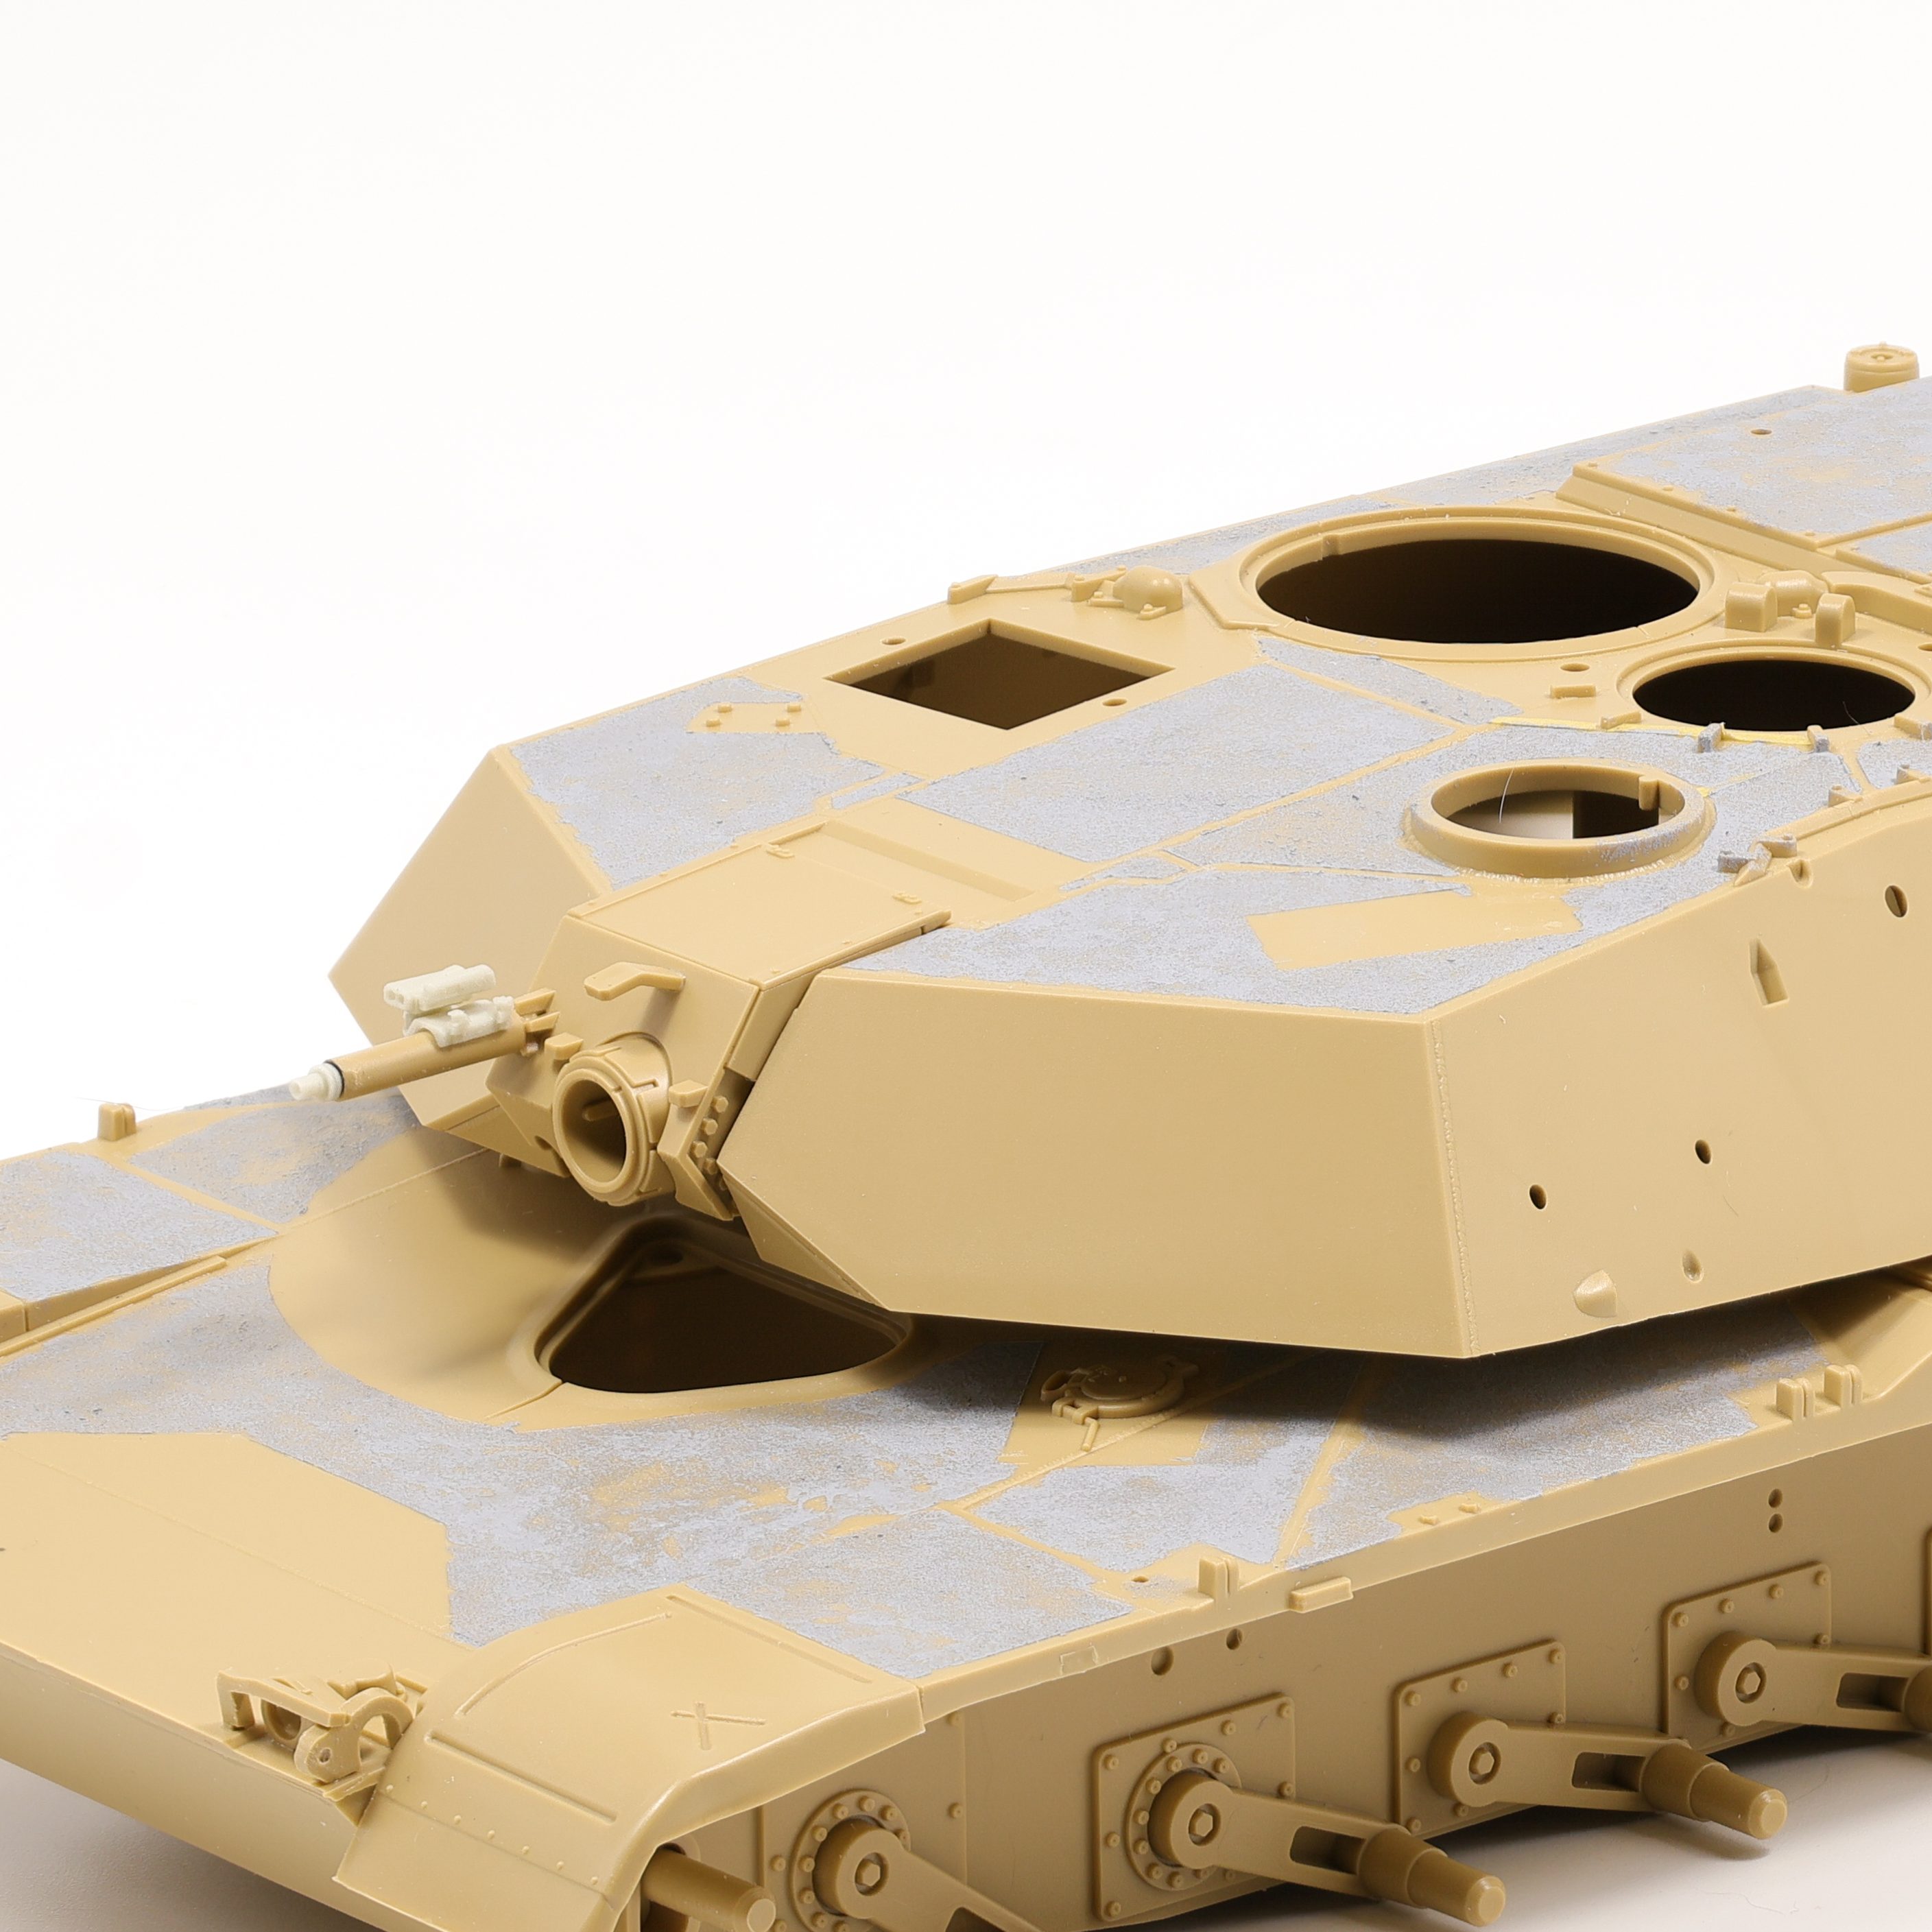
Unlike the Tiger, the Tamiya Abrams is radically more simple and unrefined. This is not necessarily a bad thing as the kit built up quite quickly. One feature missing from the kit is the anti-slip texture that is present on all standing surfaces on the Abrams. This isn’t too much of a surprise, considering that the kit is over 20 years old at this point. To replicate the missing texture, I first masked off the areas in which I didn’t want the anti-slip texture, namely over welds and other details.
The masking was deceptive in how long I thought it would take. I had initially assumed that it would be a quick and easy process but in the end had to be split up over several days. To create the texture, I utilized the same technique I had on the Tiger, Tamiya putty thinned with extra thin cement. I had initially thought that this approach would not produce a rough enough texture to pass as anti-slip, however after heavy stippling and limited standing I think the putty method is worth trying out to achieve this specific element. Only time will tell if it looks realistic under paint.
After completing the anti-slip, the model was ready for the SEP V2 update parts to be added. The more modern variants of the Abrams are absolutely brisling with updates and additions to the basic hull, and it’ll be easiest to add the resin details while the hull is as bare as possible.
The DEF Model update set was designed for the Dragon kit, but is easily adapted to fit the Tamiya plastic. The update kit includes a lot of well detailed resin upgrades and adds a much needed injection of detail to the 20 year old Tamiya offering.
At this stage I began work on the tracks and running gear. This is a fairly straightforward part of the build as the Abrams has a simple suspension setup (compared to some German cats at least). I also picked up a set of T-Rex tracks for this kit while I was in Japan earlier this year with this project in mind. While my prior experiences with T-Rex tracks have been fantastic, this set really bucked the trend unfortunately. Brass pins are utilized in this set and I found that they were too large for the track endcaps and guide horns. This required boring them out slightly to fit the oversized pins. This was an incredibly time consuming and boring process. All told it took me around three days of continuous building to get these assembled. They look great assembled, but I wouldn’t recommend picking these up for your own Abrams build.
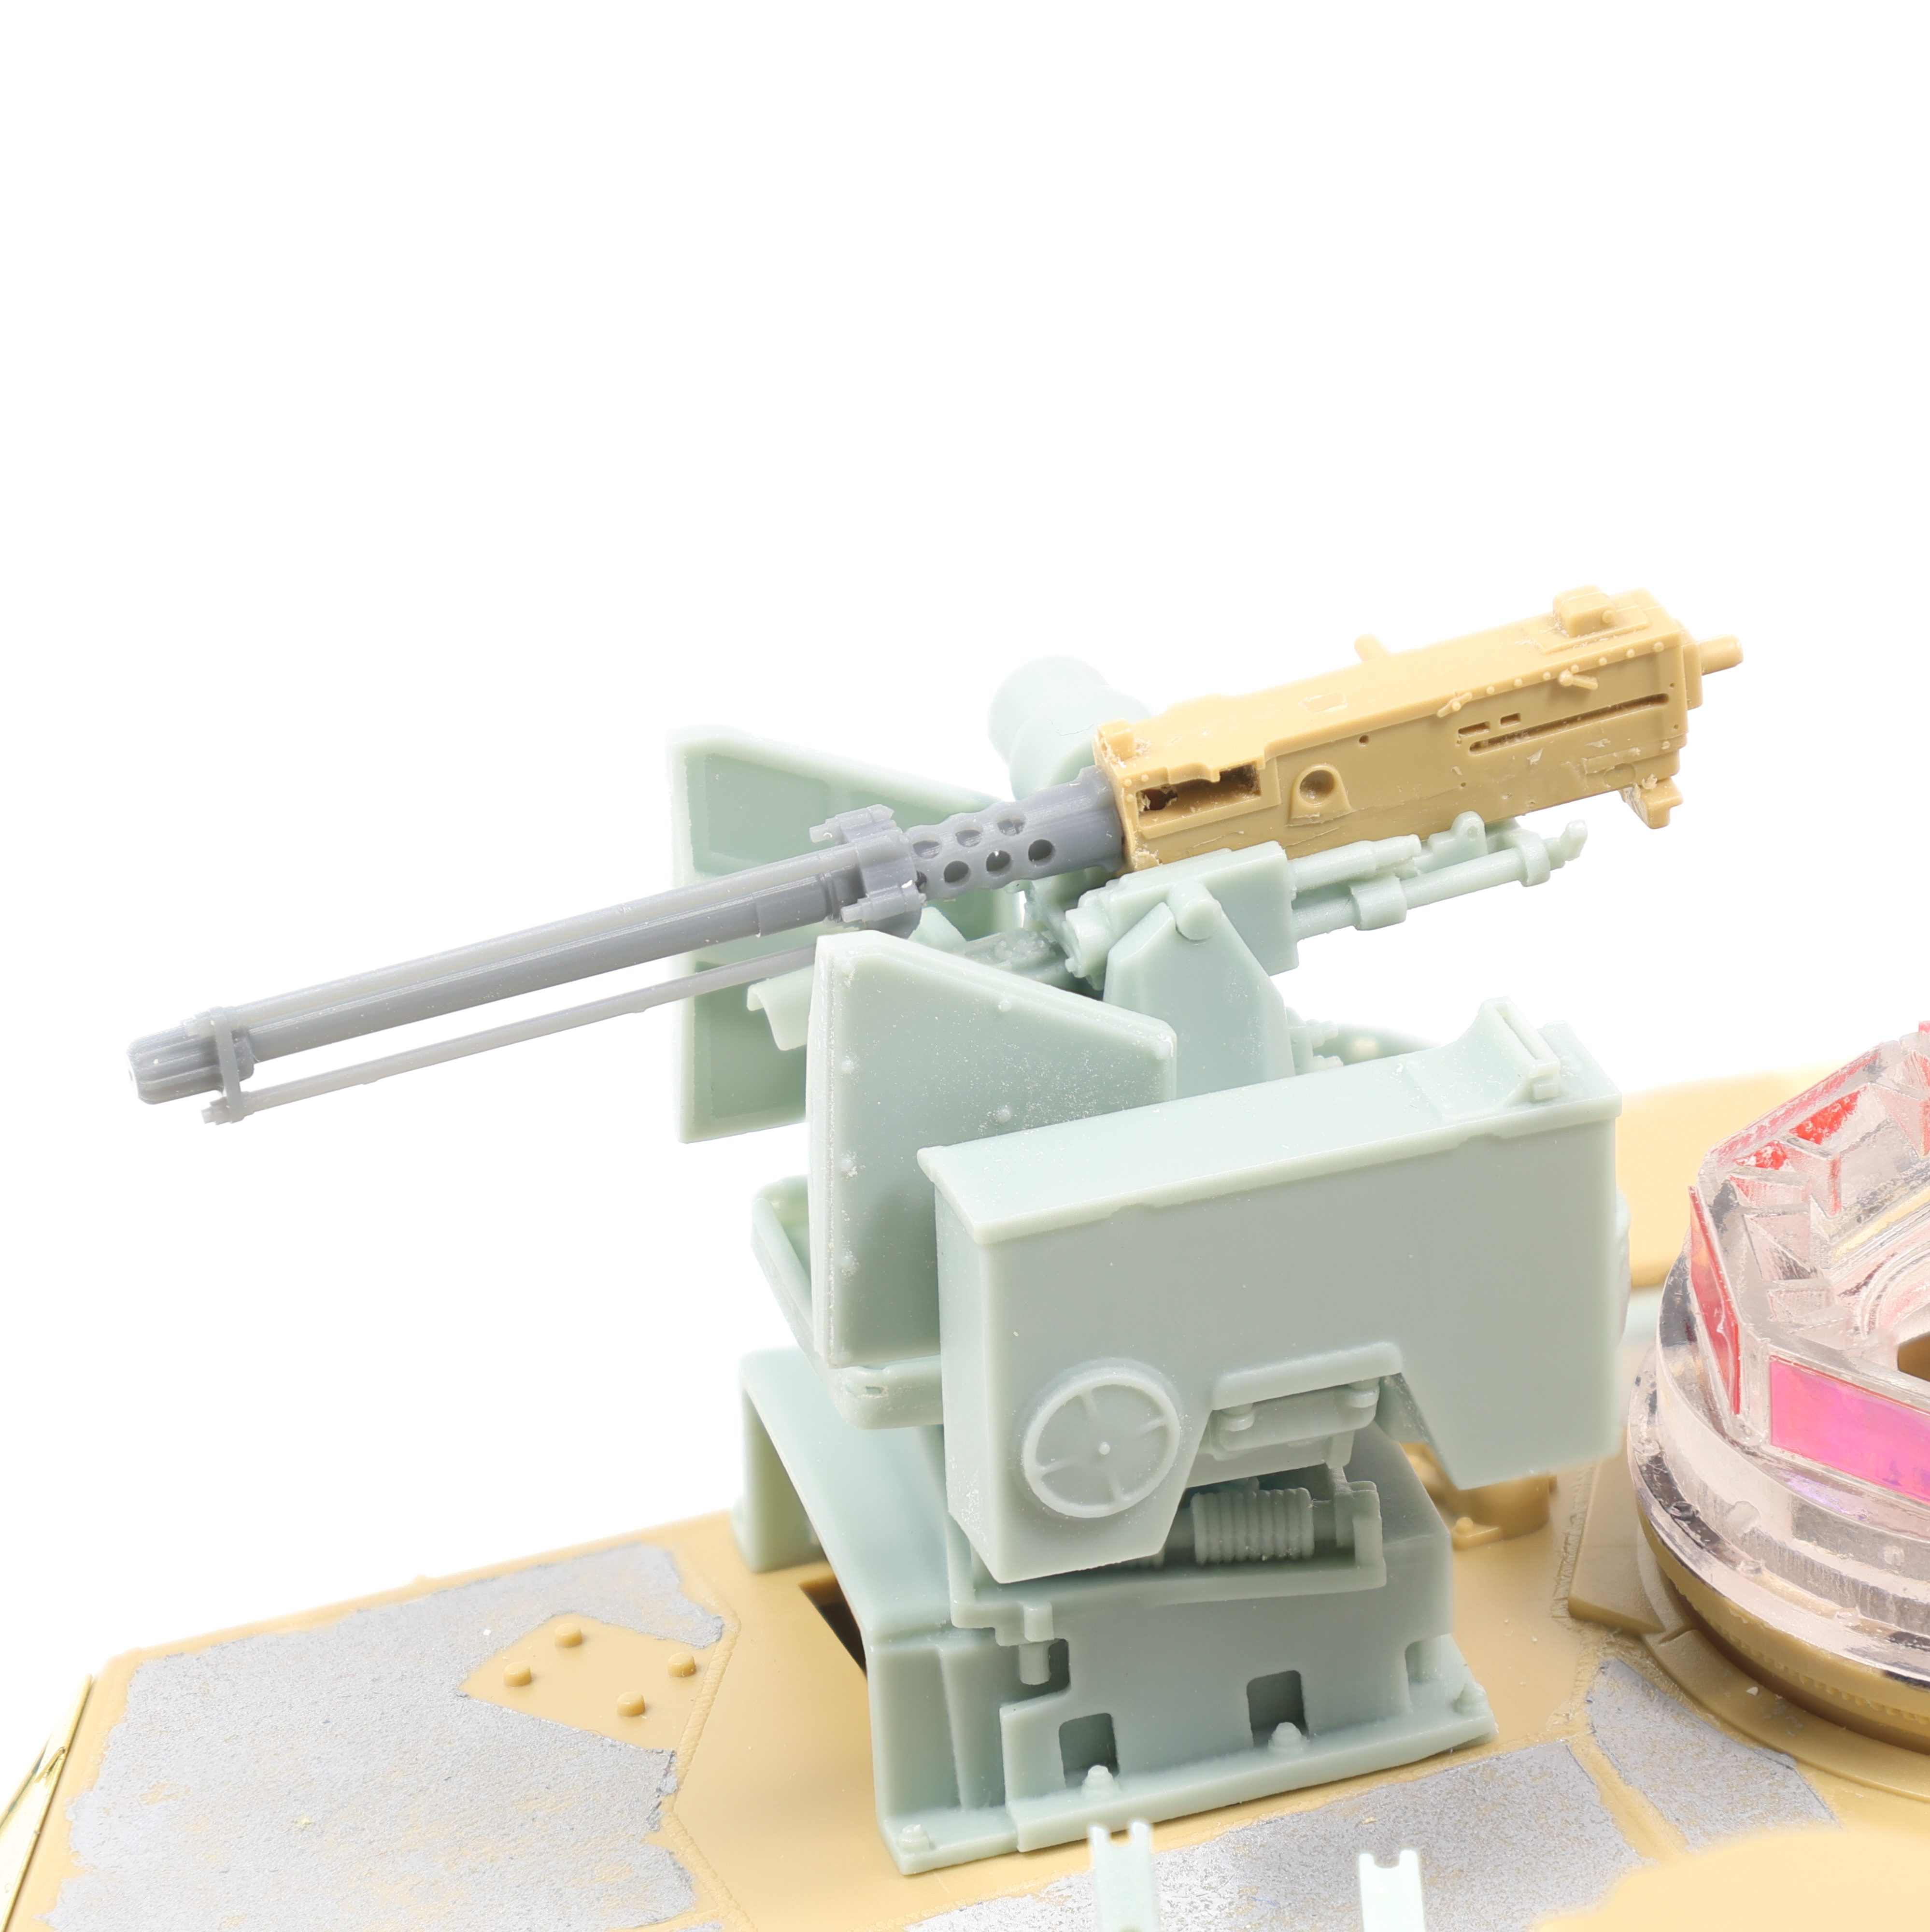
After completing the suspension, I moved on to completing the remote weapon station (RWS). This is a really nice resin part that utilized the kit MG and a 3d printed blank fire adapter. it went together fairly smoothly and I love the presence that the .50 cal has on top of the tank.
I also added some various other parts including the side skirts and photo-etched details. The build was definitely shaping up to be a mean looking Abrams!
Next up I moved on to the consiterable amount of stowage that was going to be added to the build. M1’s are very frequently are loaded down with large amounts of stowage for the crew and this build would be no exception. I utilized a resin stowage set from Legend which provides a lot of options to choose from to add detail to the model. Legend makes a few variants of stowage sets and while they are pricey, there are enough pieces included to outfit more than one model.
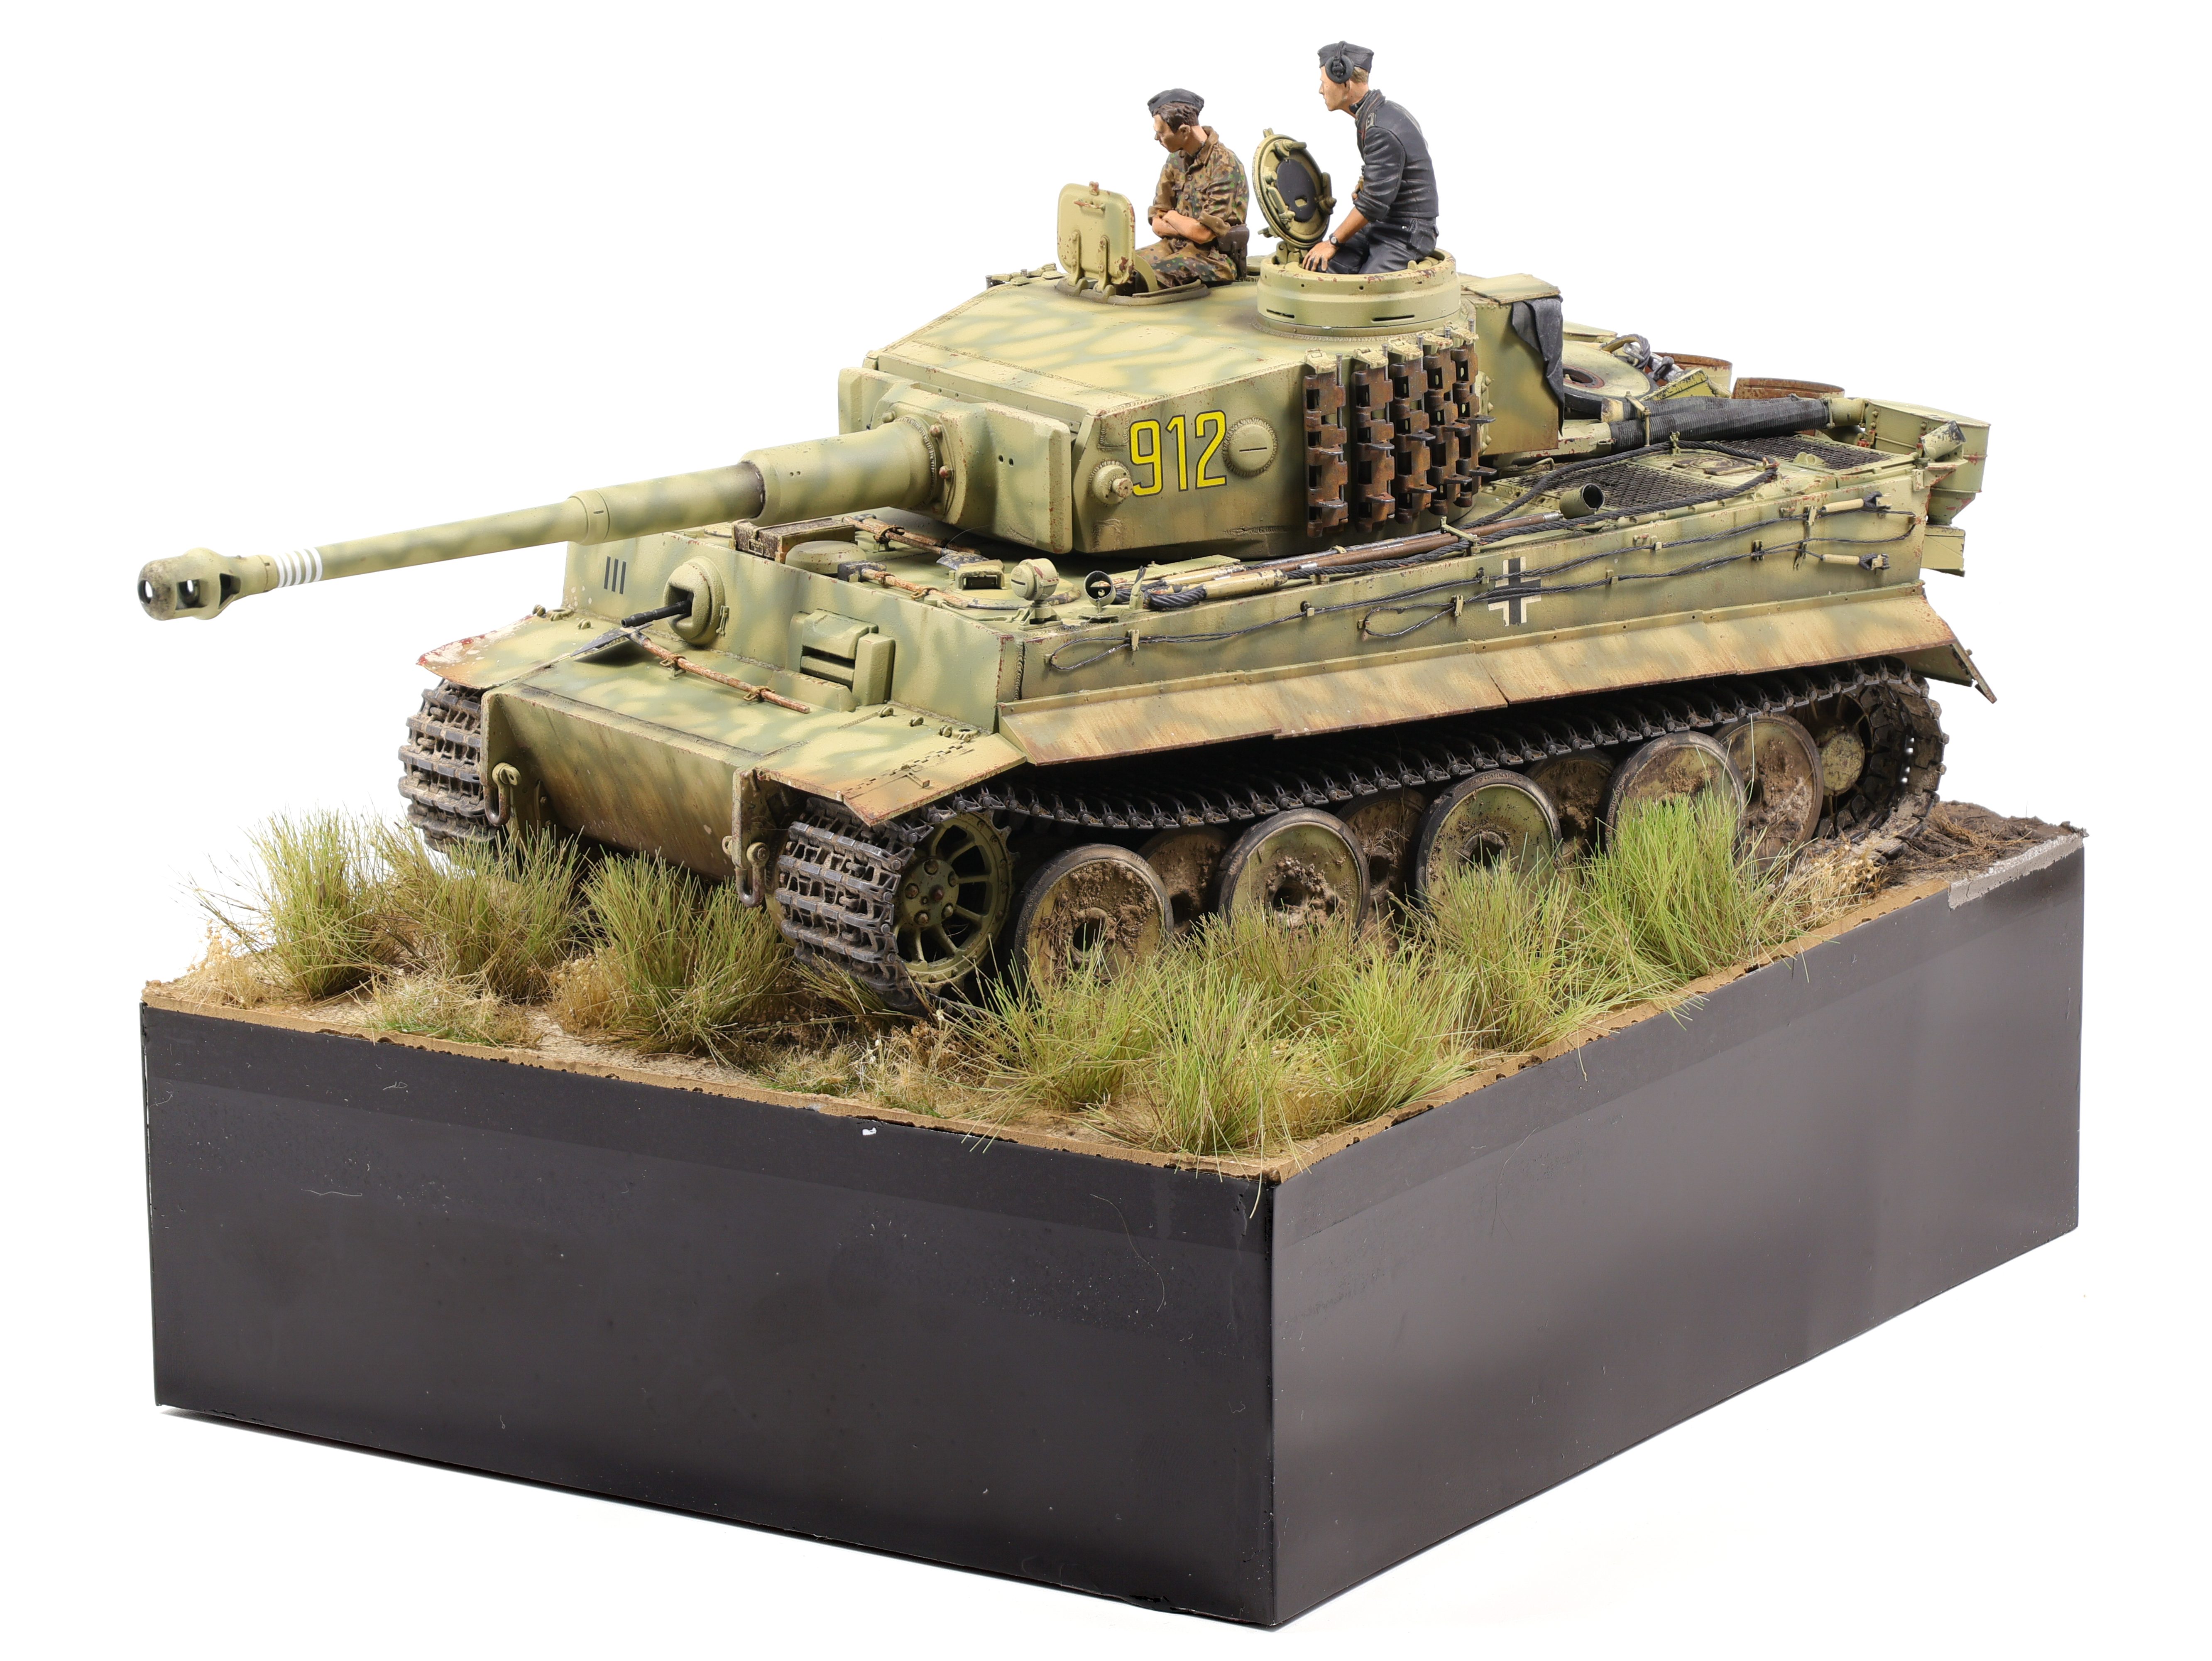
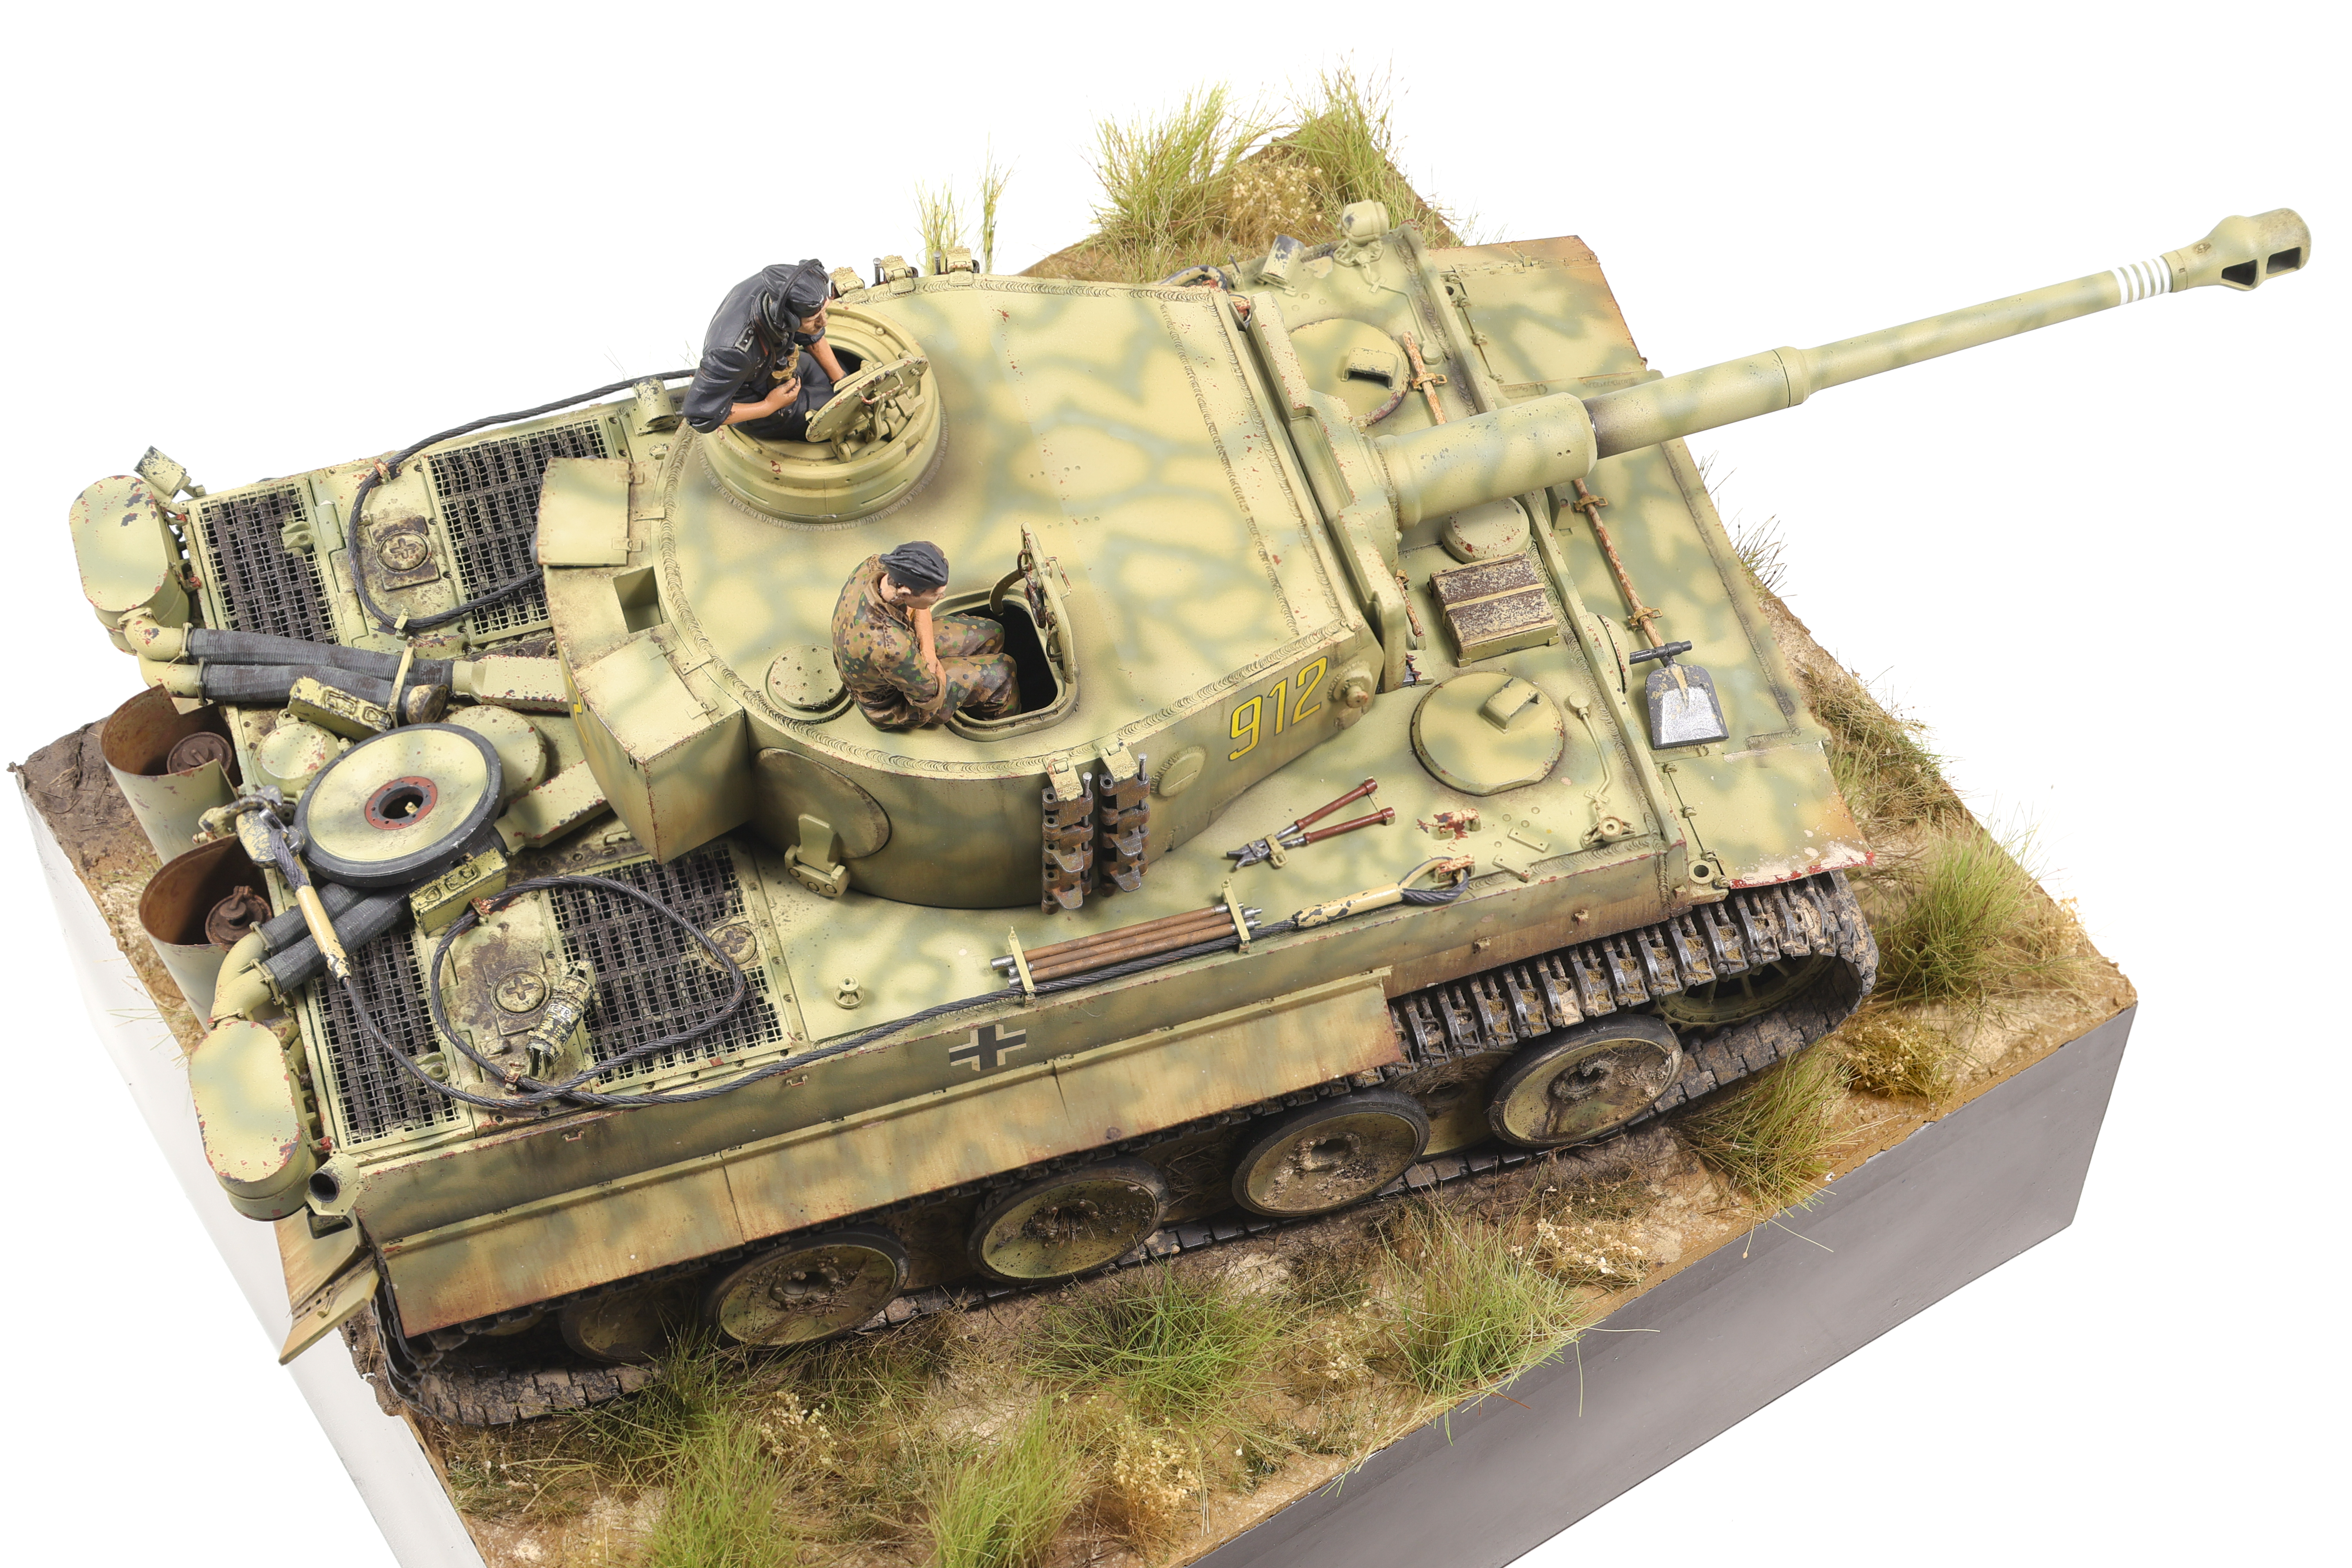
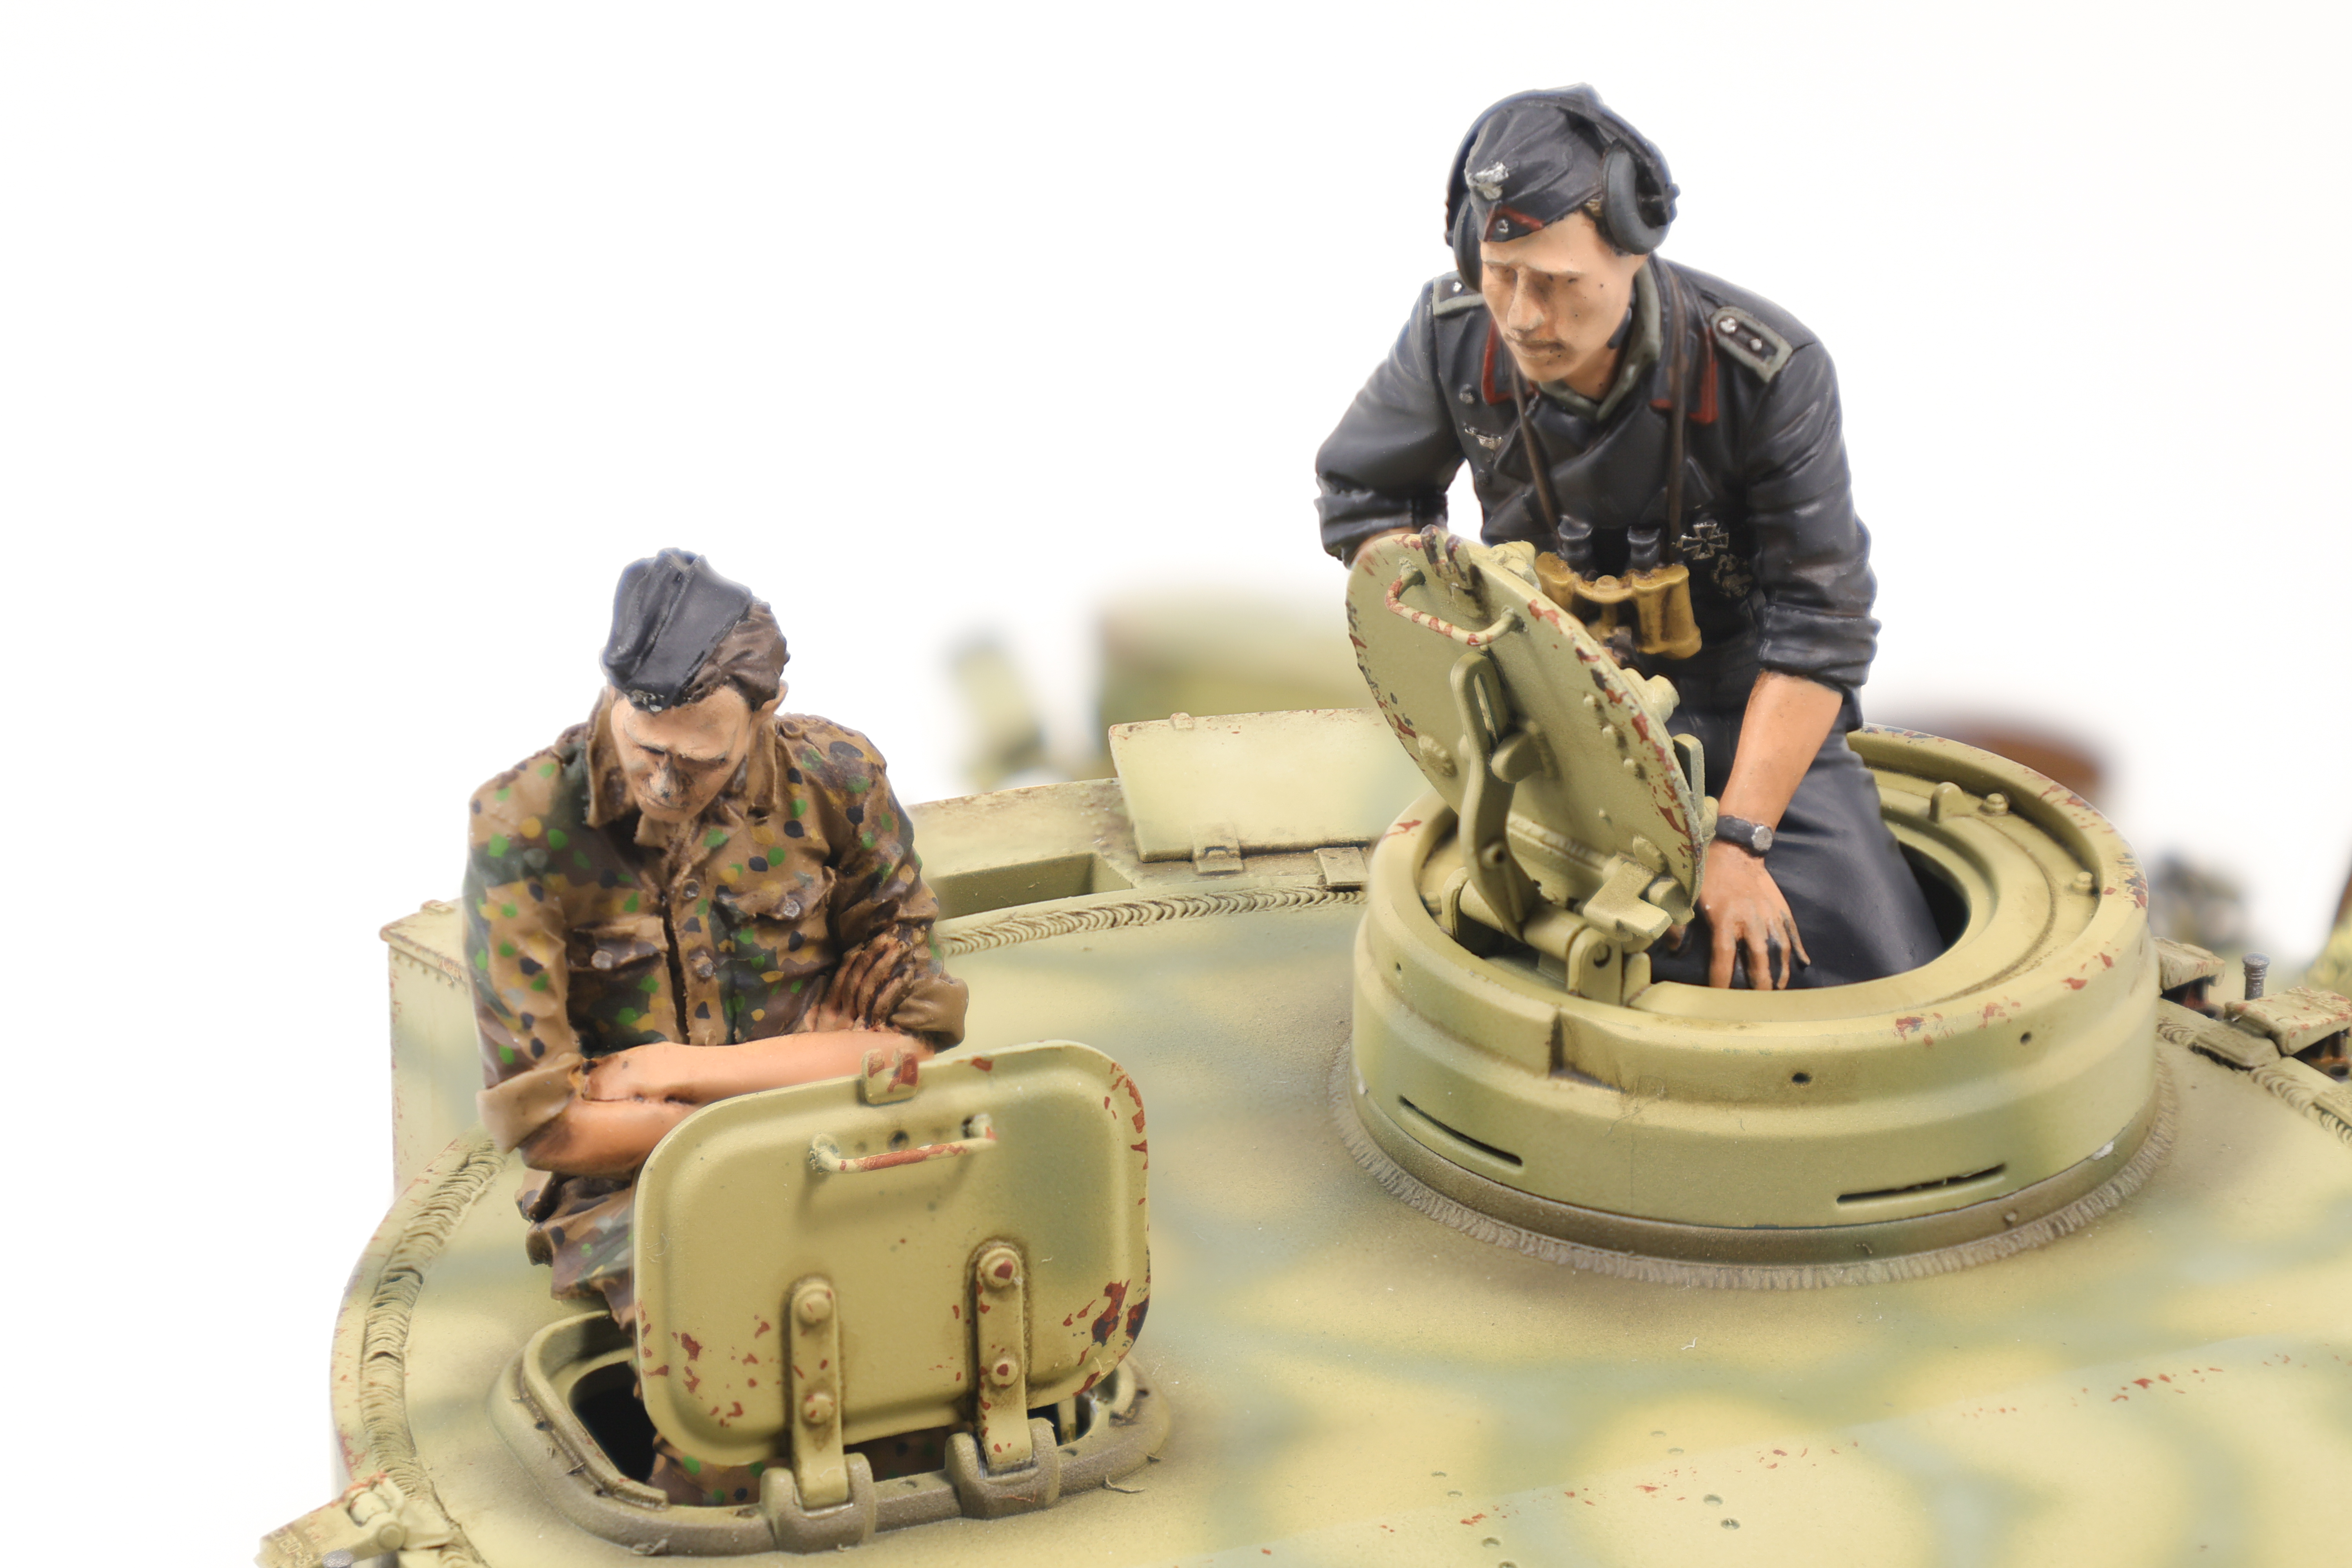
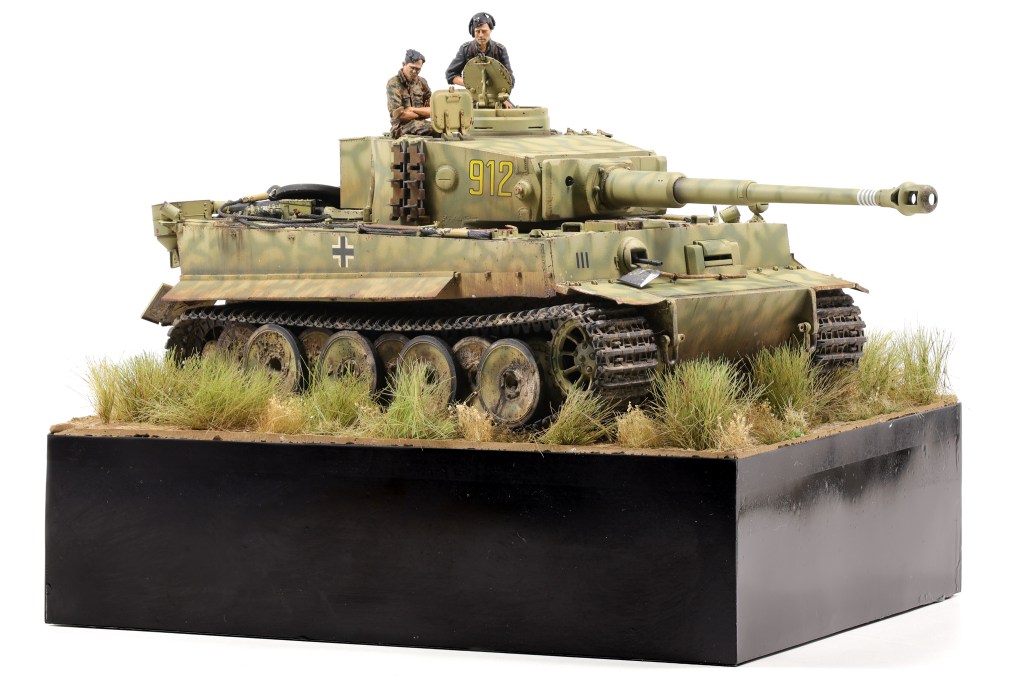
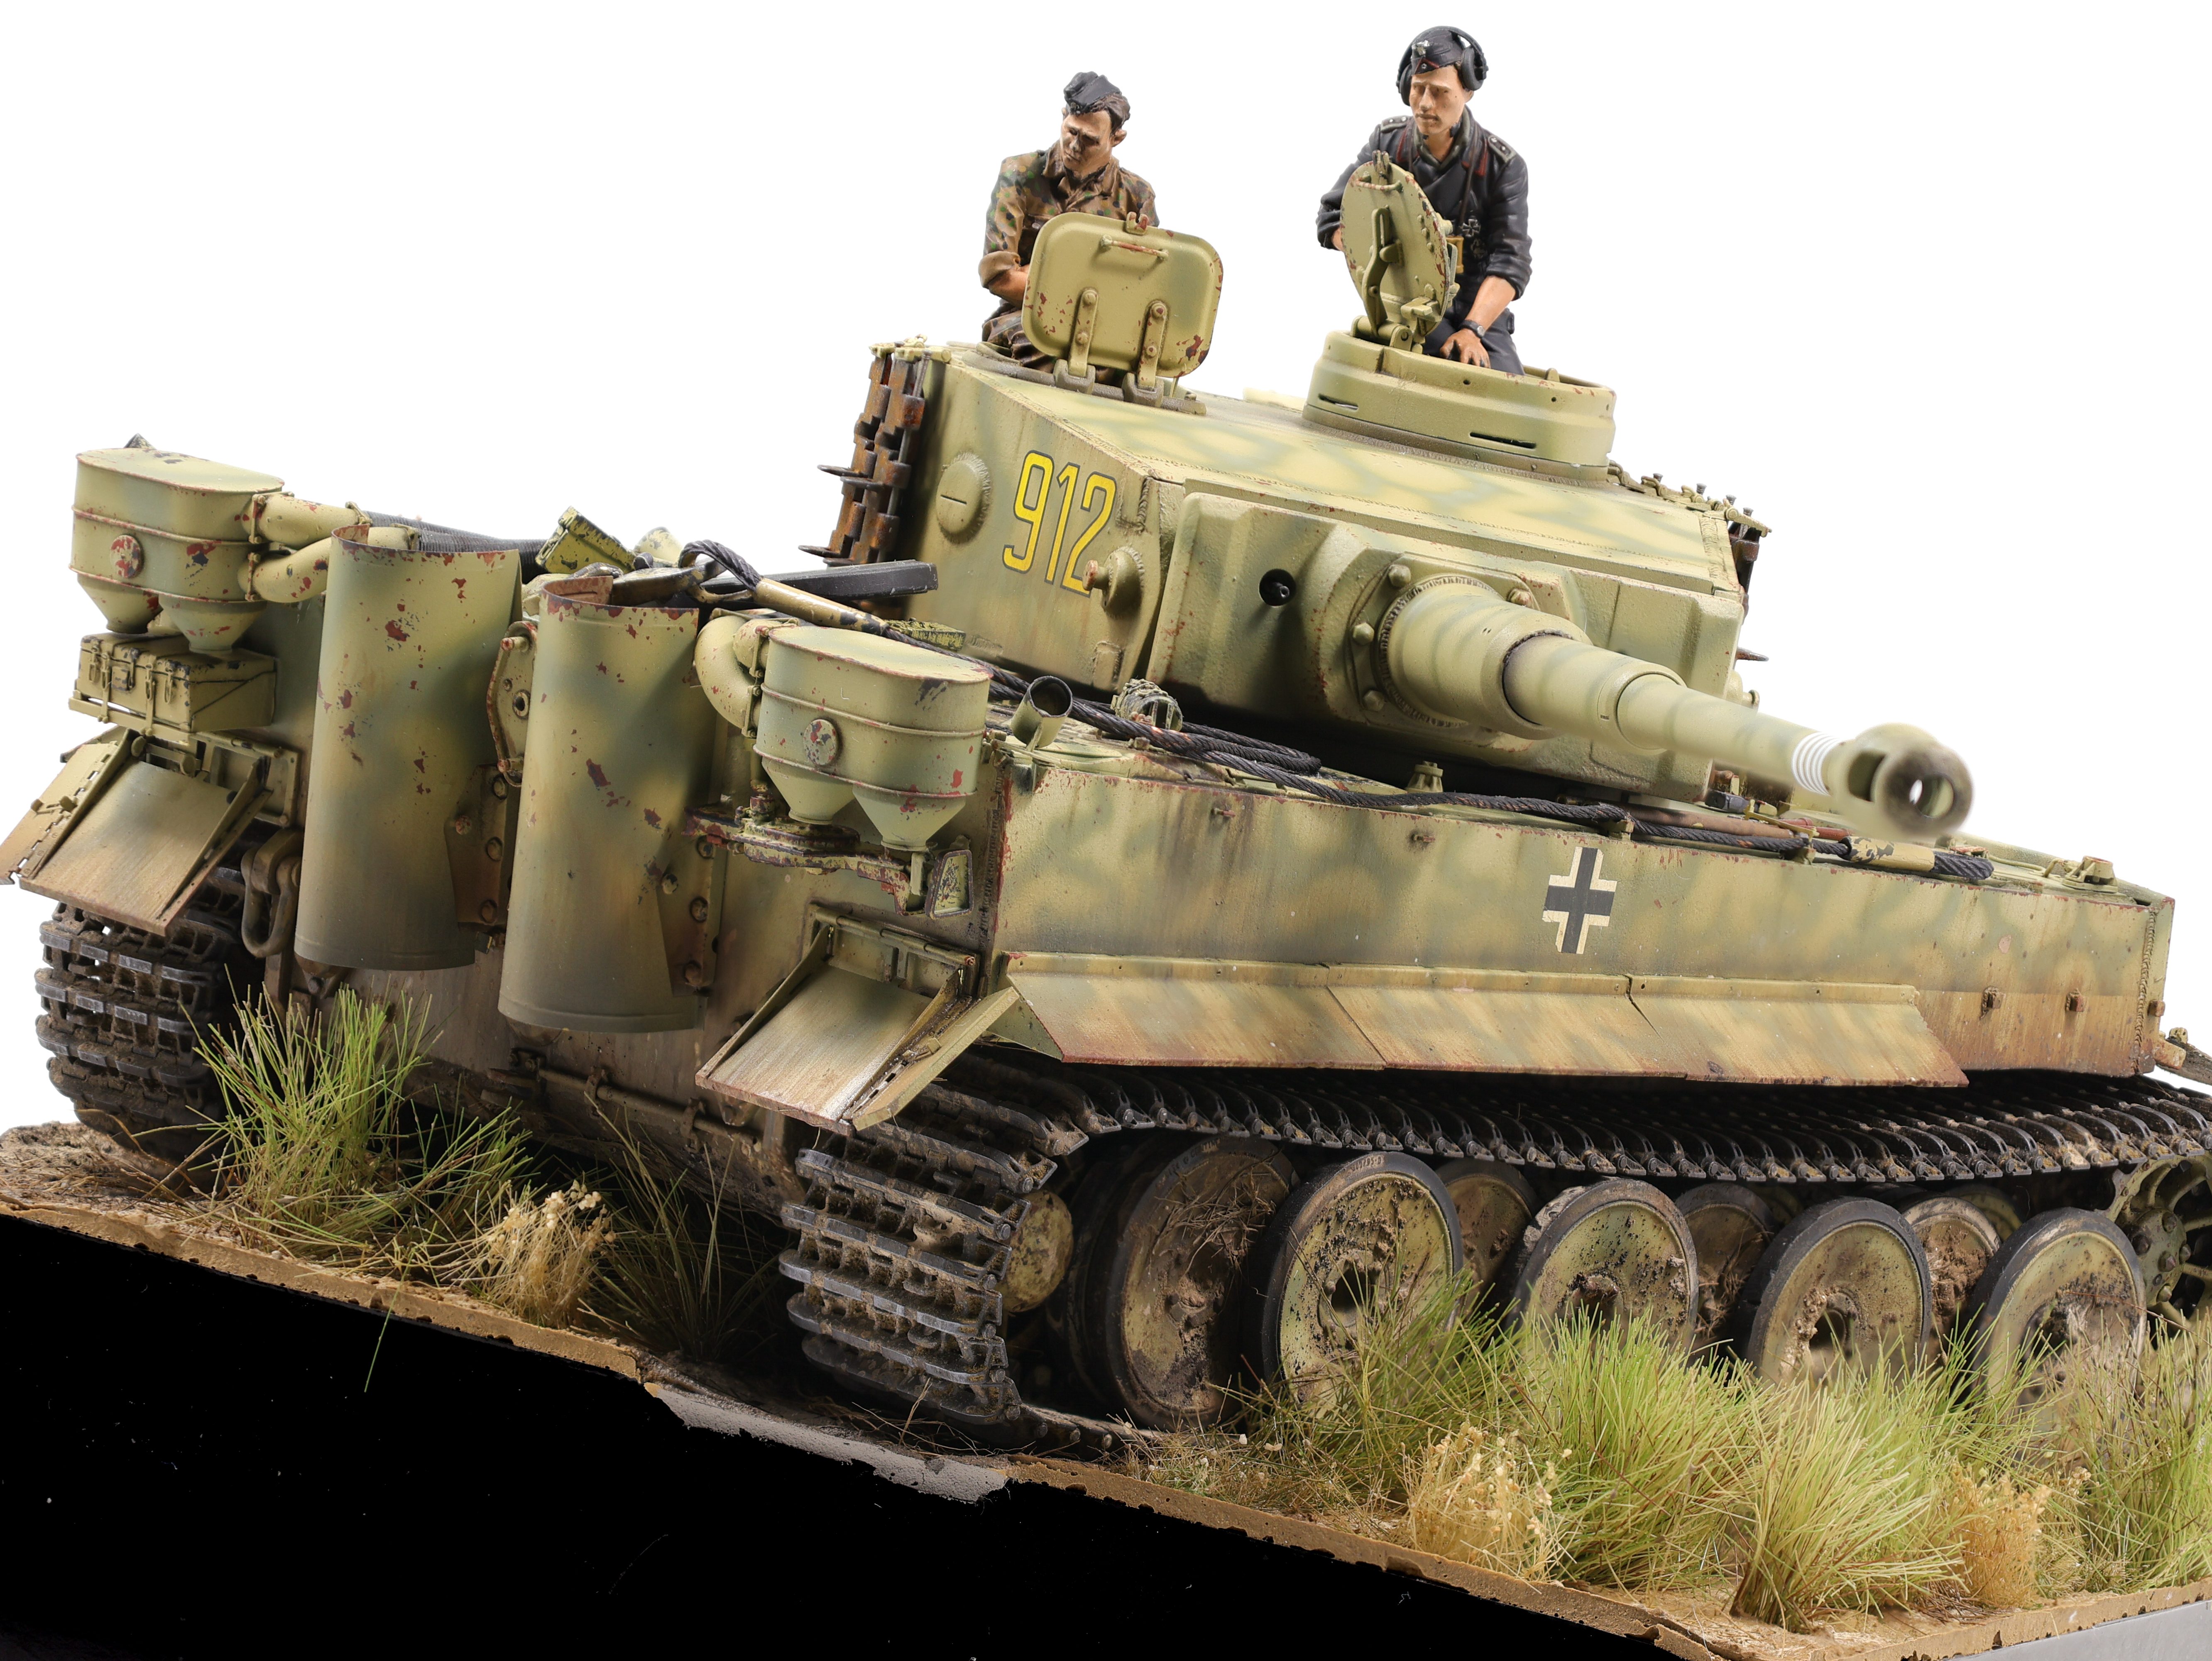
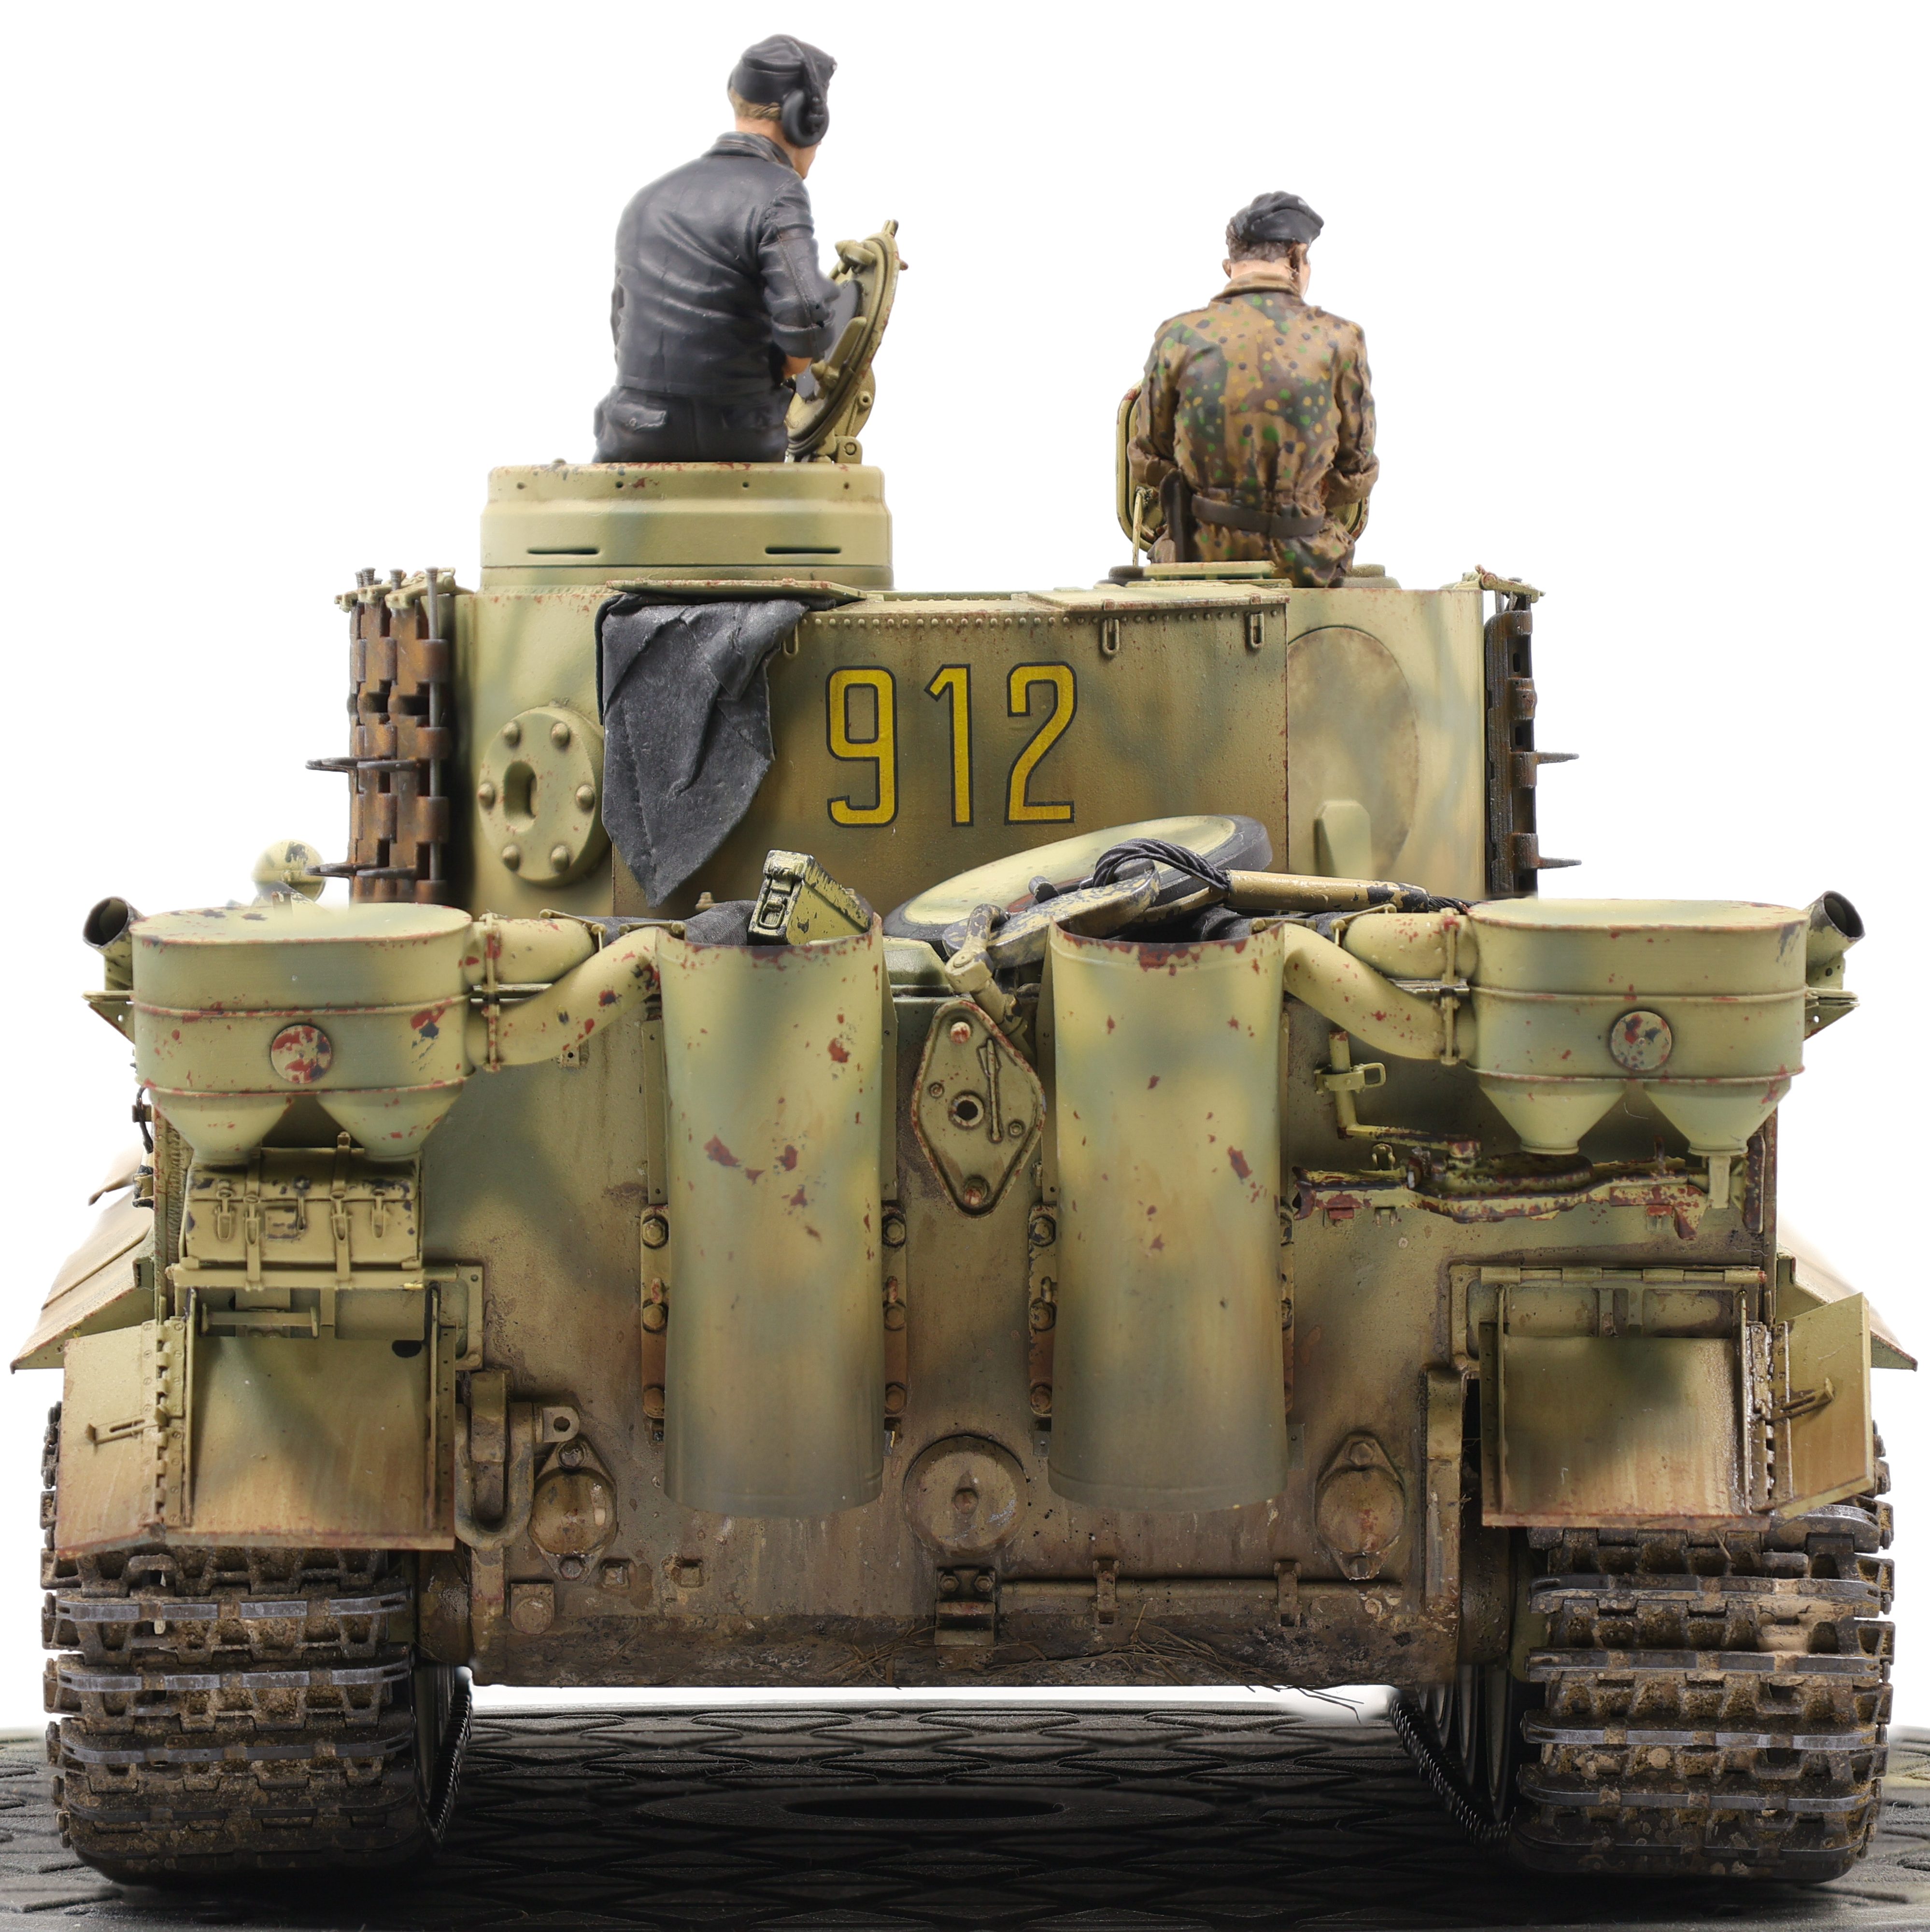
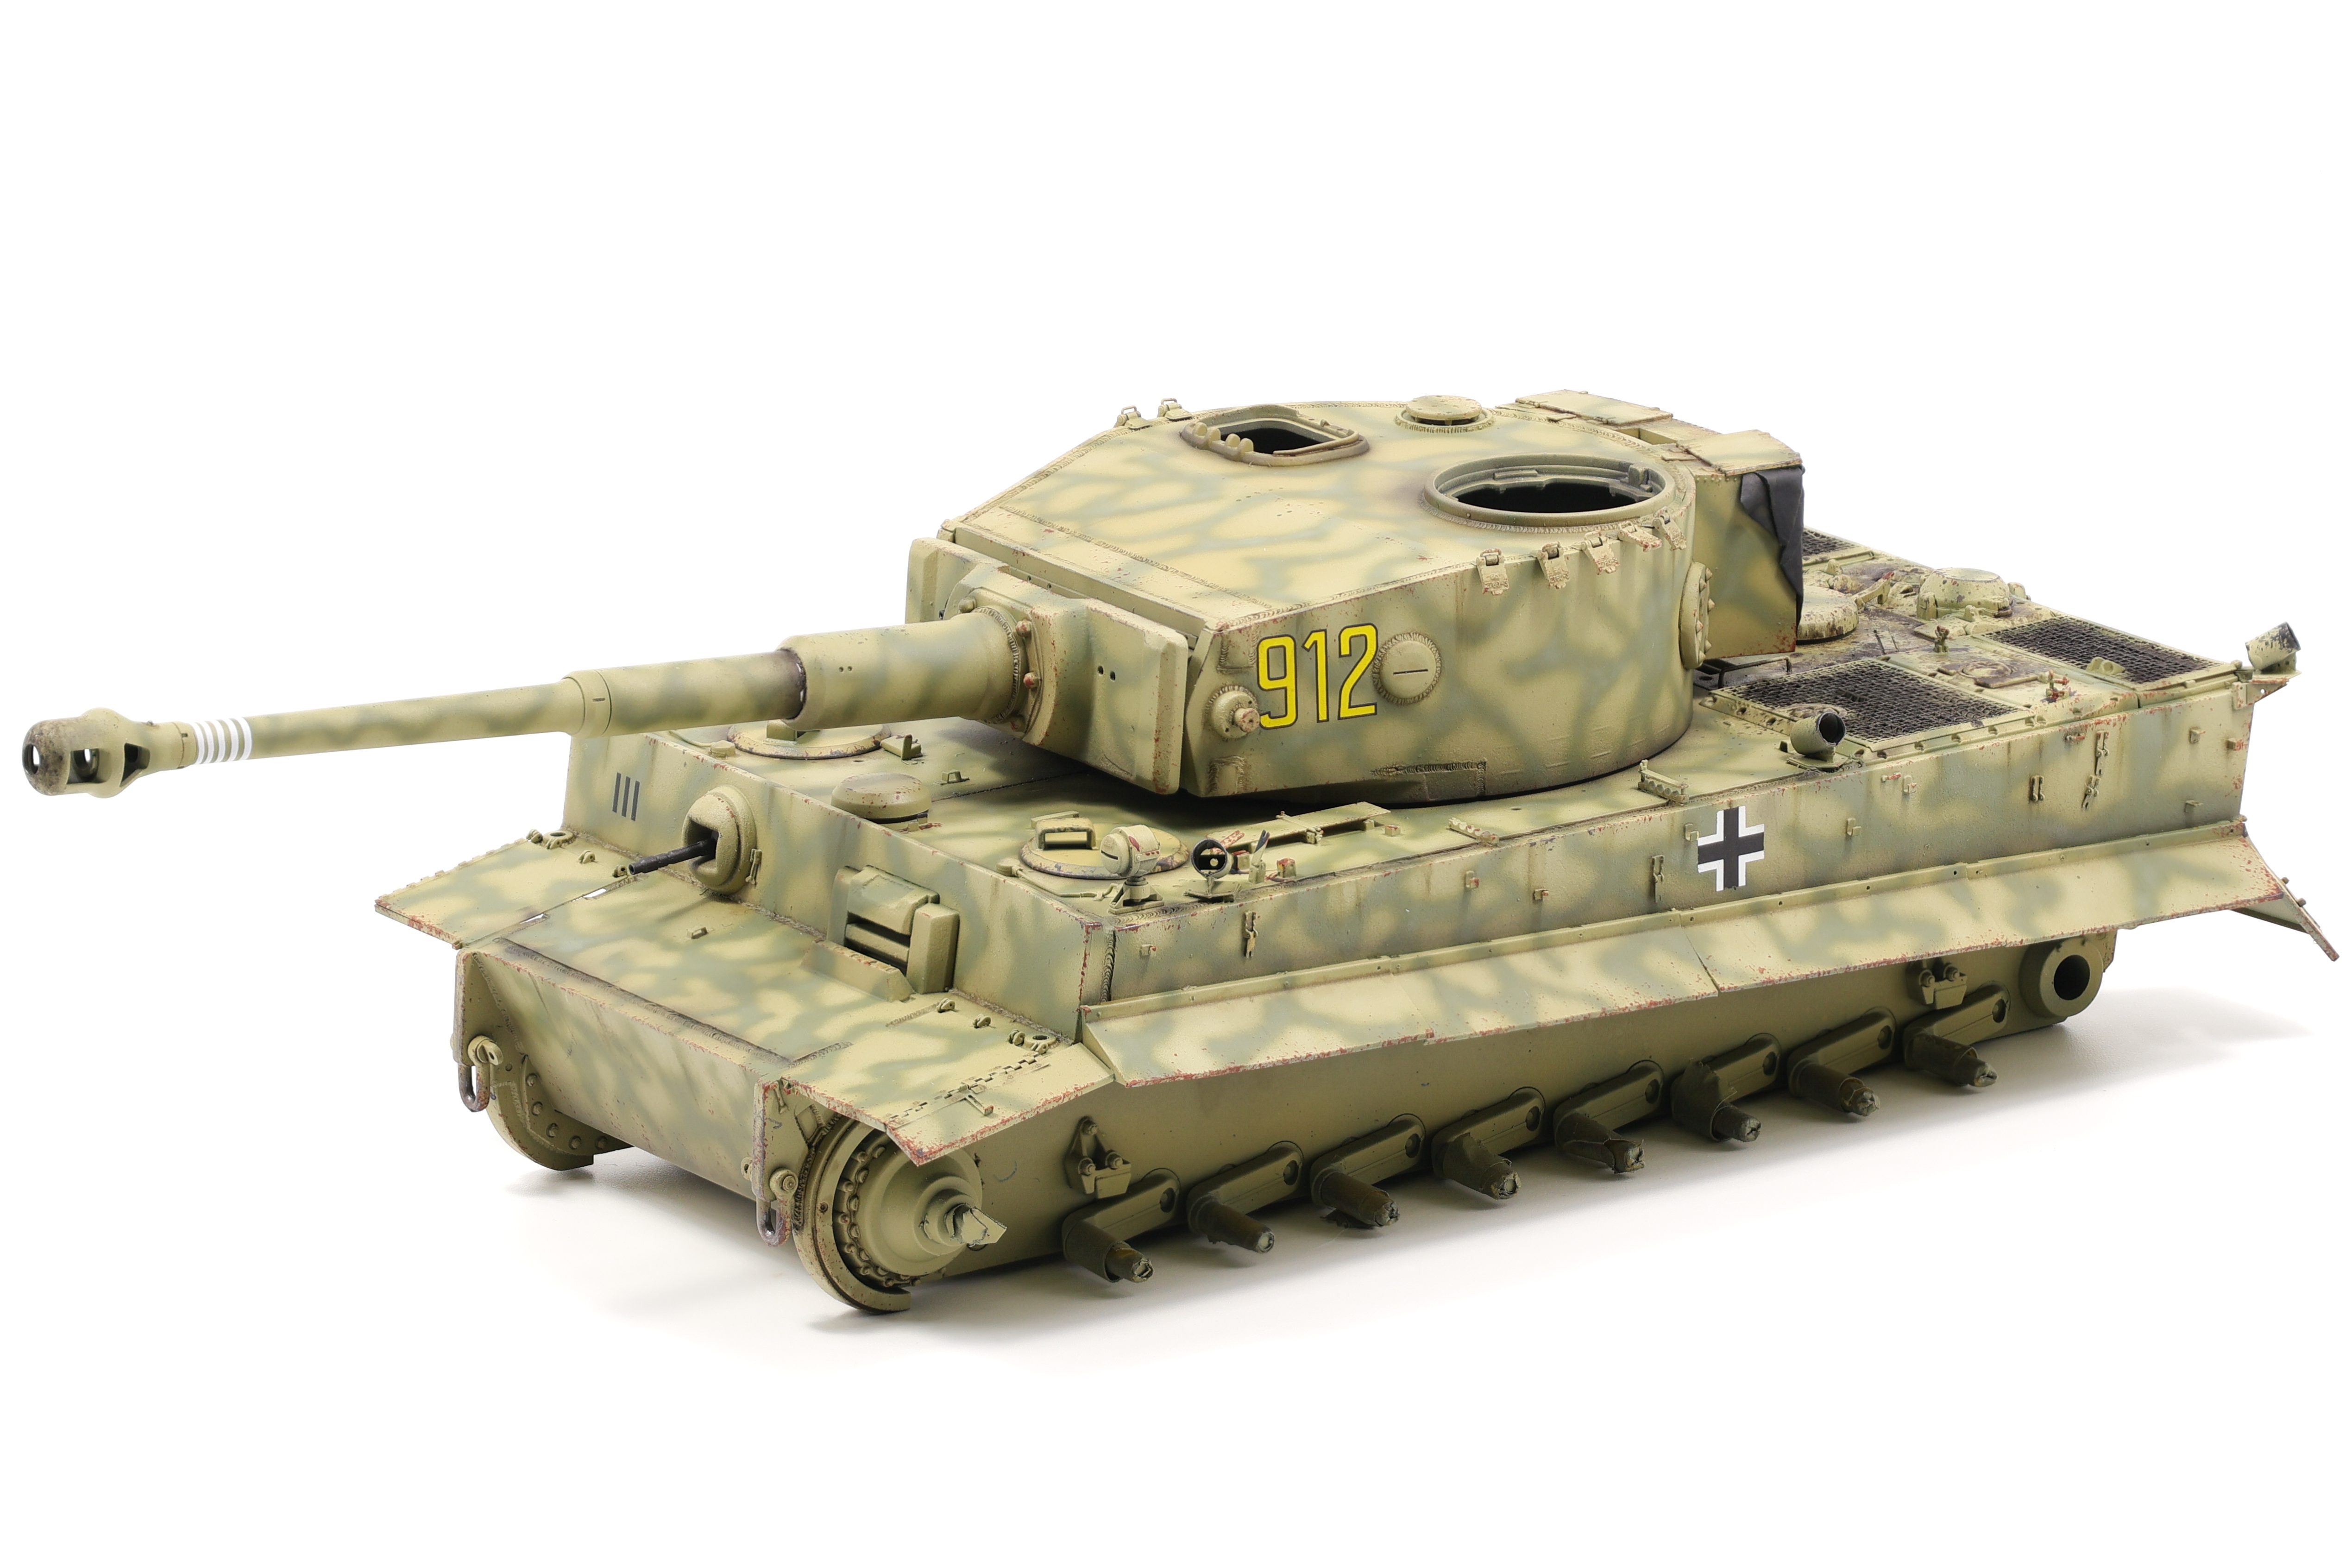
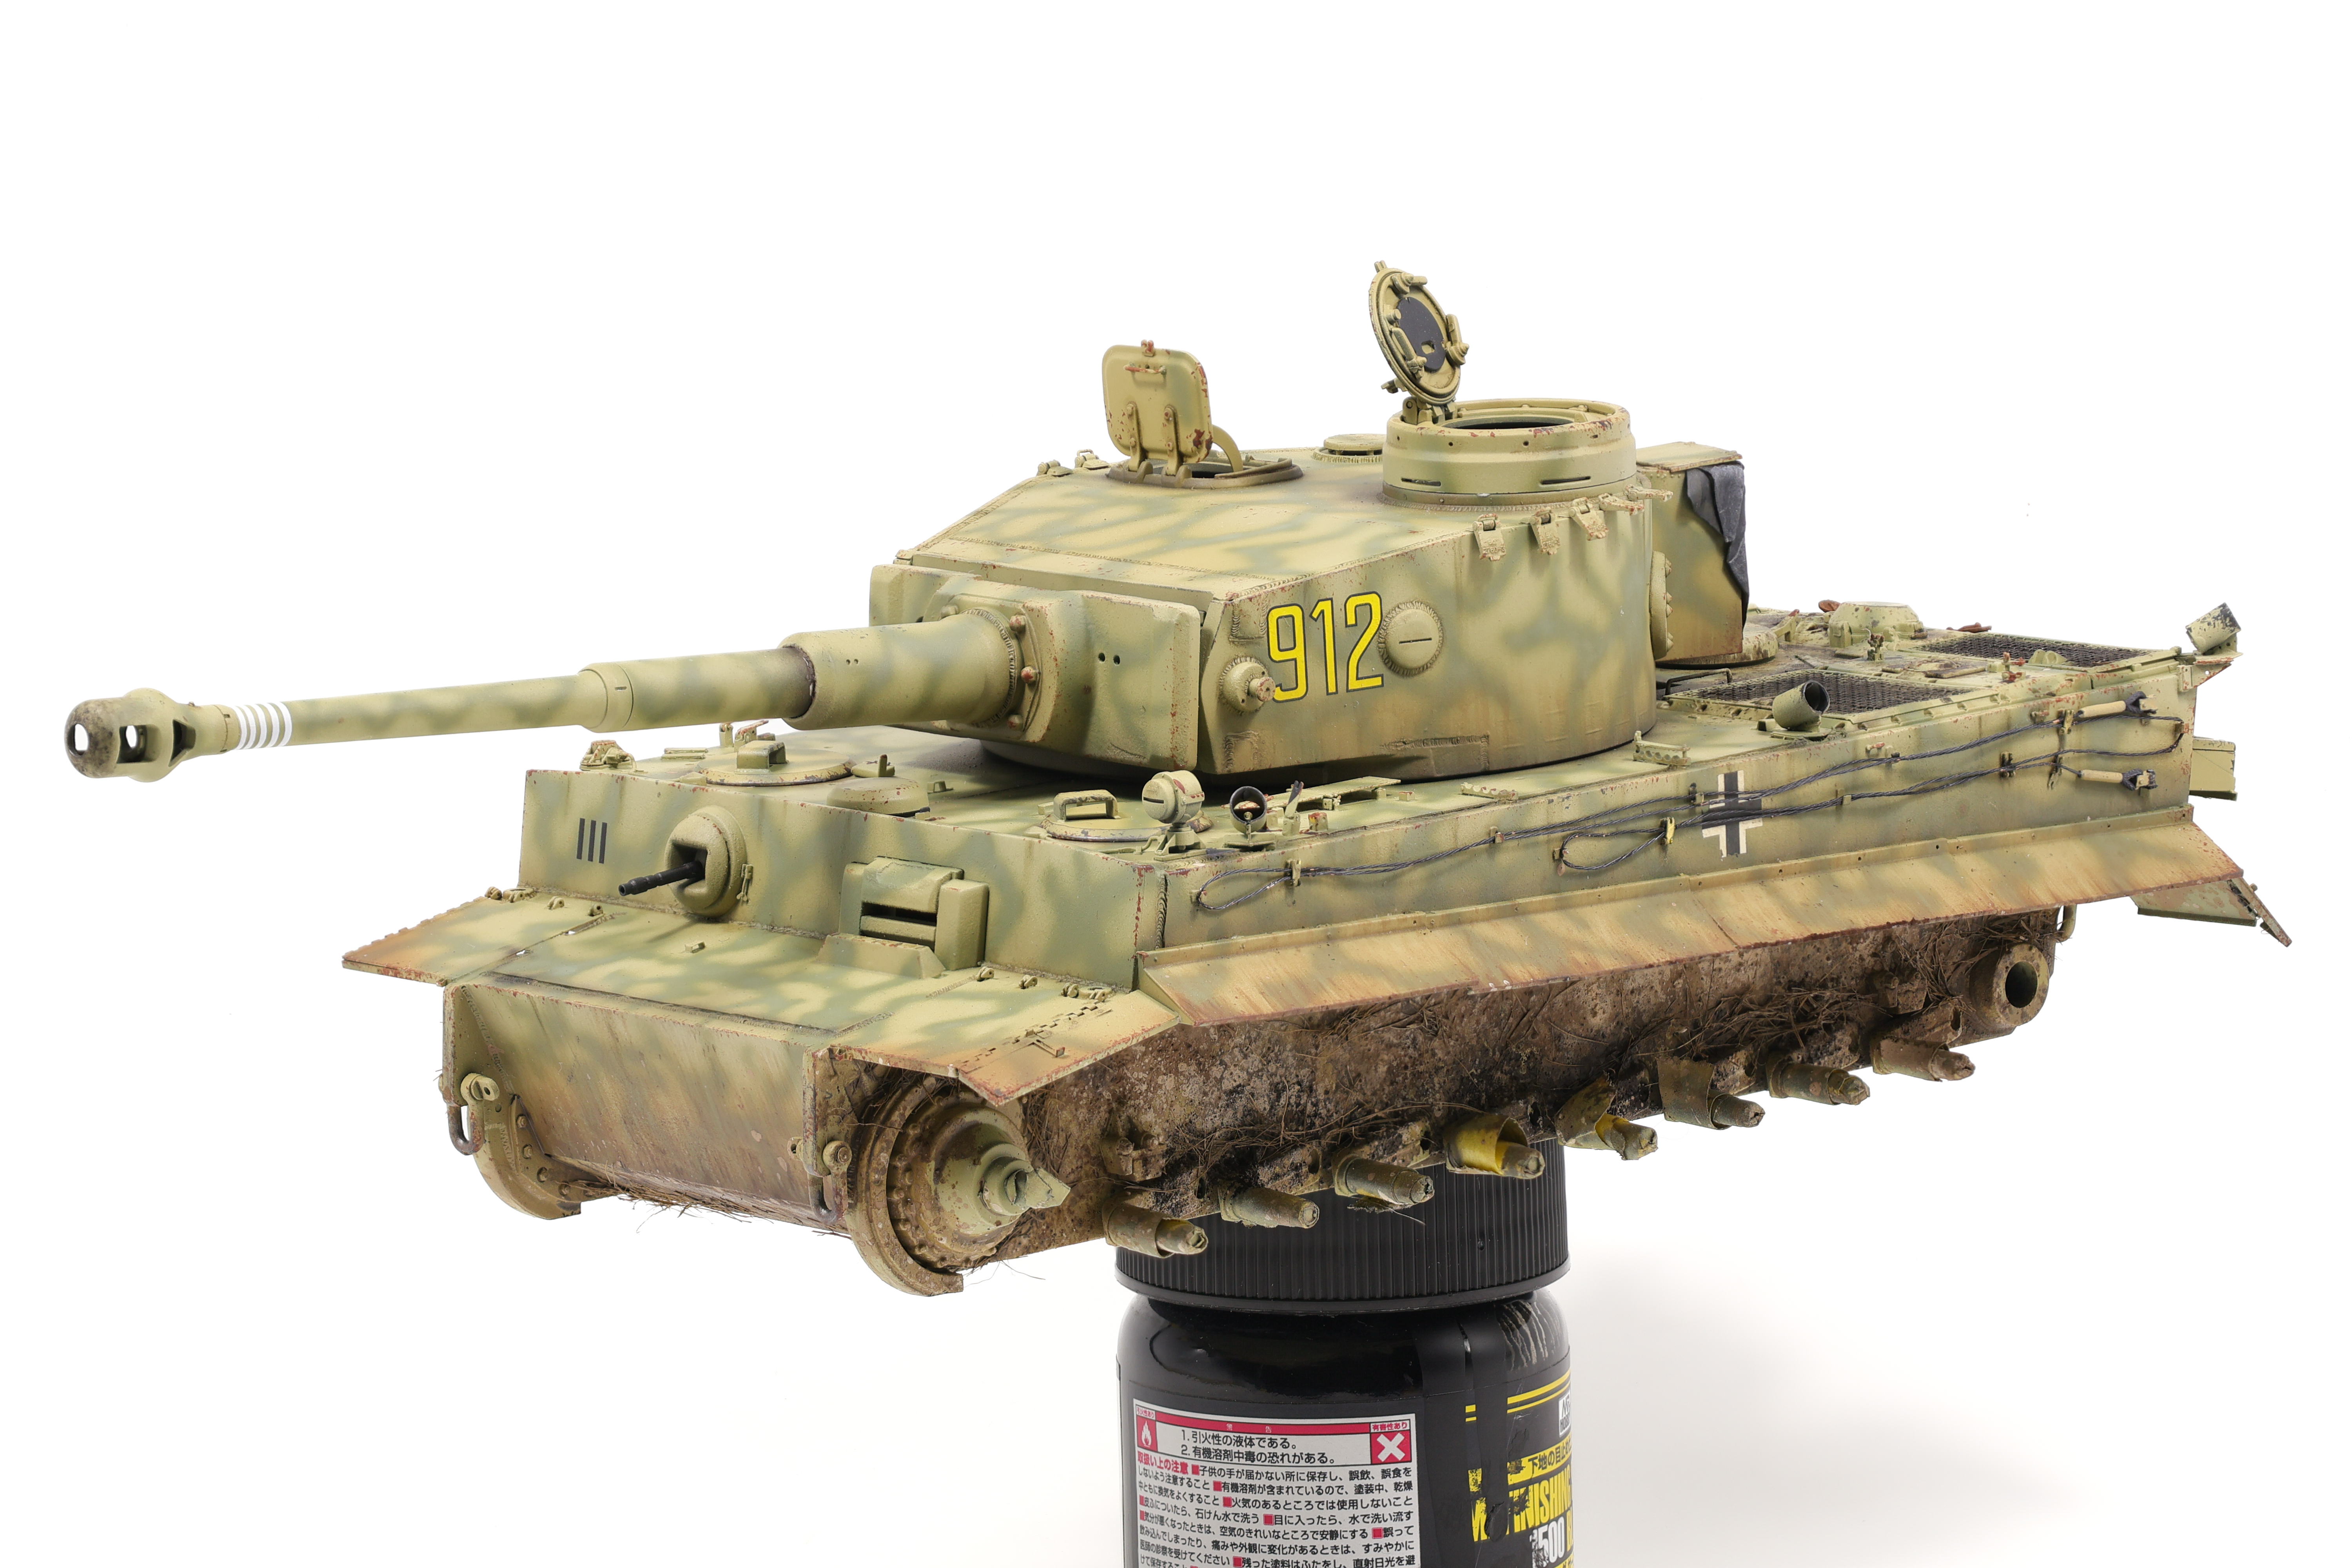
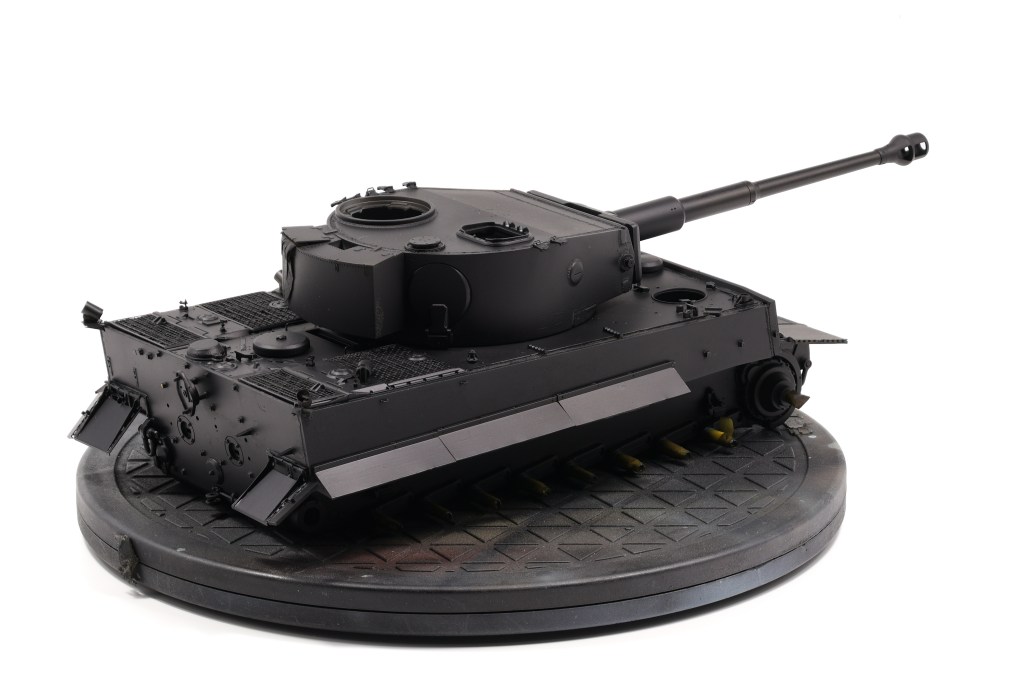
I recently completed my Tiger 1 and what a project it has been! I started this build in late May and it’s probably been my longest continuous build I’ve completed. After completing the weathering process (link below) I got to work on the final touches, namely building the figures and base.
For the base, I knew from the start that I wanted to convey that this vehicle was set on the Kursk battlefield. To do so, I picked a grassy setting, with the Tiger plowing through a field.
In the end, I think I ended up with a more “marshy” look than a dusty field but I’m still quite happy with the result here. To build the base, I stacked two insulation foam sheets on top of one another then glued styrene sheets on each of the four sides. I then painted each side in a gloss black finish before moving on to the groundwork. For the terrain, I used AK acrylic ground texturing paste. I’ve used this stuff for a few projects now and I’ve been able to get the hang of it and understand its properties better. For the undistrubed ground I settled on a rough texture paste with brown paint added. Conversely, I used a smoother paste for the areas in which the tank would sit and where the treads had upturned the ground. I did this because the rough paste would have a lot of bumps and ridges when dried and as such the tank would look like it would be floating. By using the smooth texture the tank settles down a lot more.
While the terrain paste was drying, I would then stick small grass tuffs into it which was an easy way of getting them attached to the terrain. I made sure to use different types of grass to create variation and ensure that there wasn’t too much uniformity in the ground. After the terrain had dried, I then airbrushed some brown shades onto the ground to hep further create some colour variation in the dirt. The terrain paste dries in a very uniform, unrealistic colour and it took some work to ensure it looked natural. After this was done, I then speckled different pigment shades onto the ground to create even further surface detail. I made sure to use pigments that I had used on the vehicle so that the colours would be consistent.
The Figures:
I then moved on to the figures and while I definitely feel that I need improvement in this area, I’m still fairly happy with how they turned out. With the addition of the figures, all that was left were some final paint touchups before moving everything into the Photo Booth.
Final Thoughts:
To summarize my thoughts on this project: What a build! This has undoubtedly been my most involved project to date and I couldn’t be happier with how it turned out. I knew going in that I wanted to spend the time to get this project right and I think that I’ve done that. Still, there are always things that I might have done differently and I’m looking forward to applying the lessons learned on this build on my future projects. Enjoy the photos below!
The weathering stage of the project was the perfect sweet spot of being challenging but not frustrating. I really pushed myself to use prior techniques I had only experimented with even further and make them centrepieces of how the model was weathered. For the Tiger project I wanted a relatively clean vehicle that had a lot of environmental effects added to it, basically, a lot of mud and oil spills but not a lot of chipping and paint wear.
As I complete more and more armor models I’ve realized that the weathering process starts as soon as paint is laid and that five light effects look so much better than two heavy handed ones. To quickly summarize the effects I used on this project here they are below:
Base coat and camo colour marbling
Postshading (highlights and shadows)
Sponge chipping effects
Dark brown enamel wash
Oil and fuel spills
Airbrushed enamel dirt effects (mud shade and dust shade)
Brushed enamel dirt effects (light, mid, and dark tones)
Pigment application via dusting
Pigment application via speckling
Grass application via enamel dirt effect + thinner mixture
Light dust pigment speckling for blending)
Oil staining in selected areas over top mud and dirt
Ok that was a lot but now it’s time to go into each effect and in my mind how each effect builds on top of the others.
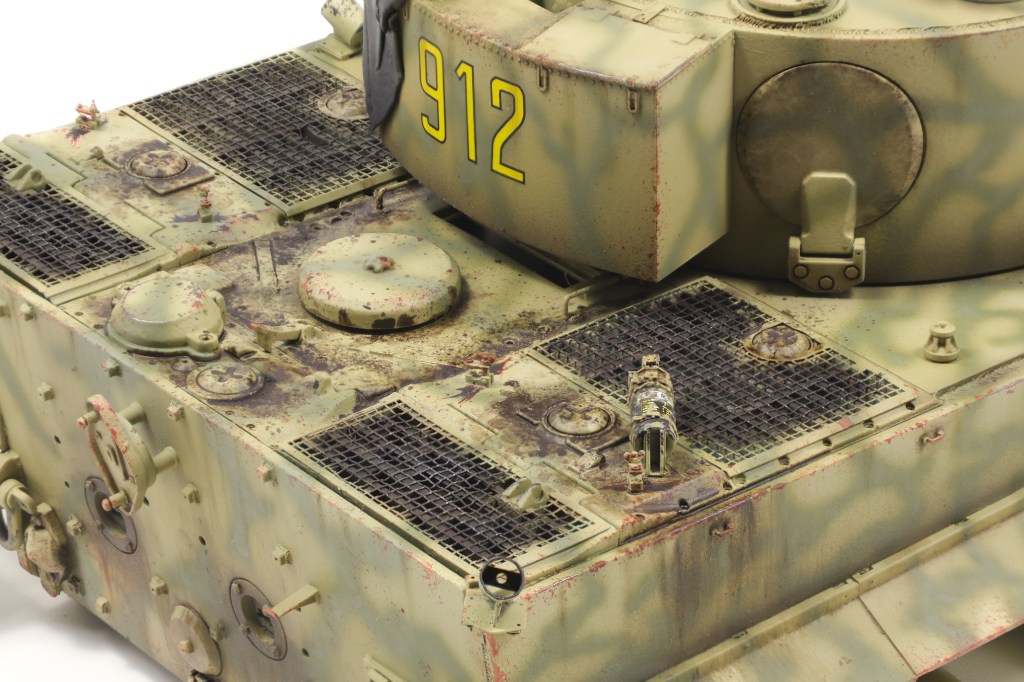
After sealing the model in a Satin varnish, the first effect I applied was a dark brown enamel wash from Ammo designed for dark yellow vehicles (A.MIG-1000). This really helped to bring out the small details that I had spend time creating, specifically the custom weld details.
Next, I turned my focus to the engine deck with the intention of adding significant oil, fuel and grime deposits. I have three products I use religiously for effects like these, all of which are from MIG productions. “Oil and Grease stain mixture”, Engine grime effect” and “Fuel stains” are all fantastic products and I use them on almost every AFV I build. I used several methods to apply them to the model, including as a diluted wash colour, stippled onto the surface, and as a streaking effect as well.
Enamel dusting is rapidly becoming one of my favourite effects and I utilized it on this build as well. The technique involves airbrushing highly diluted enamels onto the model before using a brush dampened with enamel thinner to create downward streaks. This effect is great at replicating dirt and dust that has settled on the vehicle naturally but has begun to wash away due to rain and other activity on the vehicle. I used two shades on this project, XF-10 Flat Brown and XF-52 Flat Earth as my dirt and dust shade respectively. XF-10 is a very dark, muddy colour and as such I limited it to the lower, shaded areas of the vehicle. XF-52 is a lot lighter and does a better job at depicting kicked up dust that falls onto the vehicle as it moves. This colour is also good for fading markings. On the Tiger, you can compare the colour of the balkenkreuz to see how this effect is able to depict general dust and dirt buildup on the vehicle.
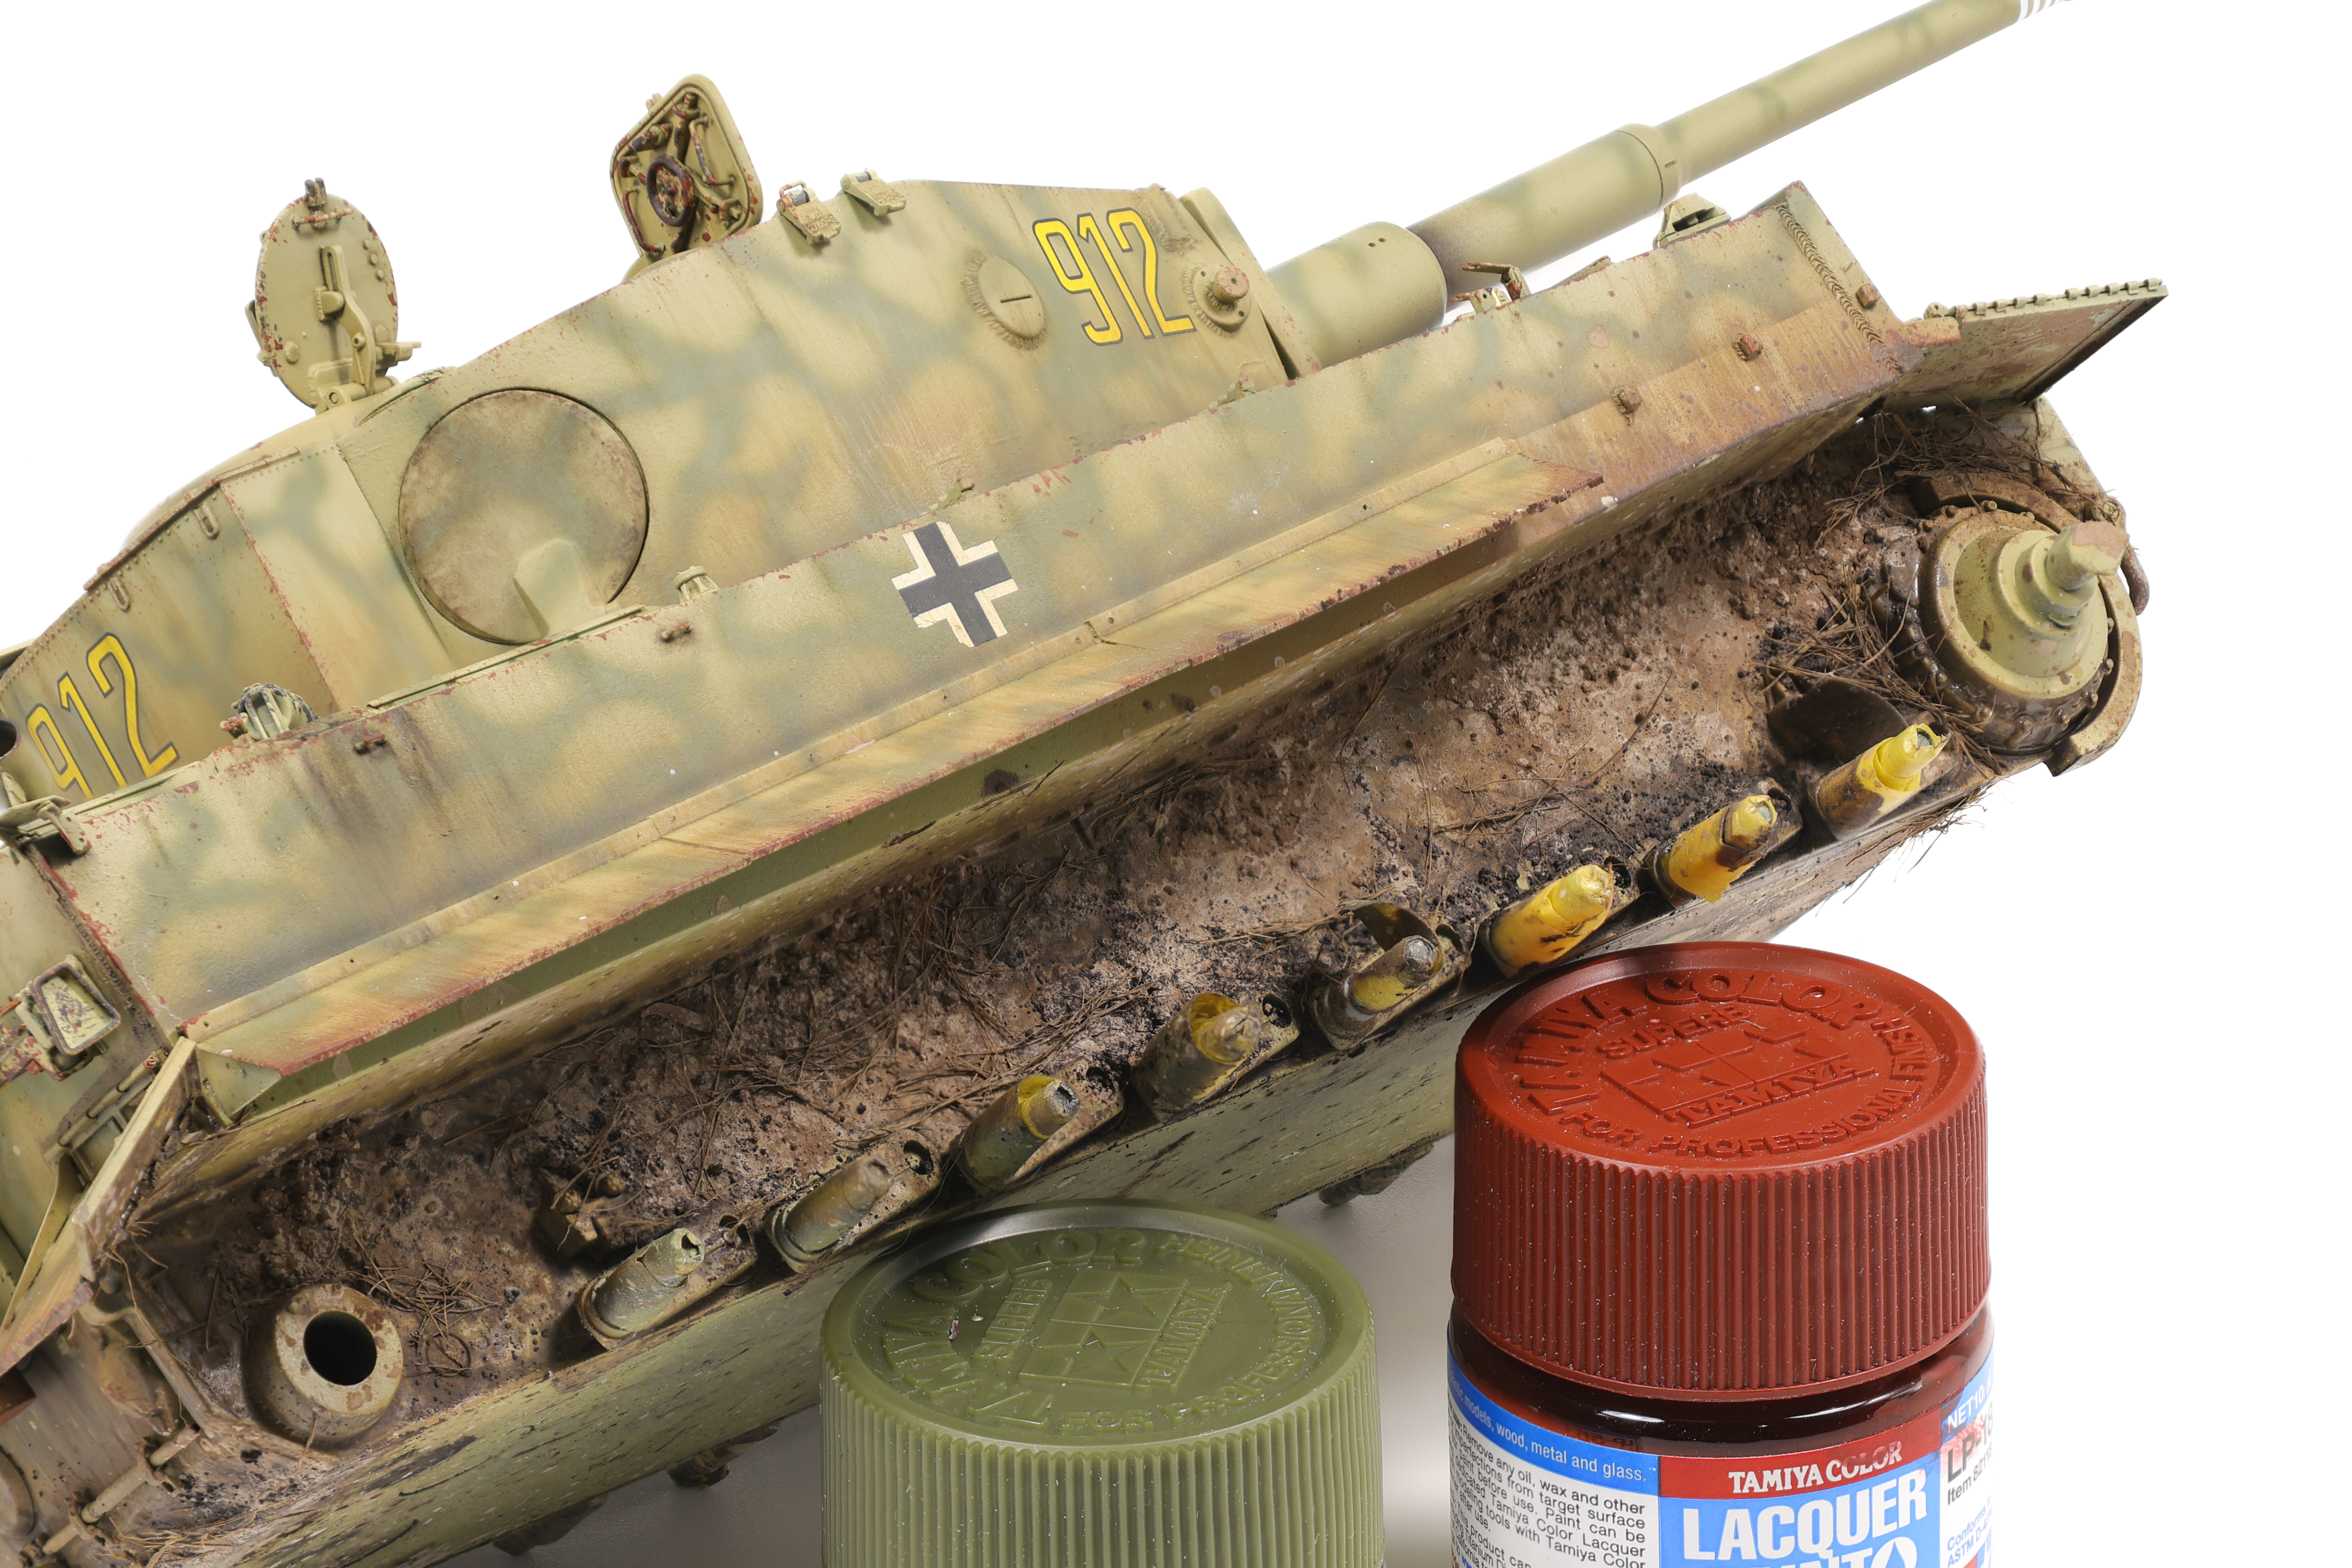
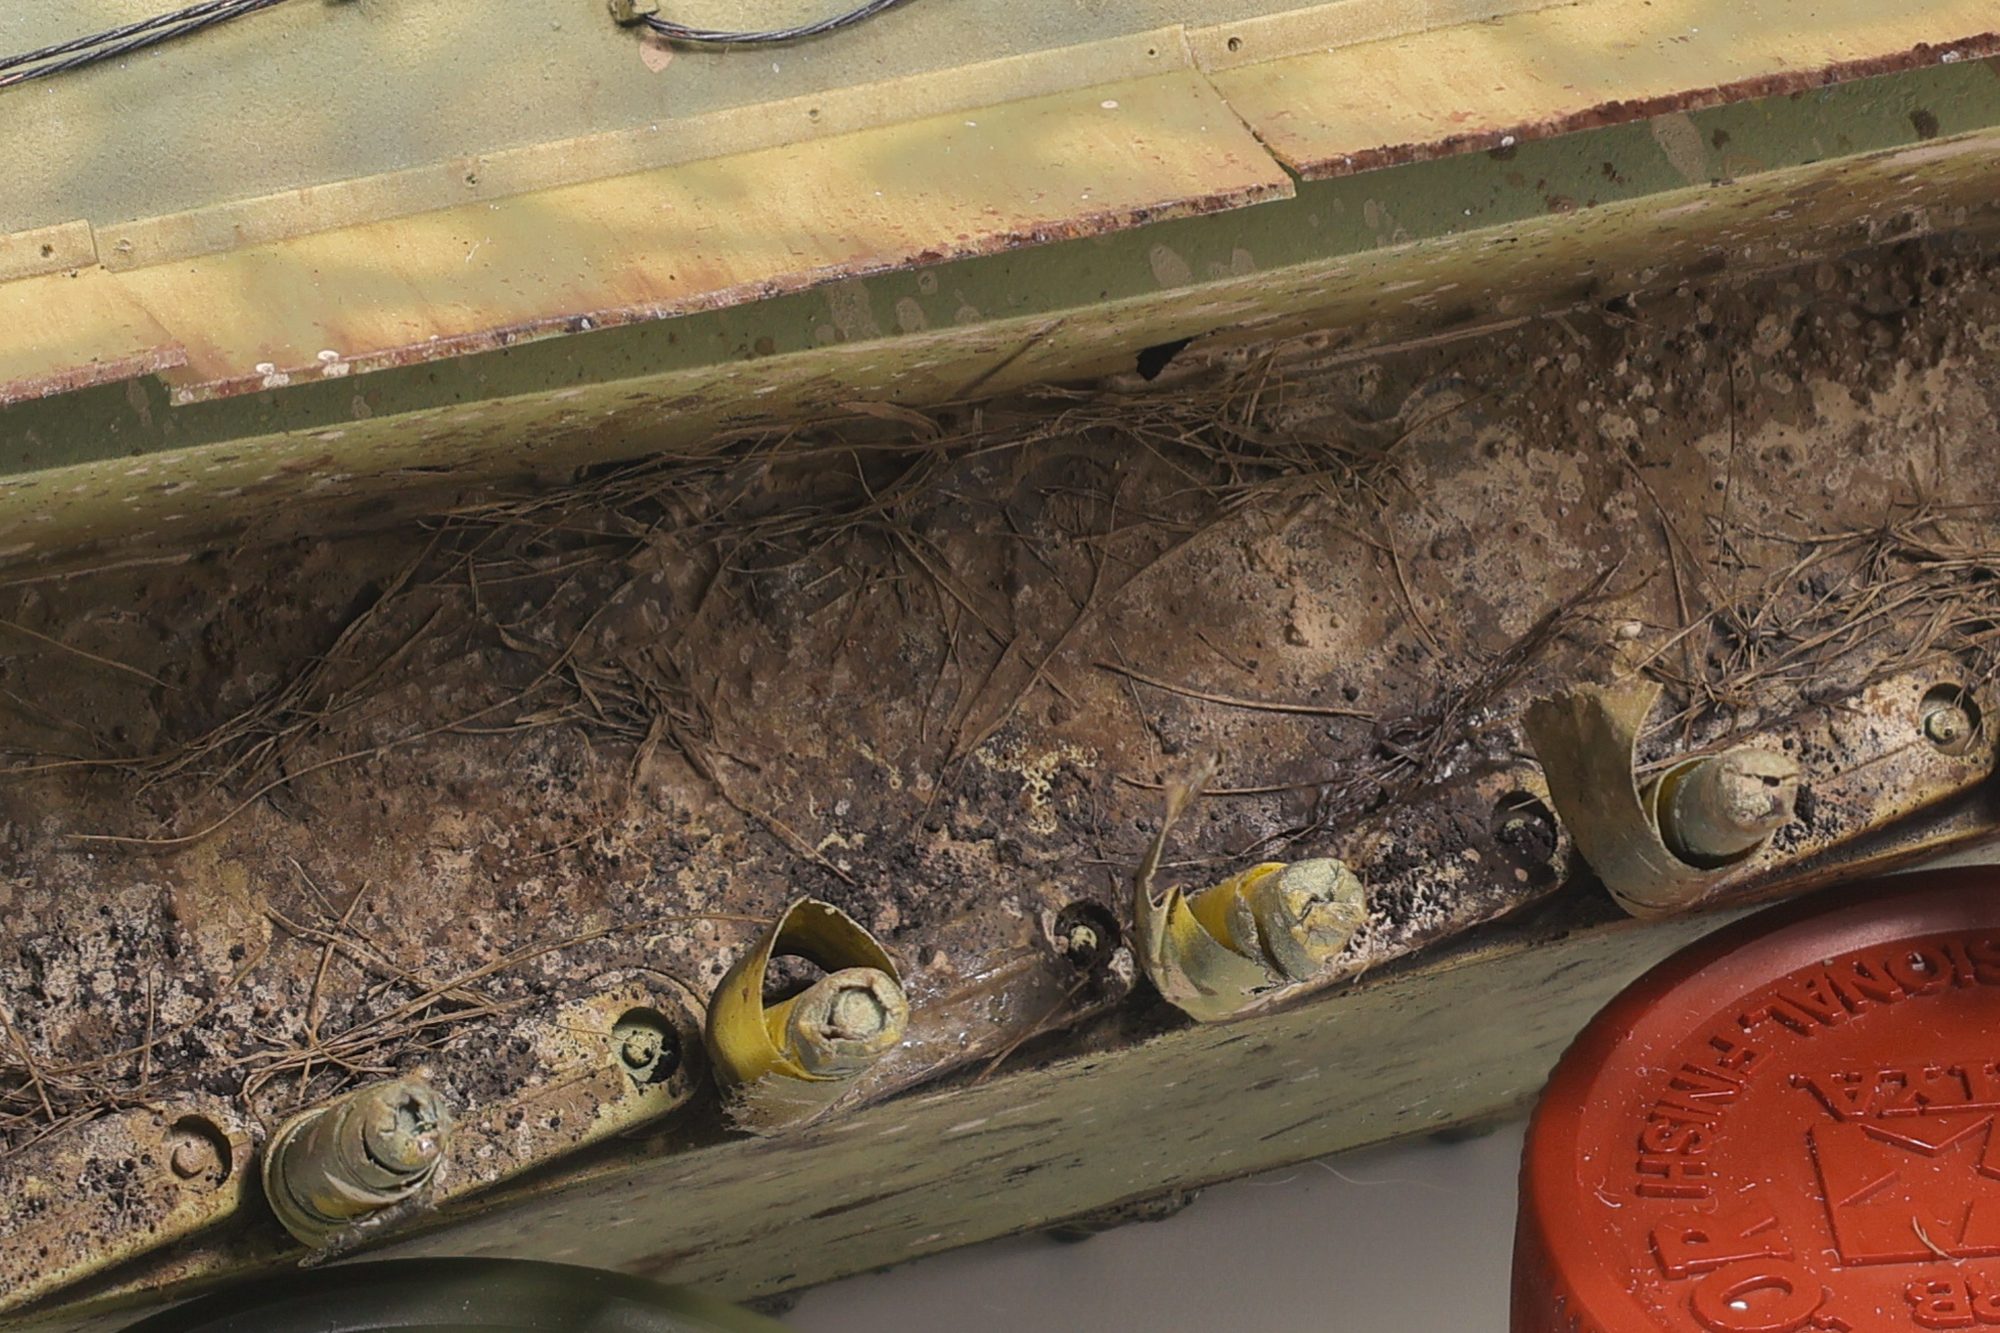
Next, I began working on the more involved dirt and mud application on the model. To start I applied some enamel nature effects from Ammo, namely “Kursk Soil ” (A.Mig-1400), “Loose Ground” (A.Mig-1752), along with “Fresh Mud” (A.Mig-1402) and “Damp Earth” (A.Mig-1406) to a lesser extent. These products were roughly brushed onto the lower areas of the model and allowed to somewhat mix with each other in limited areas. 5-10 minutes after application I then began pigment application over top the still wet enamels. I chose four shades of pigments to use. From Abteilung 502 I used “Light European Earth” (ABTP415), “Rubbel Dust” (ABTP234), and “Russian Earth” (ABTP034) along with Mig Productions’ “Track Brown” (P414). To apply pigments to the model, I loaded them onto a wooden stir stick and gently tapped it to cause the pigments to fall onto the model in medium sized clumps. Because the enamel are still wet, this causes the pigments to stick to the model and stay in place. I repeat this process for the four shades, taking care to apply them in the correct area. I used the “Rubbel Dust” and “Russian” Earth” shades as my primary colours here with “Light European Earth” and “Track Brown” serving as highlight and shadow shades.
At this stage the pigments will be very loosely applied to the model and not stay in place for the remainder of the build. To solve this issue, I applied small amounts of enamel thinner to the dry pigments causing them to dampen. This has the effect of binding them to the model when they dry and makes them a lot more durable.
As a side note, you can get very creative with this technique. By varying the amount of thinner you add you can change the texture of the final dried pigment. By adding a lot of thinner, the pigment will almost completely liquify which will look as if liquid mud has splashed onto the vehicle. An alternative approach is to use as little thinner as possible, causing the pigments to dampen, but not liquify fully. This in turn creates an effect that looks like semi-solid clumps of mud and dirt has been flung onto the vehicle and dried in place.
Next, I created a pigment mixture consisting of pigments and pigment fixer in a dish. I loaded up a brush with this mixture and stippled it all over the surface This is done to recreate small pieces of mud and dirt that has been flung onto the vehicle and is more subtle than the previous pigment application. I applied a coat of the four shades listed earlier. This also has the effect of really fixing all the pigments in place.
After letting them model dry out completely for a few days (It takes a long time for all the pigments to dry completely!) I then decided to add some grass effects to the lower surfaces of the model. To do this I whipped up a new mixture of “Loose Ground” along with AK “dried sea grass” (AK8045). I am a huge fan of this grass product, it looks incredibly realistic and there’s a ton of it so it lasts a long time. To apply it to the model, I throughly mixed the grass with the enamel product before grabbing clumps of it and applying to the model with tweezers. Because the grass has been soaked in the enamel effect, it sticks to the model and will dry in place.
The last effect I applied to the model was the addition of some oil stains over top of the dirt and grass effects. To do this I added some of the “Oil and grease stain mixture” mentioned earlier to recessed areas where I wanted oil leaks to show through. I kept this effect focused on the road wheels to depict seals that had been worn down, causing an oil leak. Using a very fine brush, I dragged out small amounts of the stain mixture to the rim.
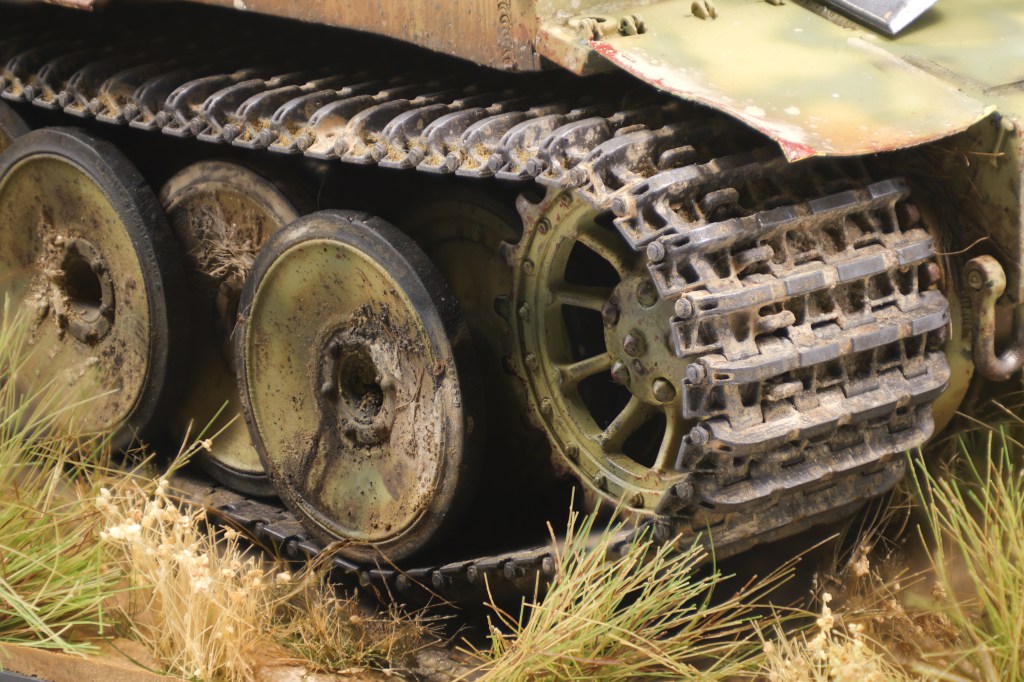
After completing the main work on the hull, I then moved on to painting and weathering the tracks. I have my workflow for tank track pretty nailed down by this point and this build was no exception. To start, I painted the track with Mr. Metal Color MC212 “Iron”. this is a fantastic base colour for tracks I’ve found. It finishes as a very flat dark grey, however after it’s buffed, it shines very nicely. After applying the base colour, I then added a very messy coat of Vallejo Sienna Claro pigment with a brush. I do this with no fixer or binder, and my goal is to get started working pigments into the track crevices.
Next, I then stippled various enamel earth effects and pigments (mixed with fixer) onto the tracks with no specific pattern. This creates an effect in which the tracks look live they’ve been run through lots of different types of dirt and mud and creates a nice overall weathered effect. I then took a paper towel and dragged it over the track cleats, removing the weathering effects from this area. This also polishes the underlying MC212, causing the paint to shine and creates a nice contrast with the dirty parts of the track. As a final effect, I drag a graphite stick over to of the cleats as well.
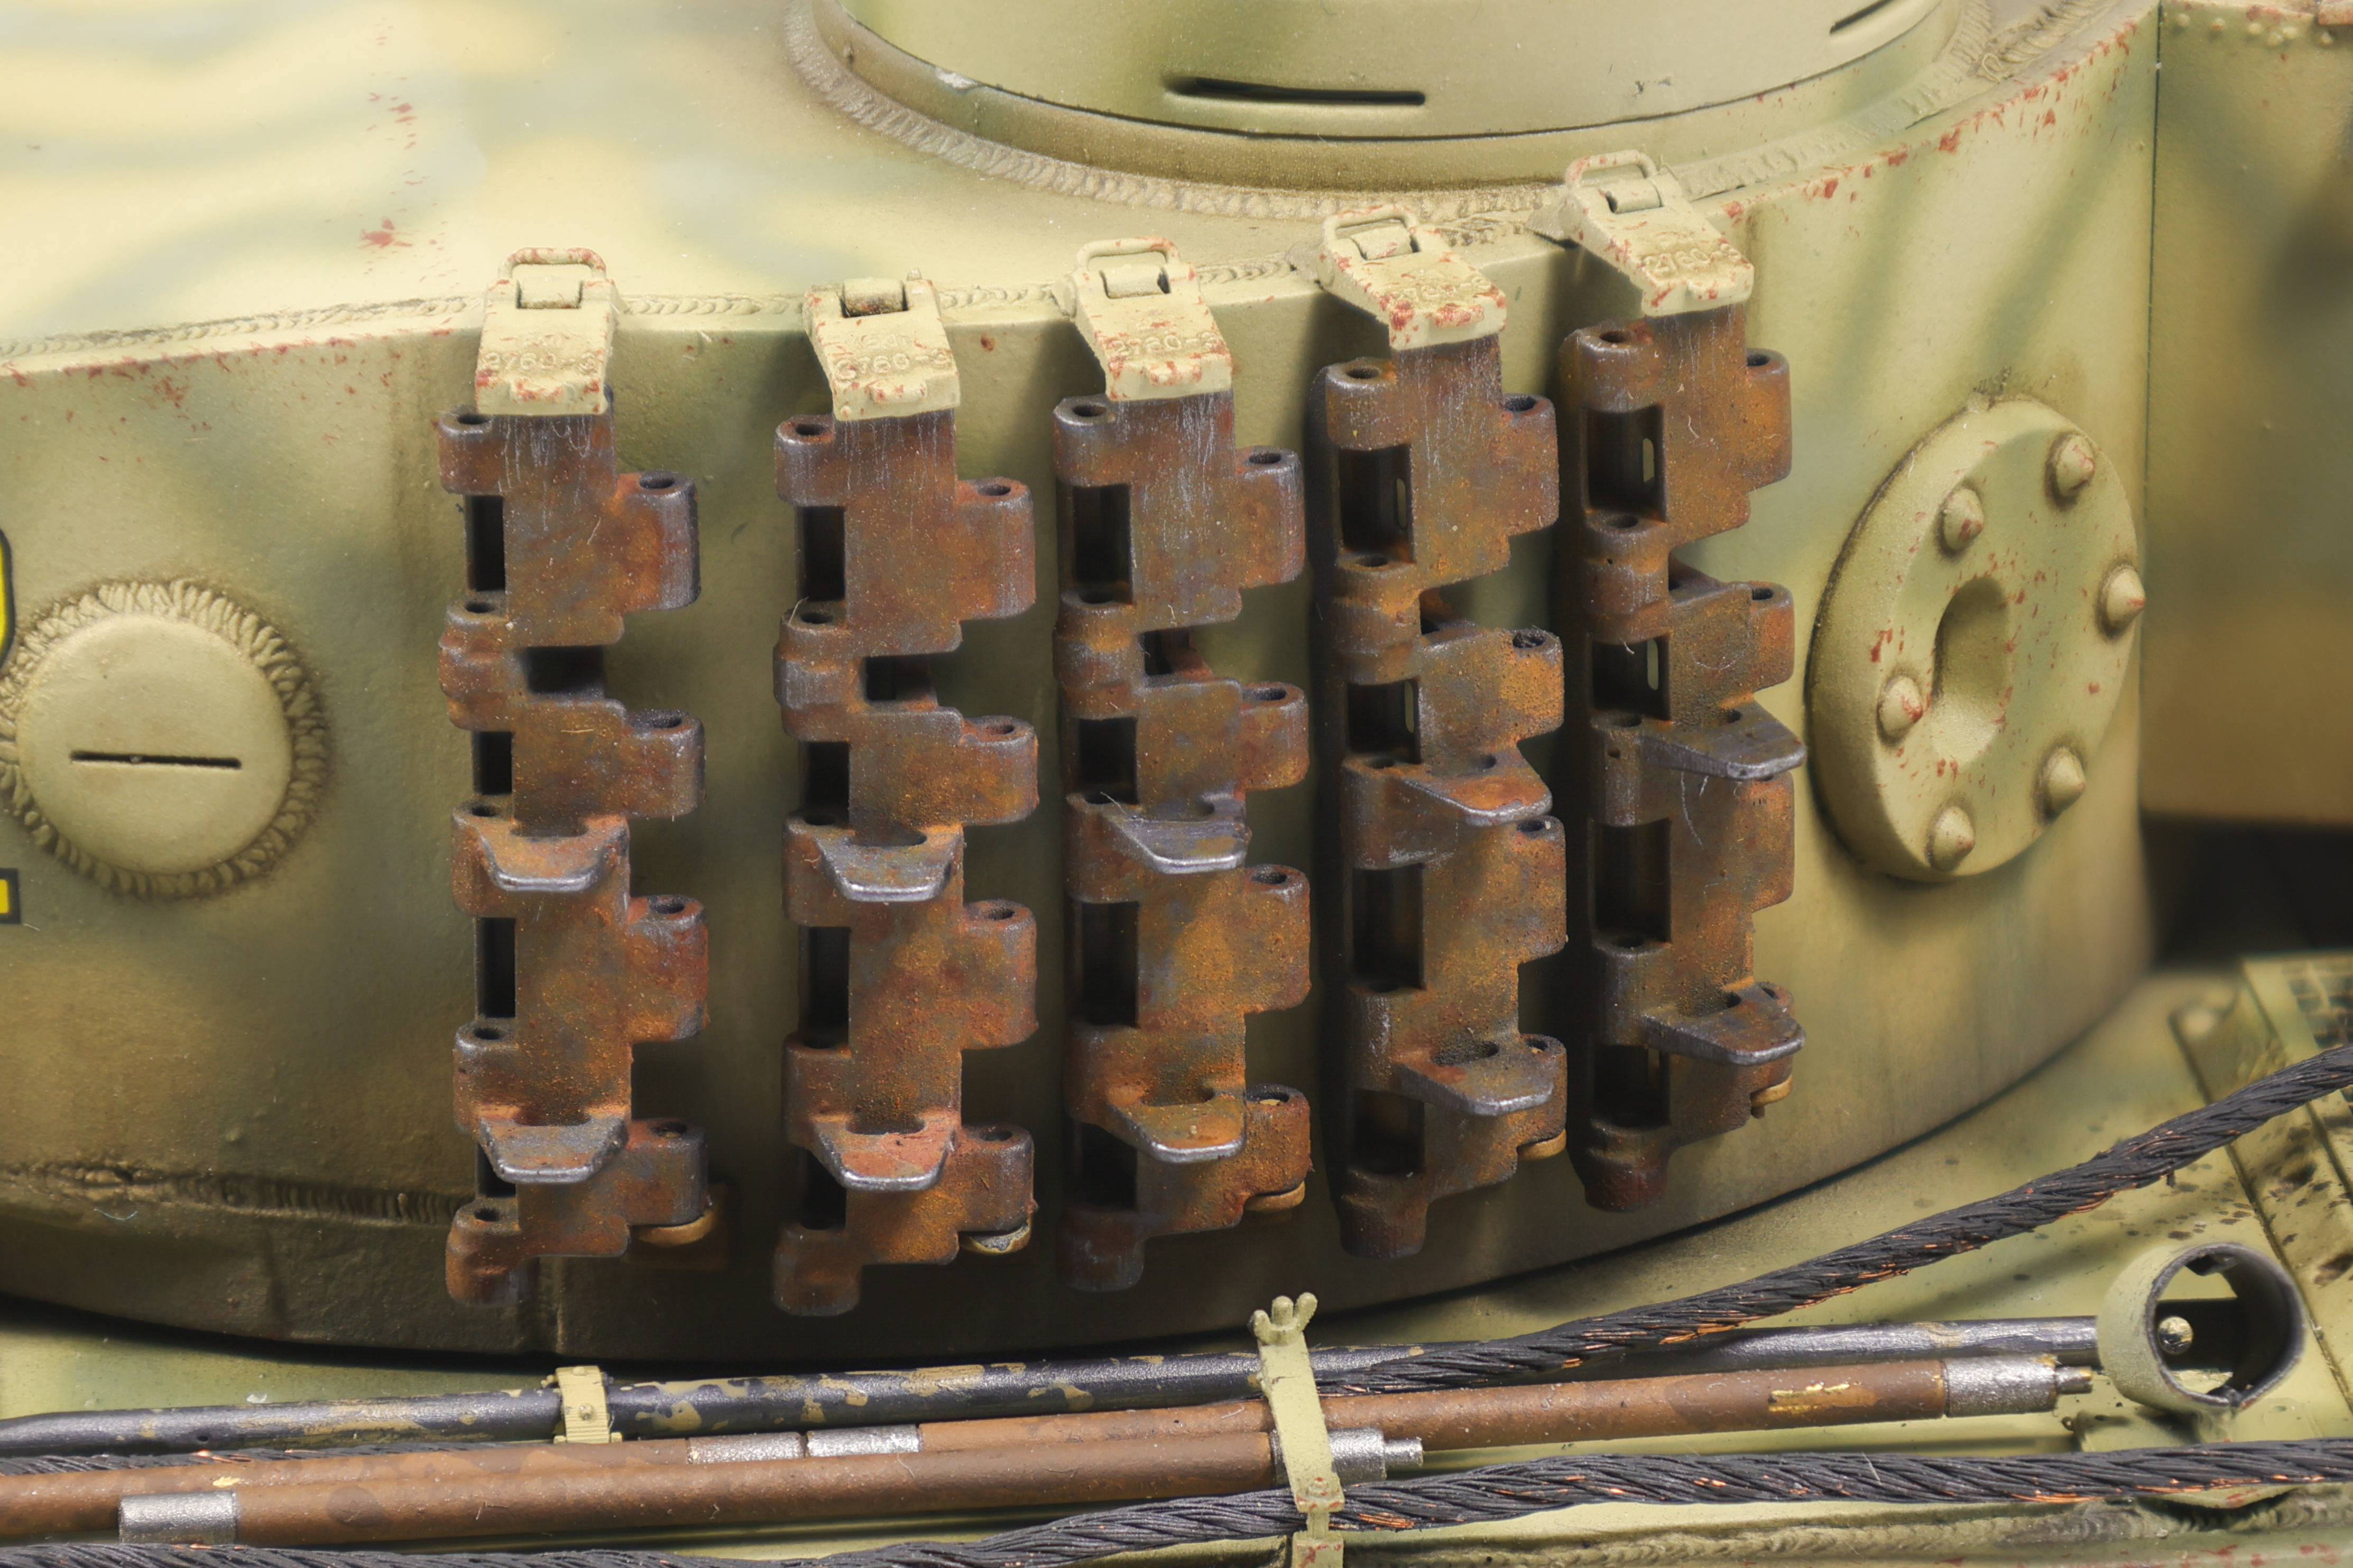
Next, I moved on to the tracks that would be fitted to the sides of the turret. Since these would not have seen as much wear as the running tracks, they would need to be weathered in a different way as previously described. As before, I painted them with a MC212 base coat before conducting further weathering. I then utilized two different rust shades to weather these tracks. I utilized a dark rust streaks and light rust wash colour as my two tones that I would work with. The dark rust streaks colour appeared more so like a dark brown and would serve as the basis for future work. I applied it fairly liberally over the tracks, making sure that it flowed into recesses. I then speckled on the light rust wash colour taking care not to overflow the surface. This approach would create highlights in specific areas and create a fairly convincing rust effect in my opinion.
As a final touch, I then polished the exposed edges to simulate rust being worn away on exposed surfaces, creating a nice contrast with the rust tones.
And with that, that’ll be it for this update! A final update of the completed build will be out shortly!
For this project I took the approach of avoiding any pre-shading or subtractive chipping. While this strategy was not entirely new to me (see my T-55A project) it is still is not something I’m used to. I made this decision because I felt that post-shading was a better approach for achieving the desired look I was after.
This decision led into the next, namely what kind of chipping I wanted to apply to the build. To start, I knew that the chipping effects were going to be somewhat limited in this project. My rationale was that Kursk tigers were often new additions to their units and were not heavily worn down vehicles. These factors heavily favored in my decision to use additive chipping (with a brush or sponge) instead of subtractive chipping (with chipping medium). With the fact that the chipping was not going to be a significant effect I was happy to omit a chipping medium from my workflow.
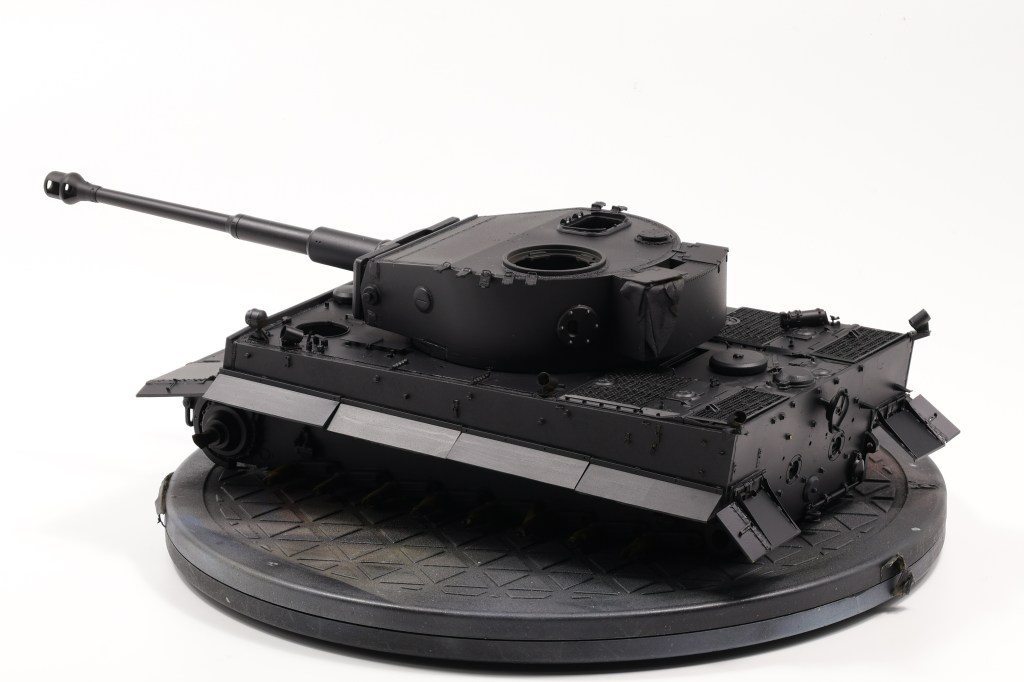
It came time to prime the model and as usual, I turned to Mr. Surfacer 1500 black as my primer as choice. Some people say that using a black base can make the surface colour look “colder” however in my case I don’t see it.
I was particularly happy to finally see my efforts in creating a realistic cast texture and I’m particularly happy with how it turned out, although black is not the best colour for detecting surface finish variation.
Next up was the main coat and for it I selected Tamiya’s Dark Yellow 2 shade (LP-55 and XF-88). I’m familiar with this specific colour and used it on my Sd.Kfz 251/22 Pakwagen project. I did find that it was slightly too dark and to compensate for this I added a few drops of flat white. I used Tamiya’s lacquer range and while I like how they cover the model, I find that they just run out too quickly. Tamiya’s acrylics can be heavily thinned and as such last a long time. The lacquers were significantly thinner and didn’t require a lot of thinner. As such I relied on a lot more paint to get proper coverage For this specific build I pretty much emptied the jar I bought for this project.
The results speak for themselves however and I was happy with how my Tiger looked after completing the first main coat.
After completing the main coat I began the post-shading process To do so I simply used more dark yellow with added white and black. I sprayed the light coats on higher areas and the darker coats where shadows would be. This was my first time going heavily into the world of post-shading and I’m quite happy with the results here.
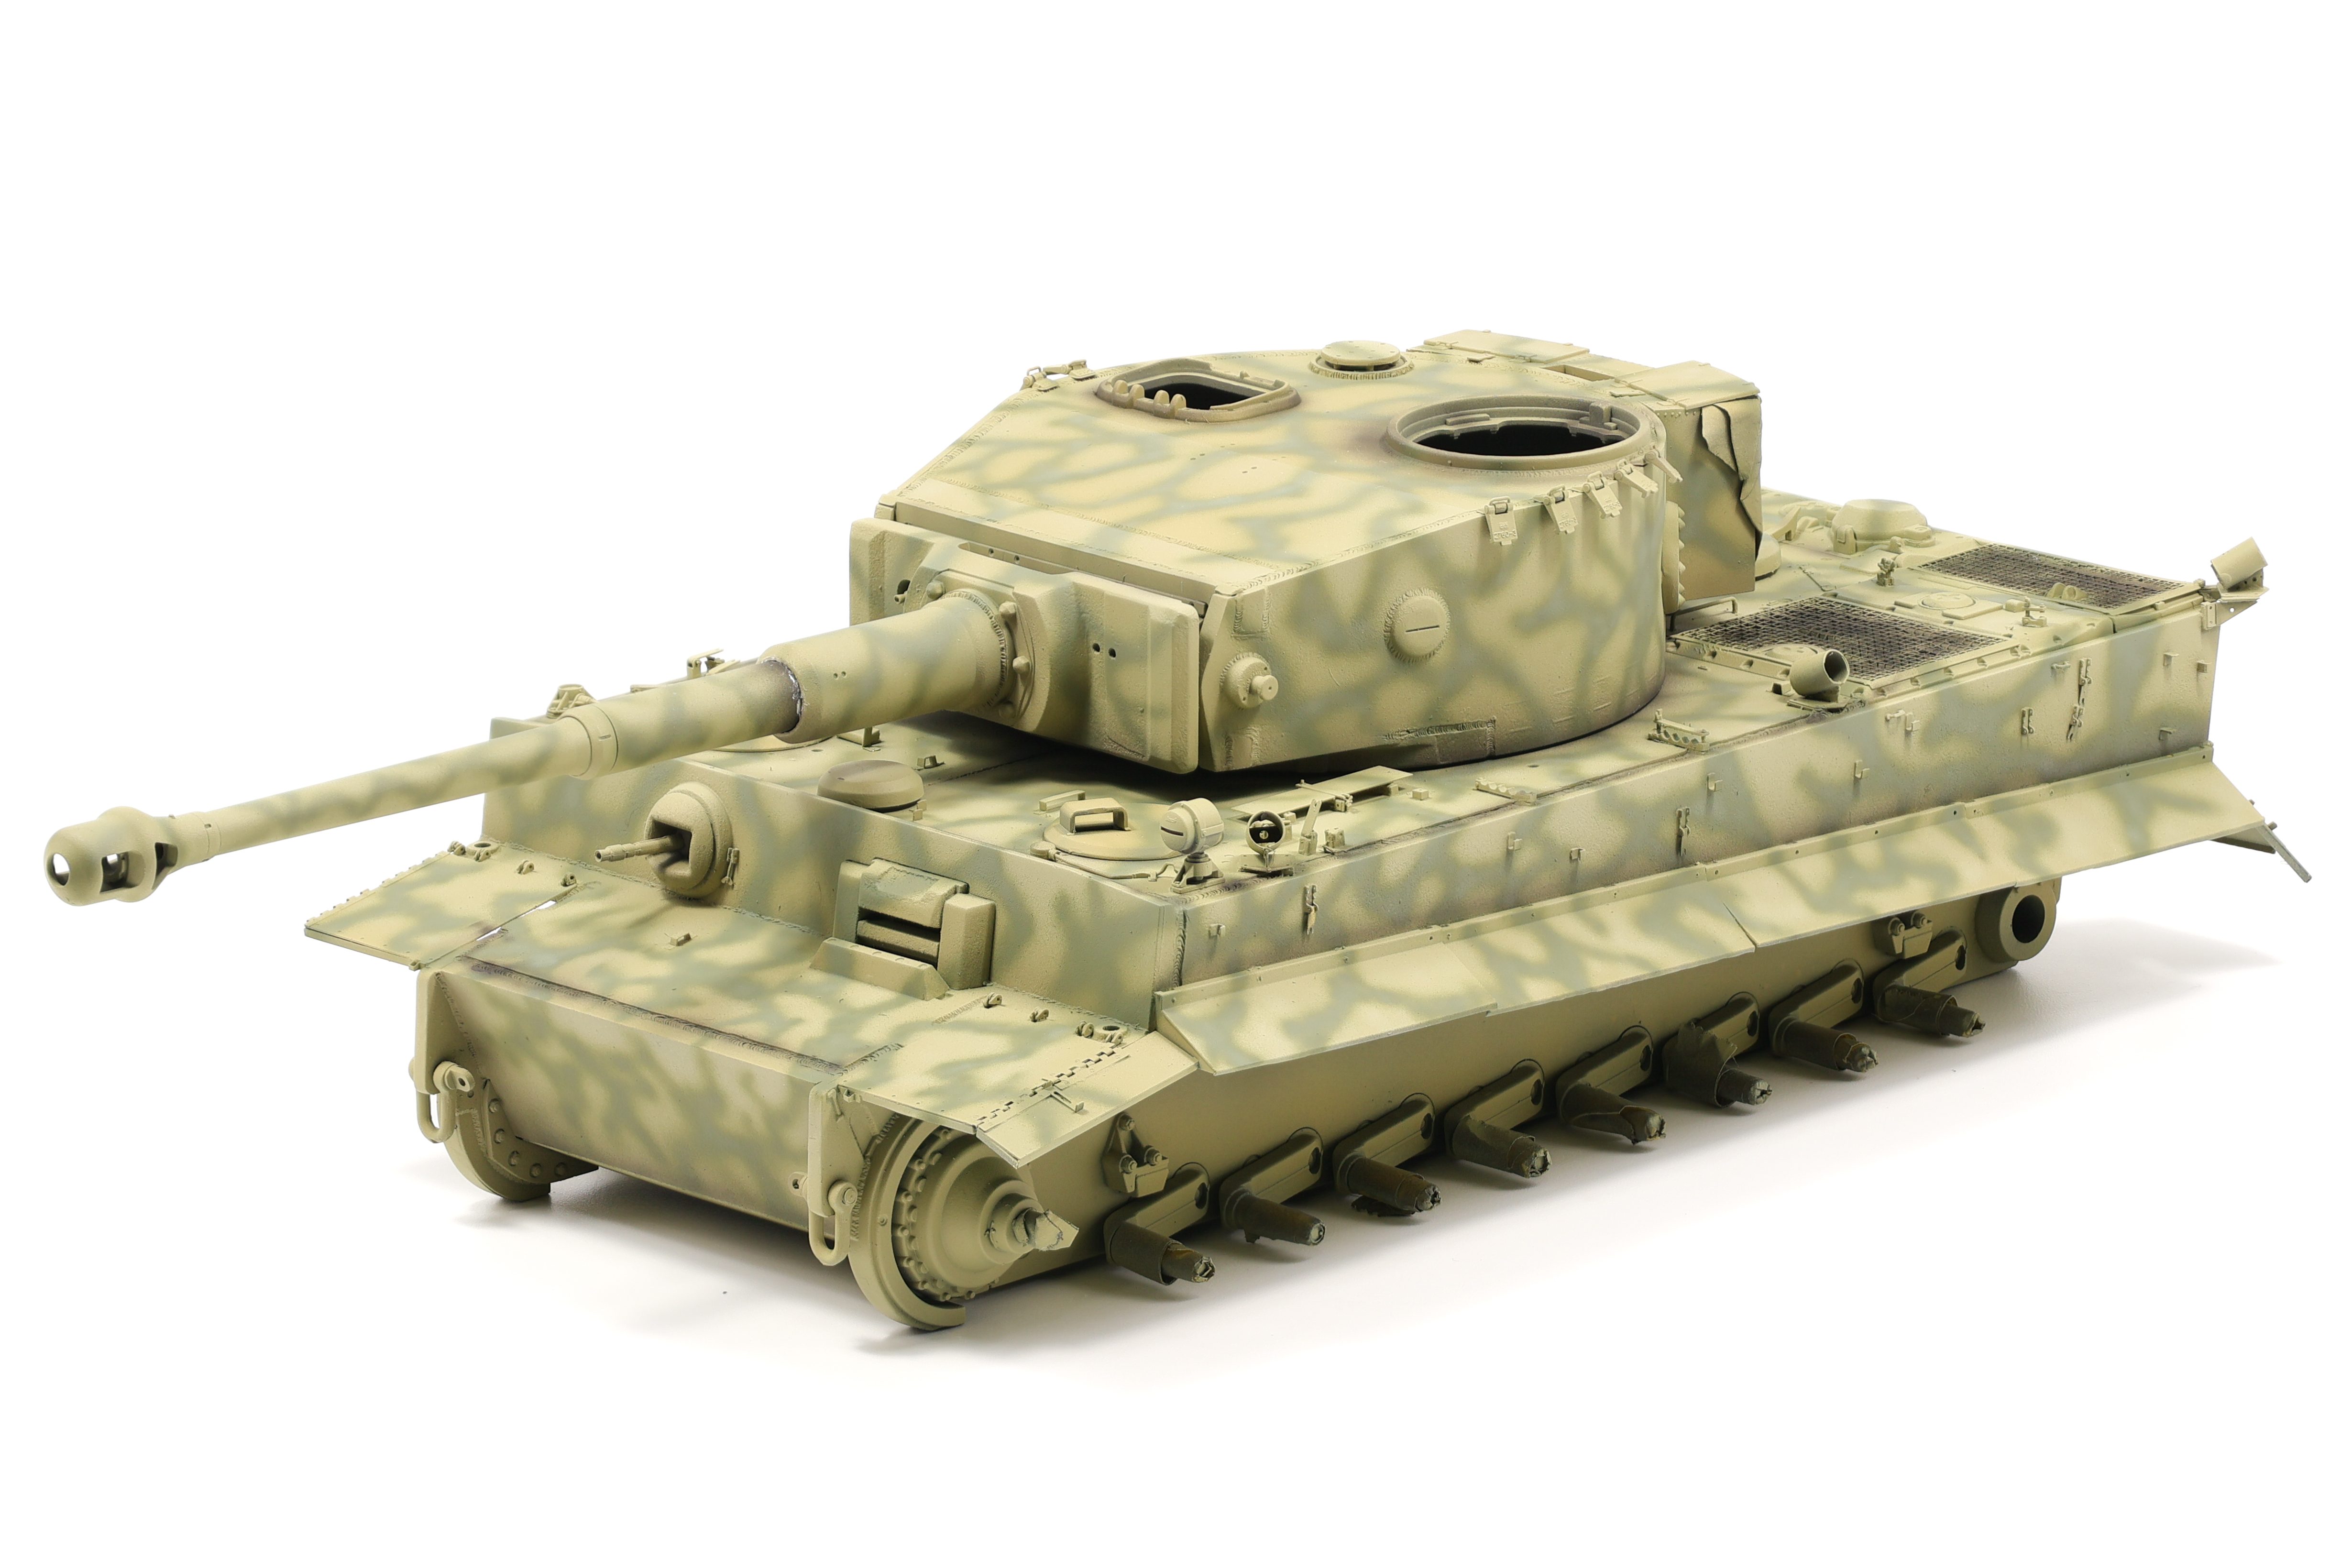
Next up in the process was the camouflage which was a process that, although it would be challenging, I was looking forward to immensely. It was hard to determine an exact scheme from reference photos and the colour profiles from Echelon FD didn’t help a lot either. The best way to describe the scheme was “dunkelgleb with olivegrun splotches”. I took a slightly different approach and tried to re-create a webbed look with long strands of olivegrun over the base dunkelgleb. It took about two days to finally finish but overall I’m very happy with how the scheme came out.
After getting the initial Olivegrun colour on I did another post-shading coat although this time I was more thorough with my approach and took the effect further in some areas. I whipped up a 50/50 mixture of Tamiya Dark Green 2 and White in order to make the initial scheme more faded and worn. Additionally, it blends in a lot better with the dark yellow base coat which is what I was after. I also did more shading with black, or at least a very dark brown. This effect can be most seen where the skirts meet the hull as well as the engine deck as well as a few other areas. Overall I really enjoyed the post-shading process on this model and at this point a decided to wrap it up and move on to the next phase of the build – Markings.
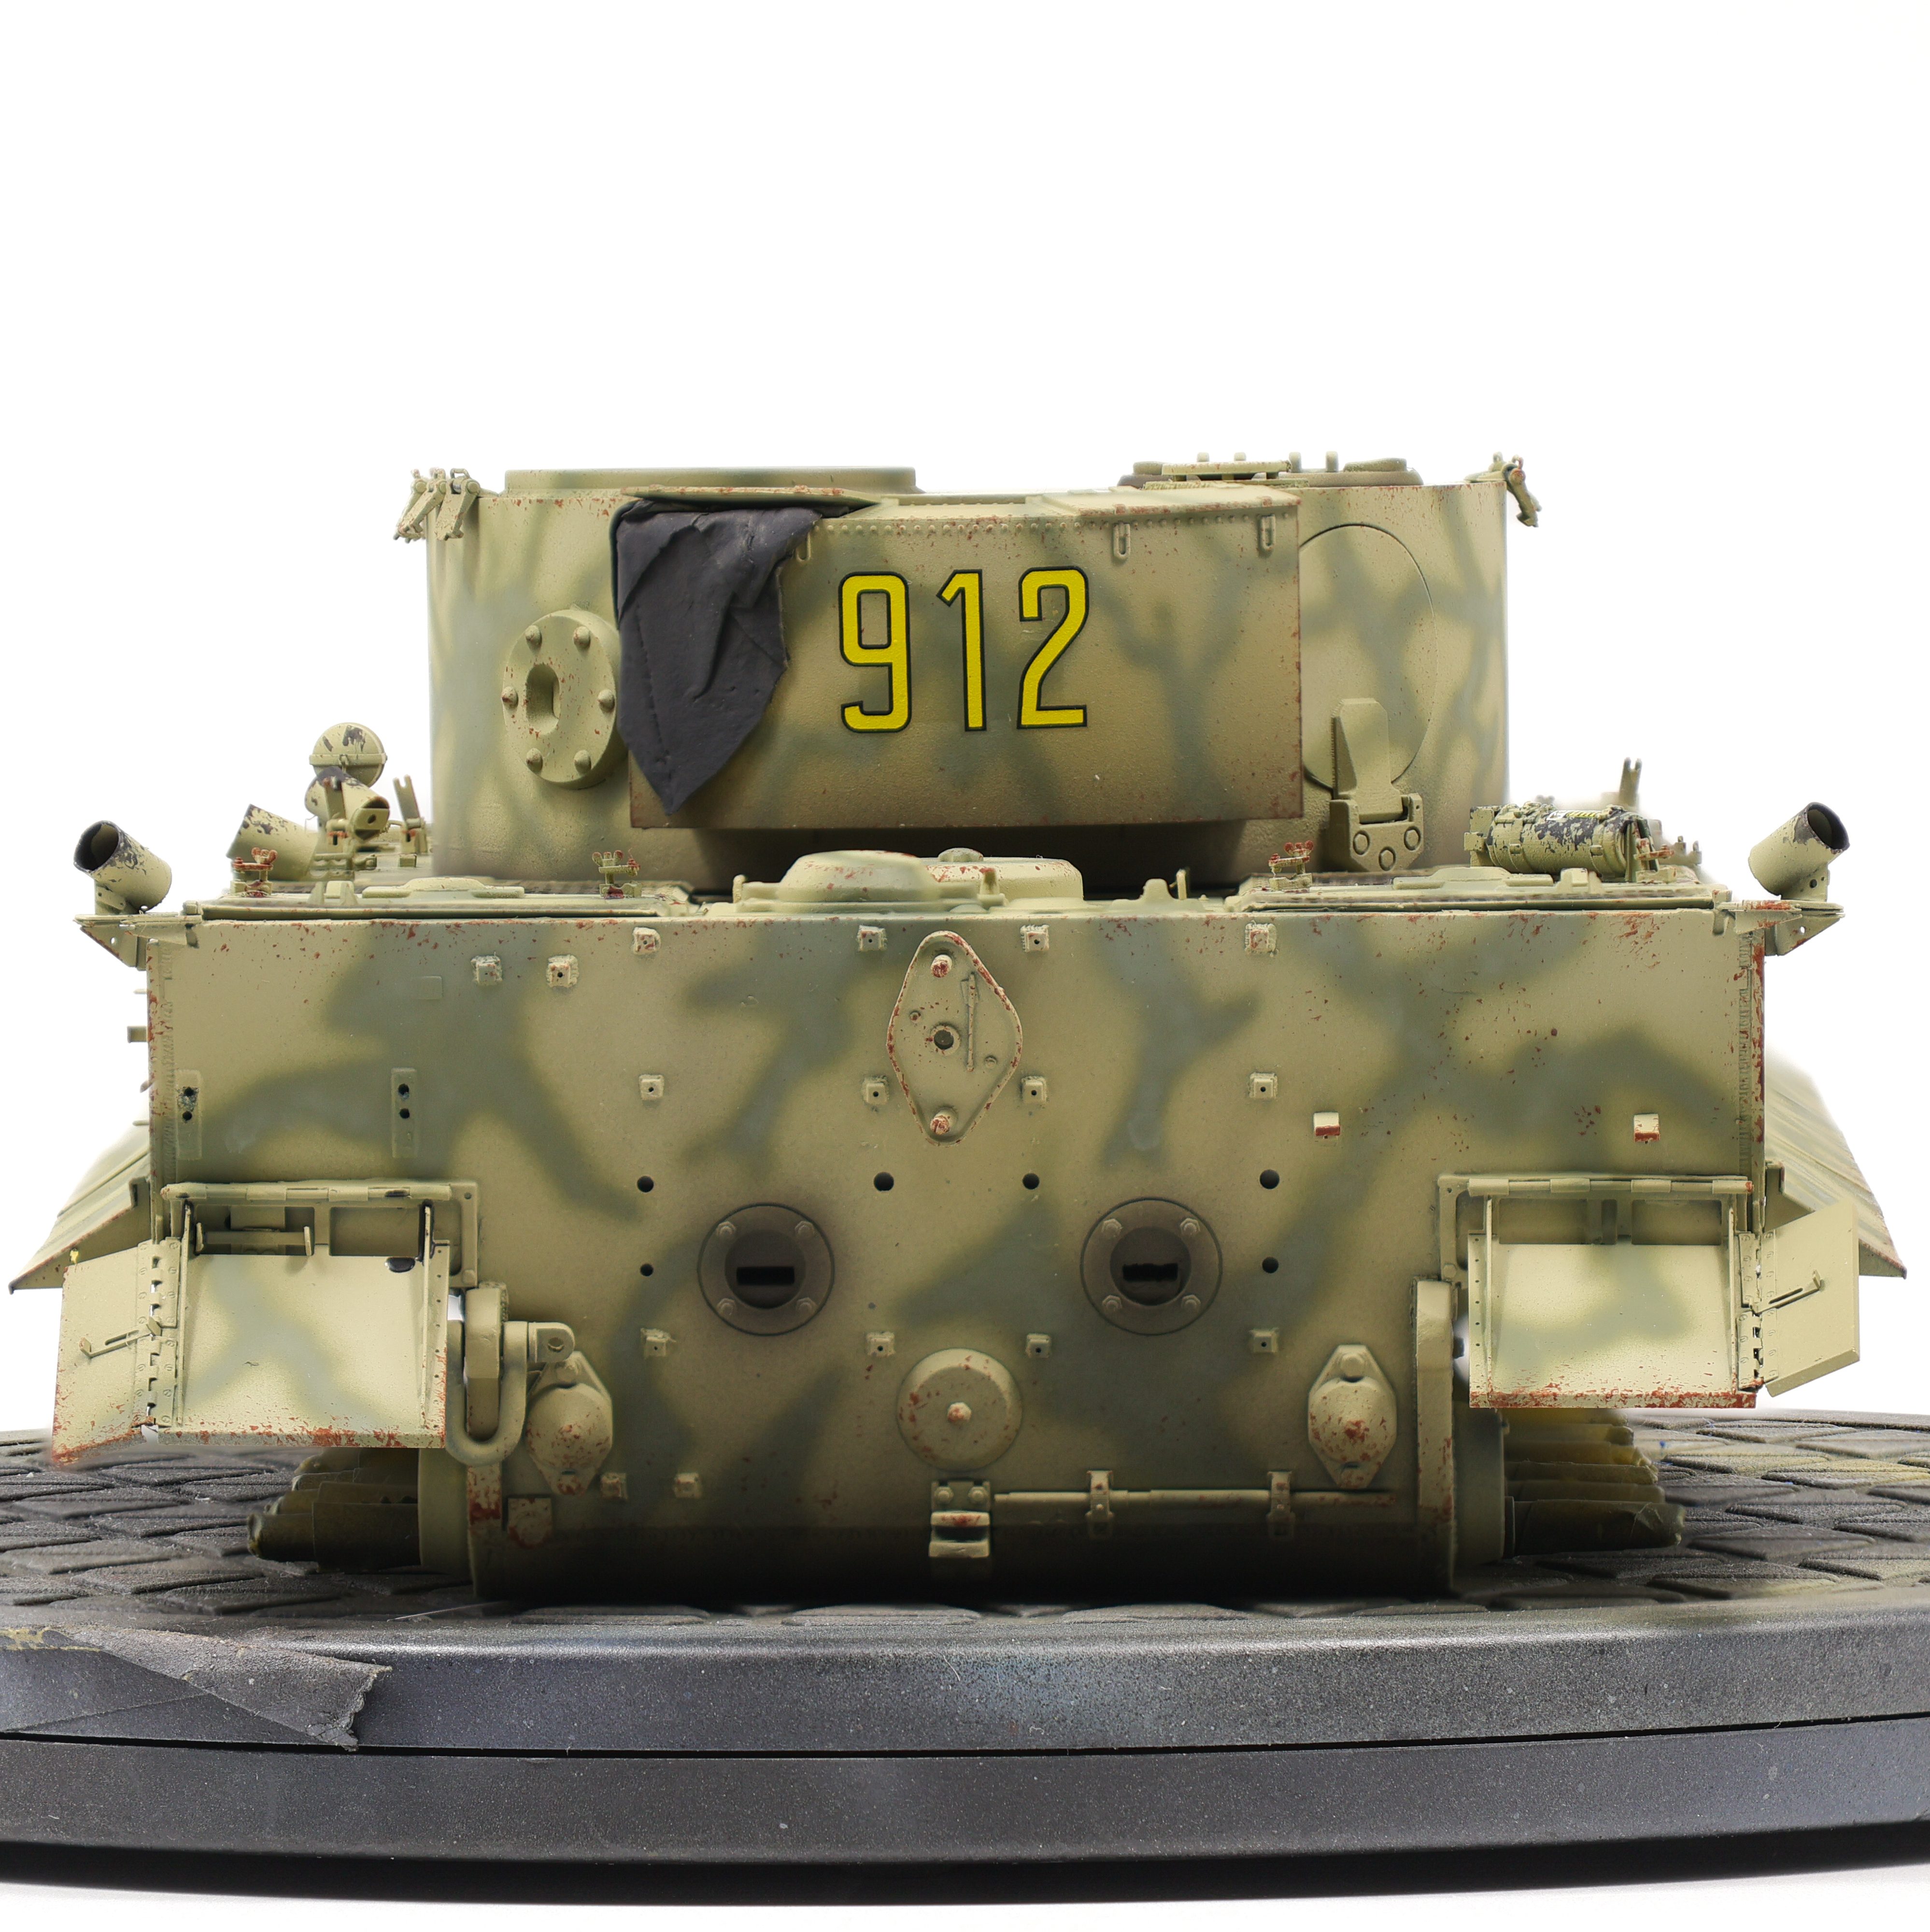
Considering that I had used Tamiya lacquers for all the paintwork, I felt confident in applying the decals straight onto paint. I’ve never worked with Echelon decals before and, after a test run on a spare piece of plastic, decided to use Tamiya Mark Fit Super Strong as the setting solution. I lightly sanded the paint surface with a 12000 grit sanding sponge in order to get the surface as smooth as possible in preparation for the decals. After a few passes the surface felt a lot smoother with no visible loss of paint.
Decals went on really well and with the help of setting solution, conformed excelently to the cast texture I had re-created. Results like these are really why I like to go the extra mile on small effects, it can really make a difference in the (almost) final result.
Truth be told, there weren’t a whole ton of markings to apply and it only took an hour or so to get them on the model. Of particular note are the kill markings on the barrel that Echelon provides. I was amazed as to how easy this decal conformed around the barrel to perfectly line up when it overlaps itself. This is done by making it slightly curved inward to match the dimensions of the barrel. It’s clear that they did their research and tested this product before selling to customers. Very happy with this sheet and I’ll be using them in the future.
After applying the decals I went along with some light chipping effects before sealing the model in VMS satin varnish. I didn’t want to go overboard on the chipping as I wanted a cleaner look from the vehicle. That’ll be it for now and enjoy the detail photos below!