Categories
1:35 Naval Projects

British Landing Craft Assault (LCA): Painting and Weathering

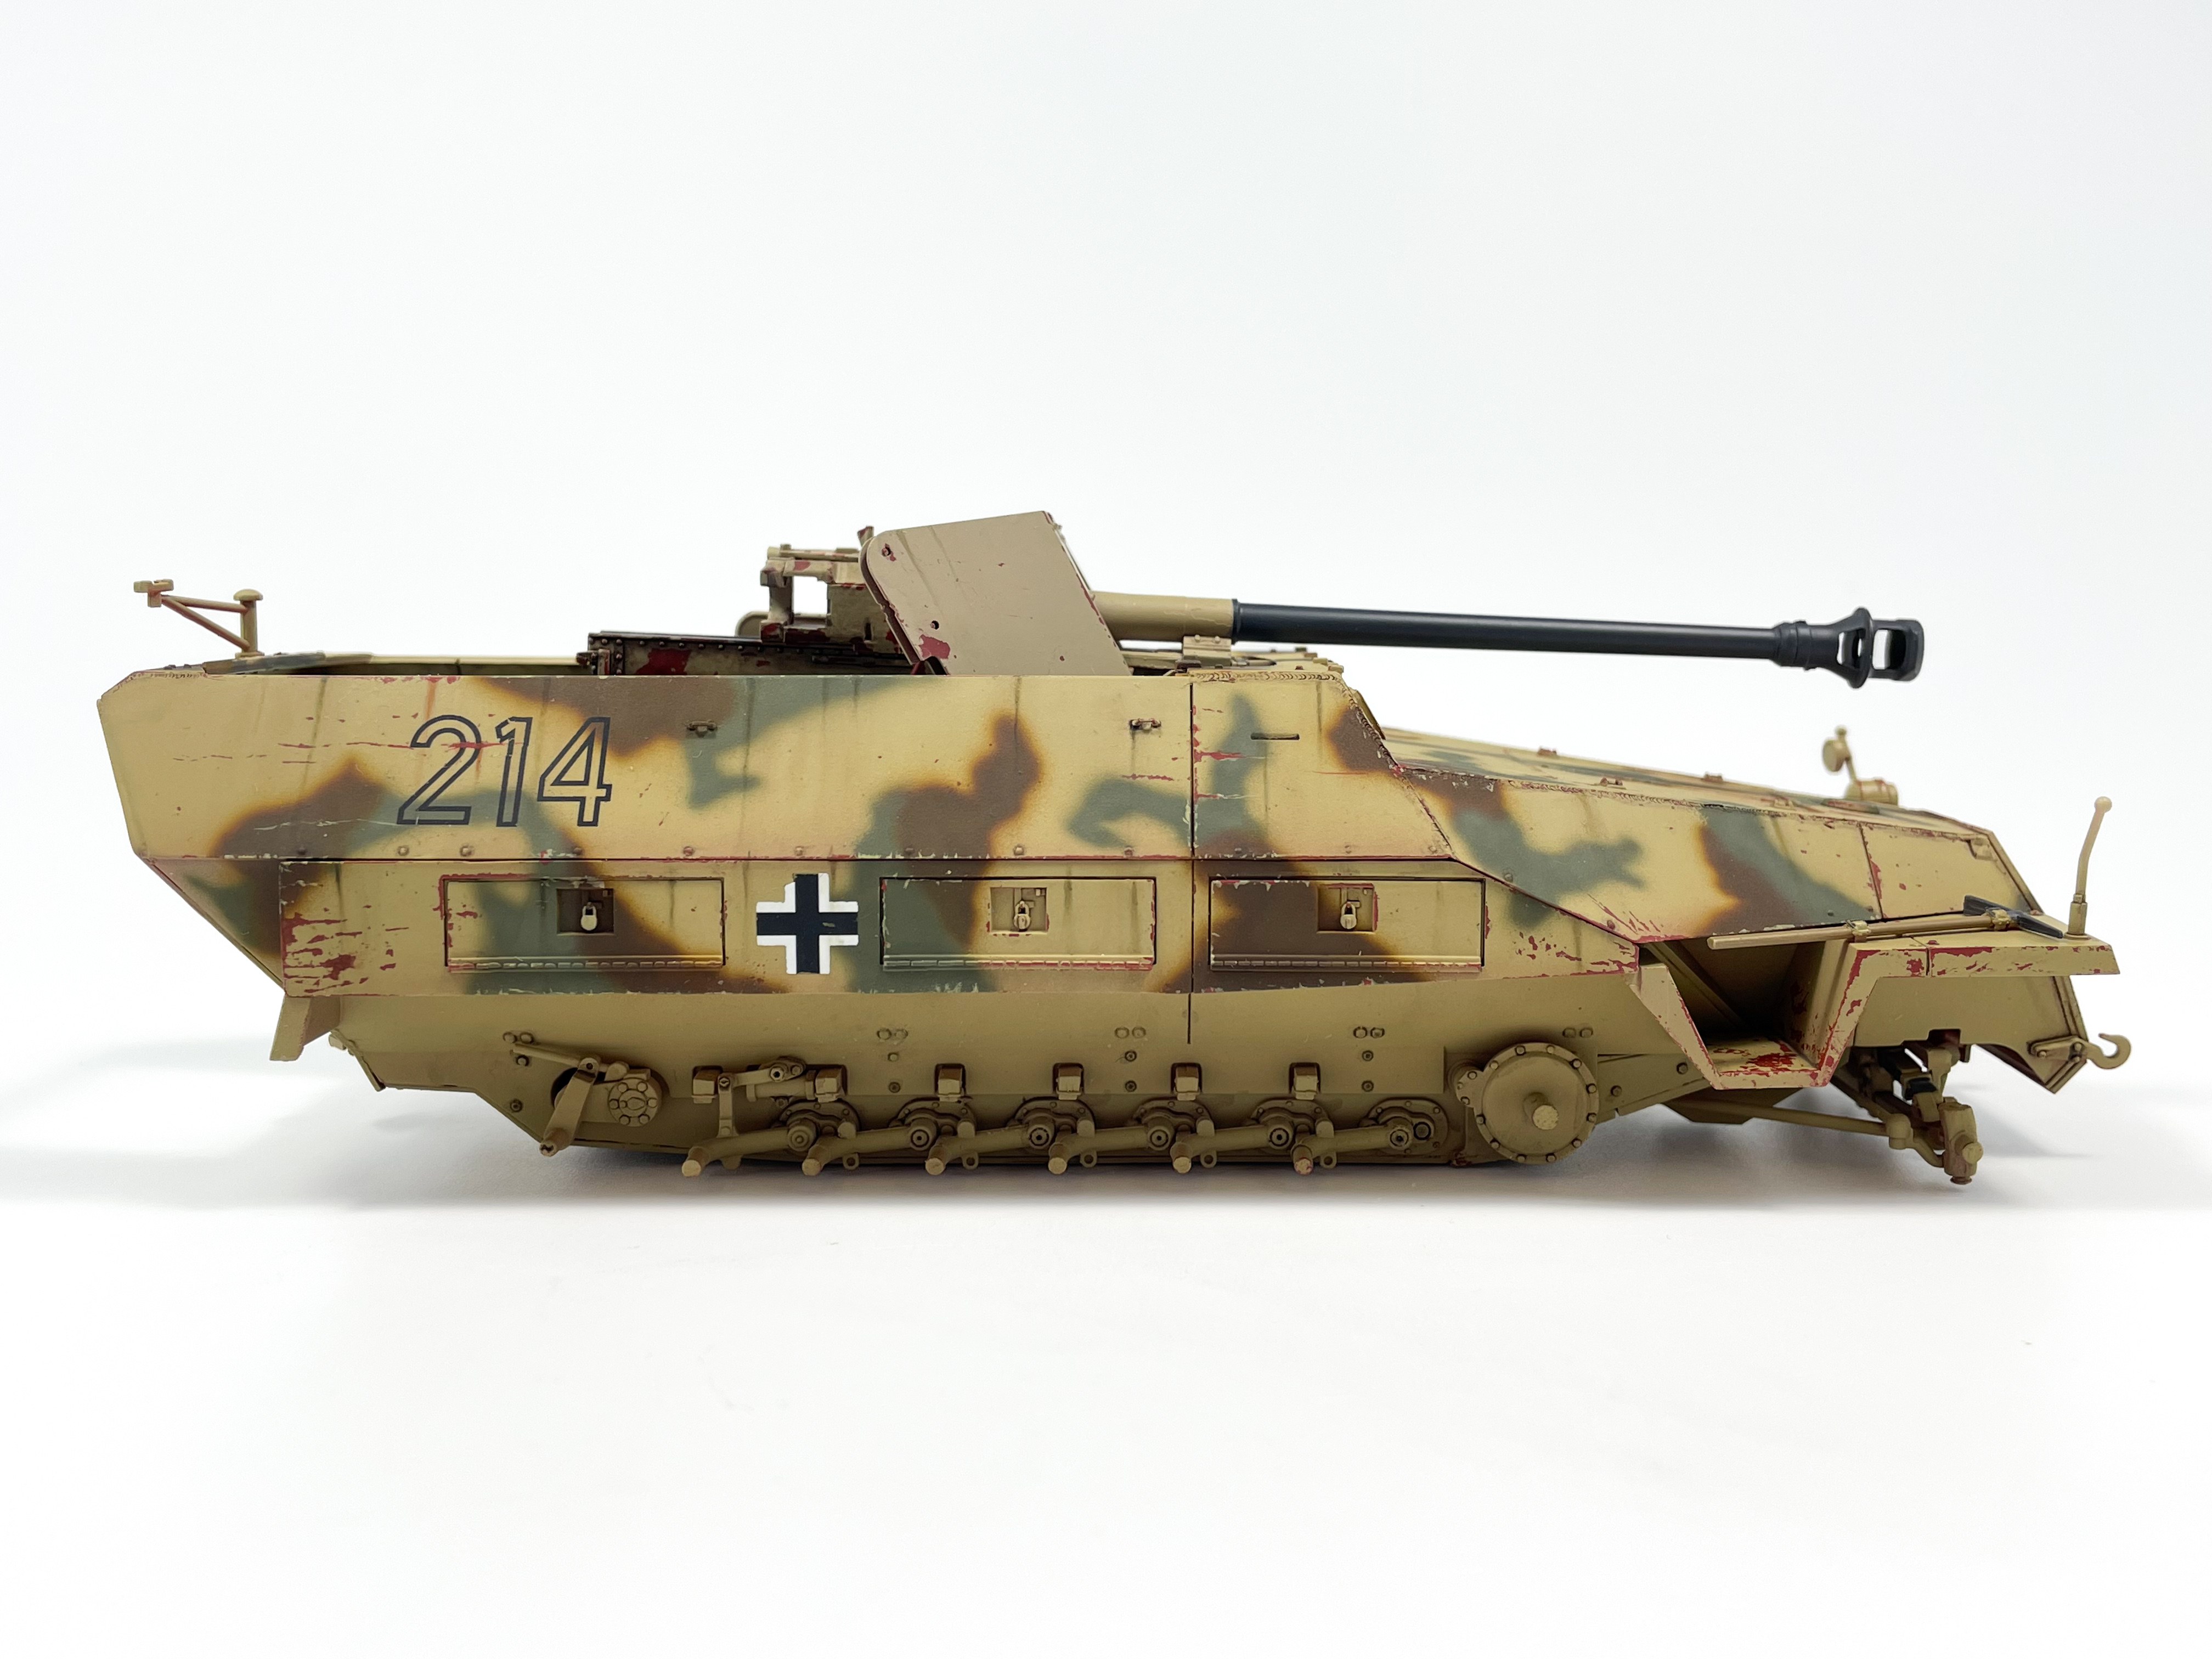
With progress moving quickly on the LCA I found myself at the painting stage earlier than I had expected. For the build I planned to keep the weathering on the more subtle side for numerous reasons, primarily the fact that these vehicles didn’t see as much wear as land based armour. This is not to say that LCA’s did not wear at all however but rather that in my option a restrained weathering approach was in order.

Early painting steps included priming in Mr. Finishing Surfacer 1500 black (my preferred type of primer) and a random light grey shade I had lying around, which in this case was AK’s “light sky blue”. When choosing colours for marbling I took into account the shades of the final base colours and selected a paint that was slightly lighter than the final grey shade. I did this because the black of the primer will heavily darken the final coat of the model if the marble colour is not light enough to offset the black. This was a lesson I learnt during the painting process of my Kinetic CF-18 and as a result the whole build was tinted slightly too dark.

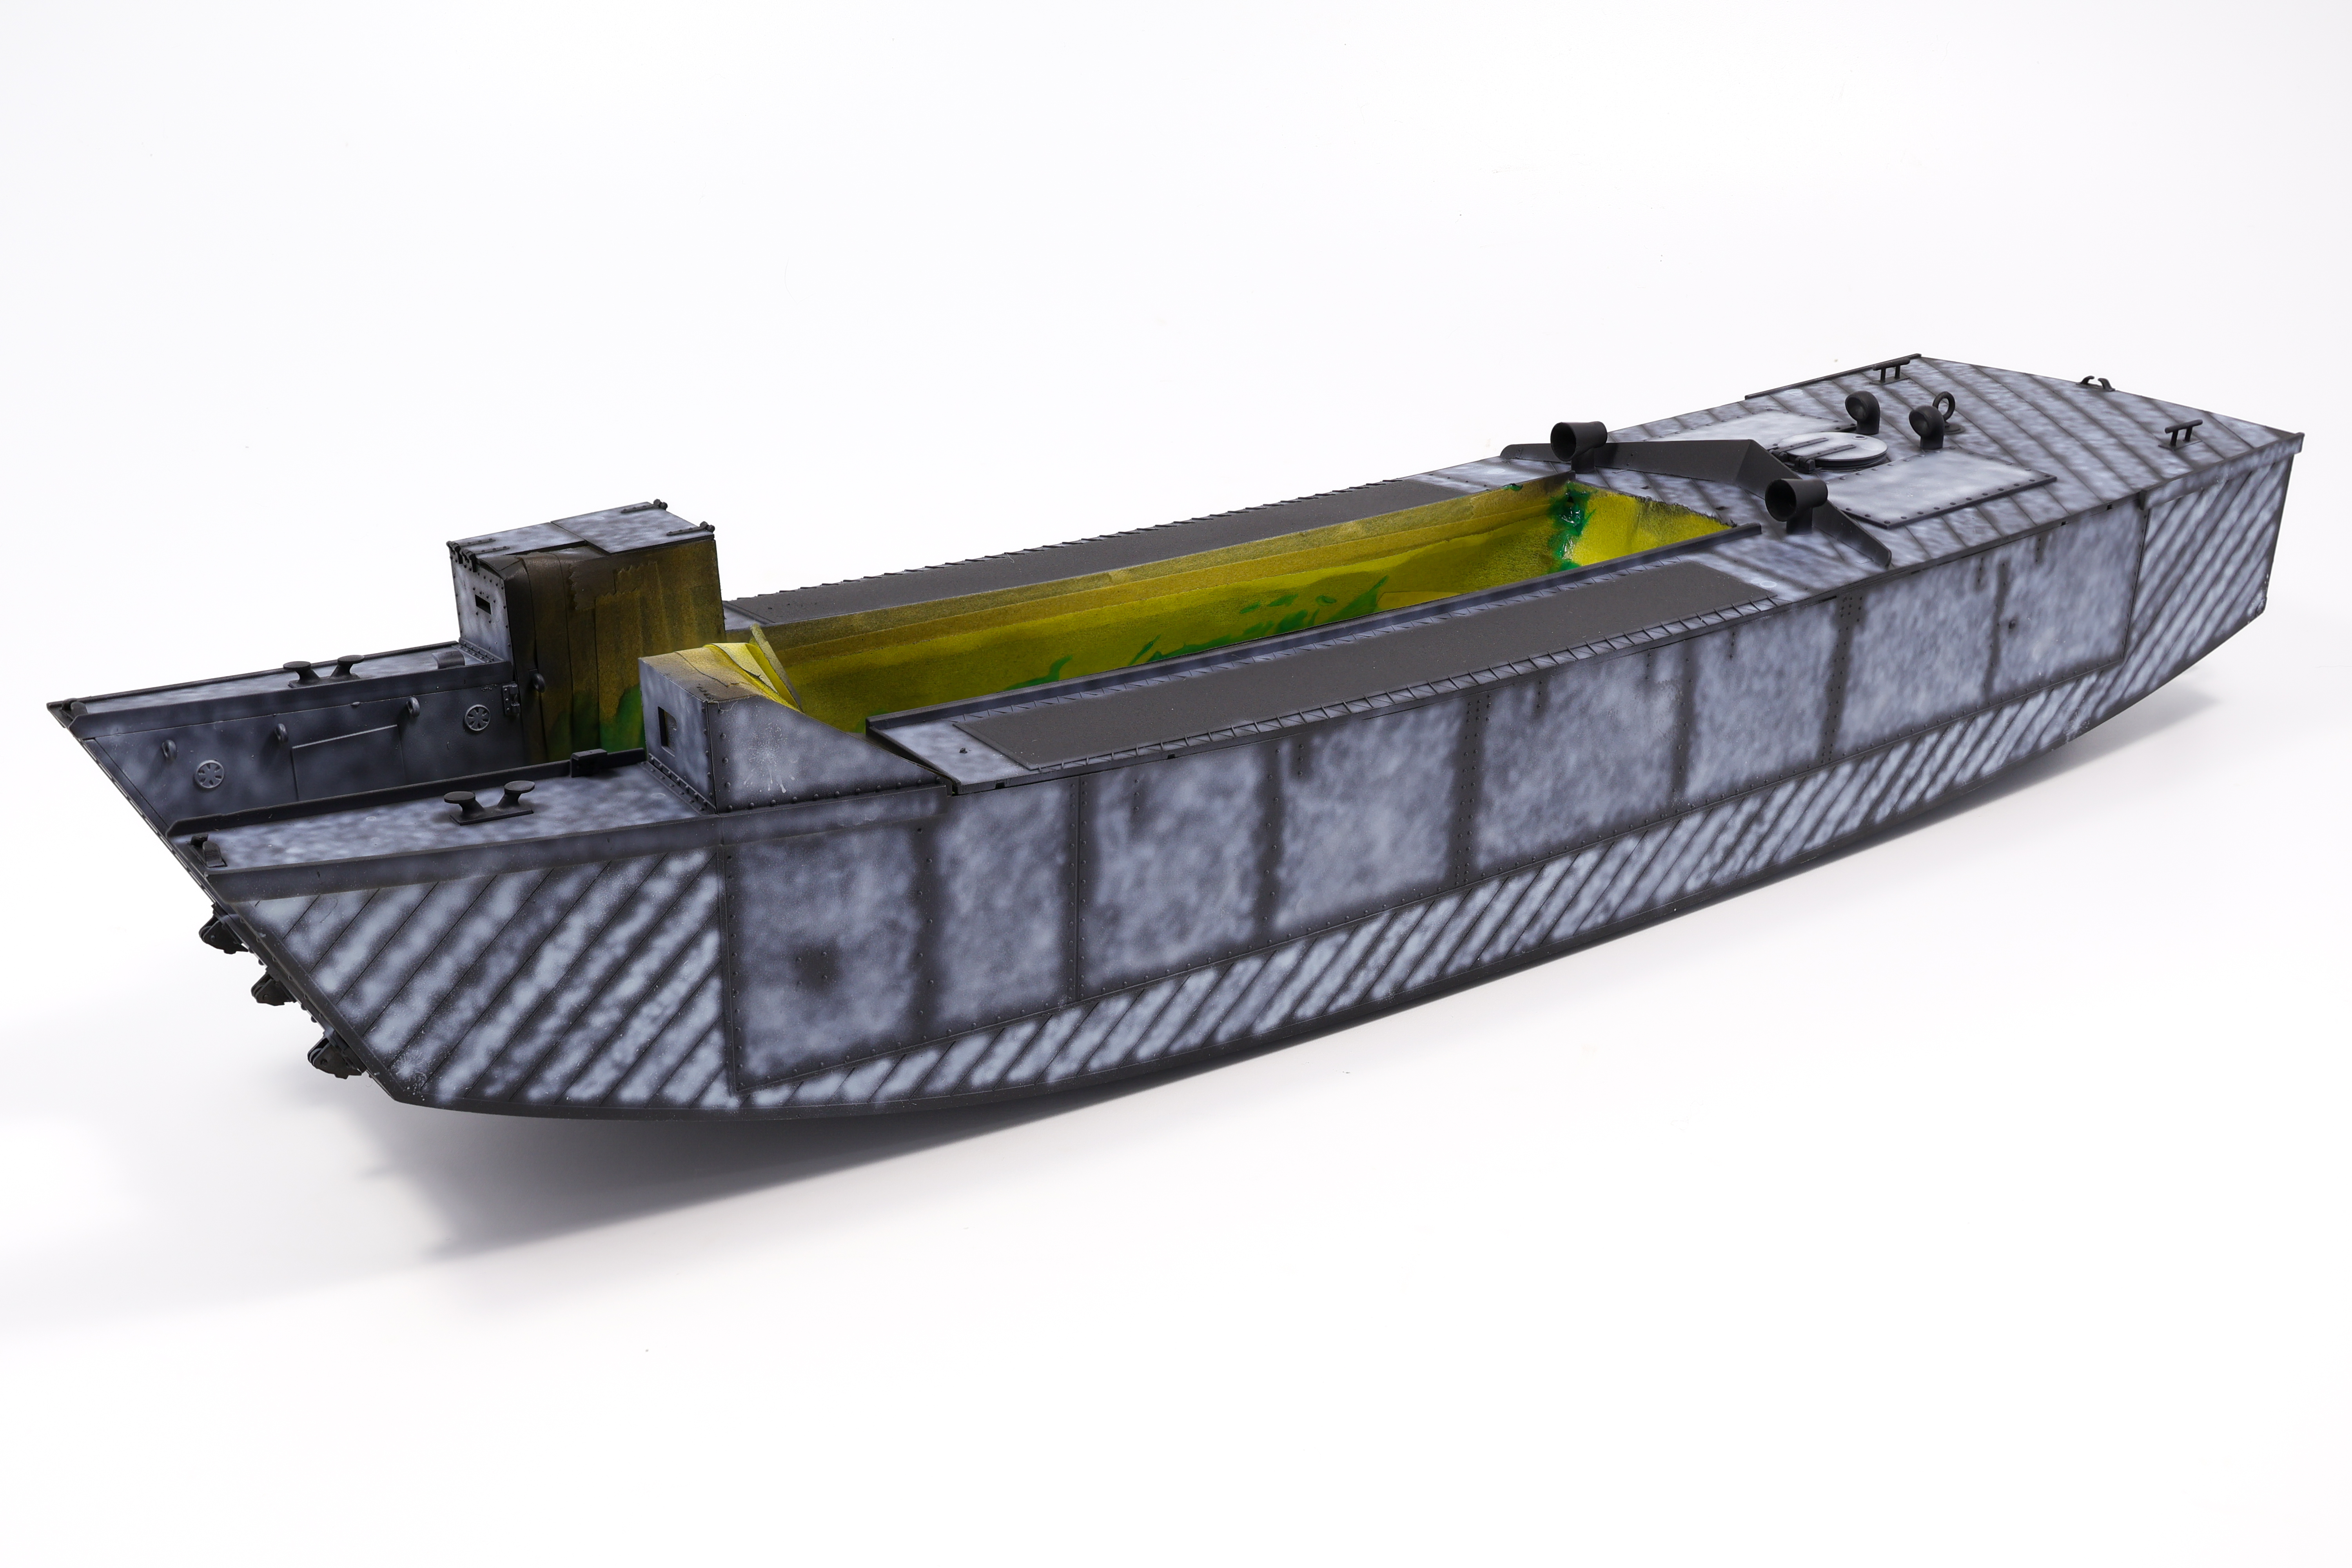
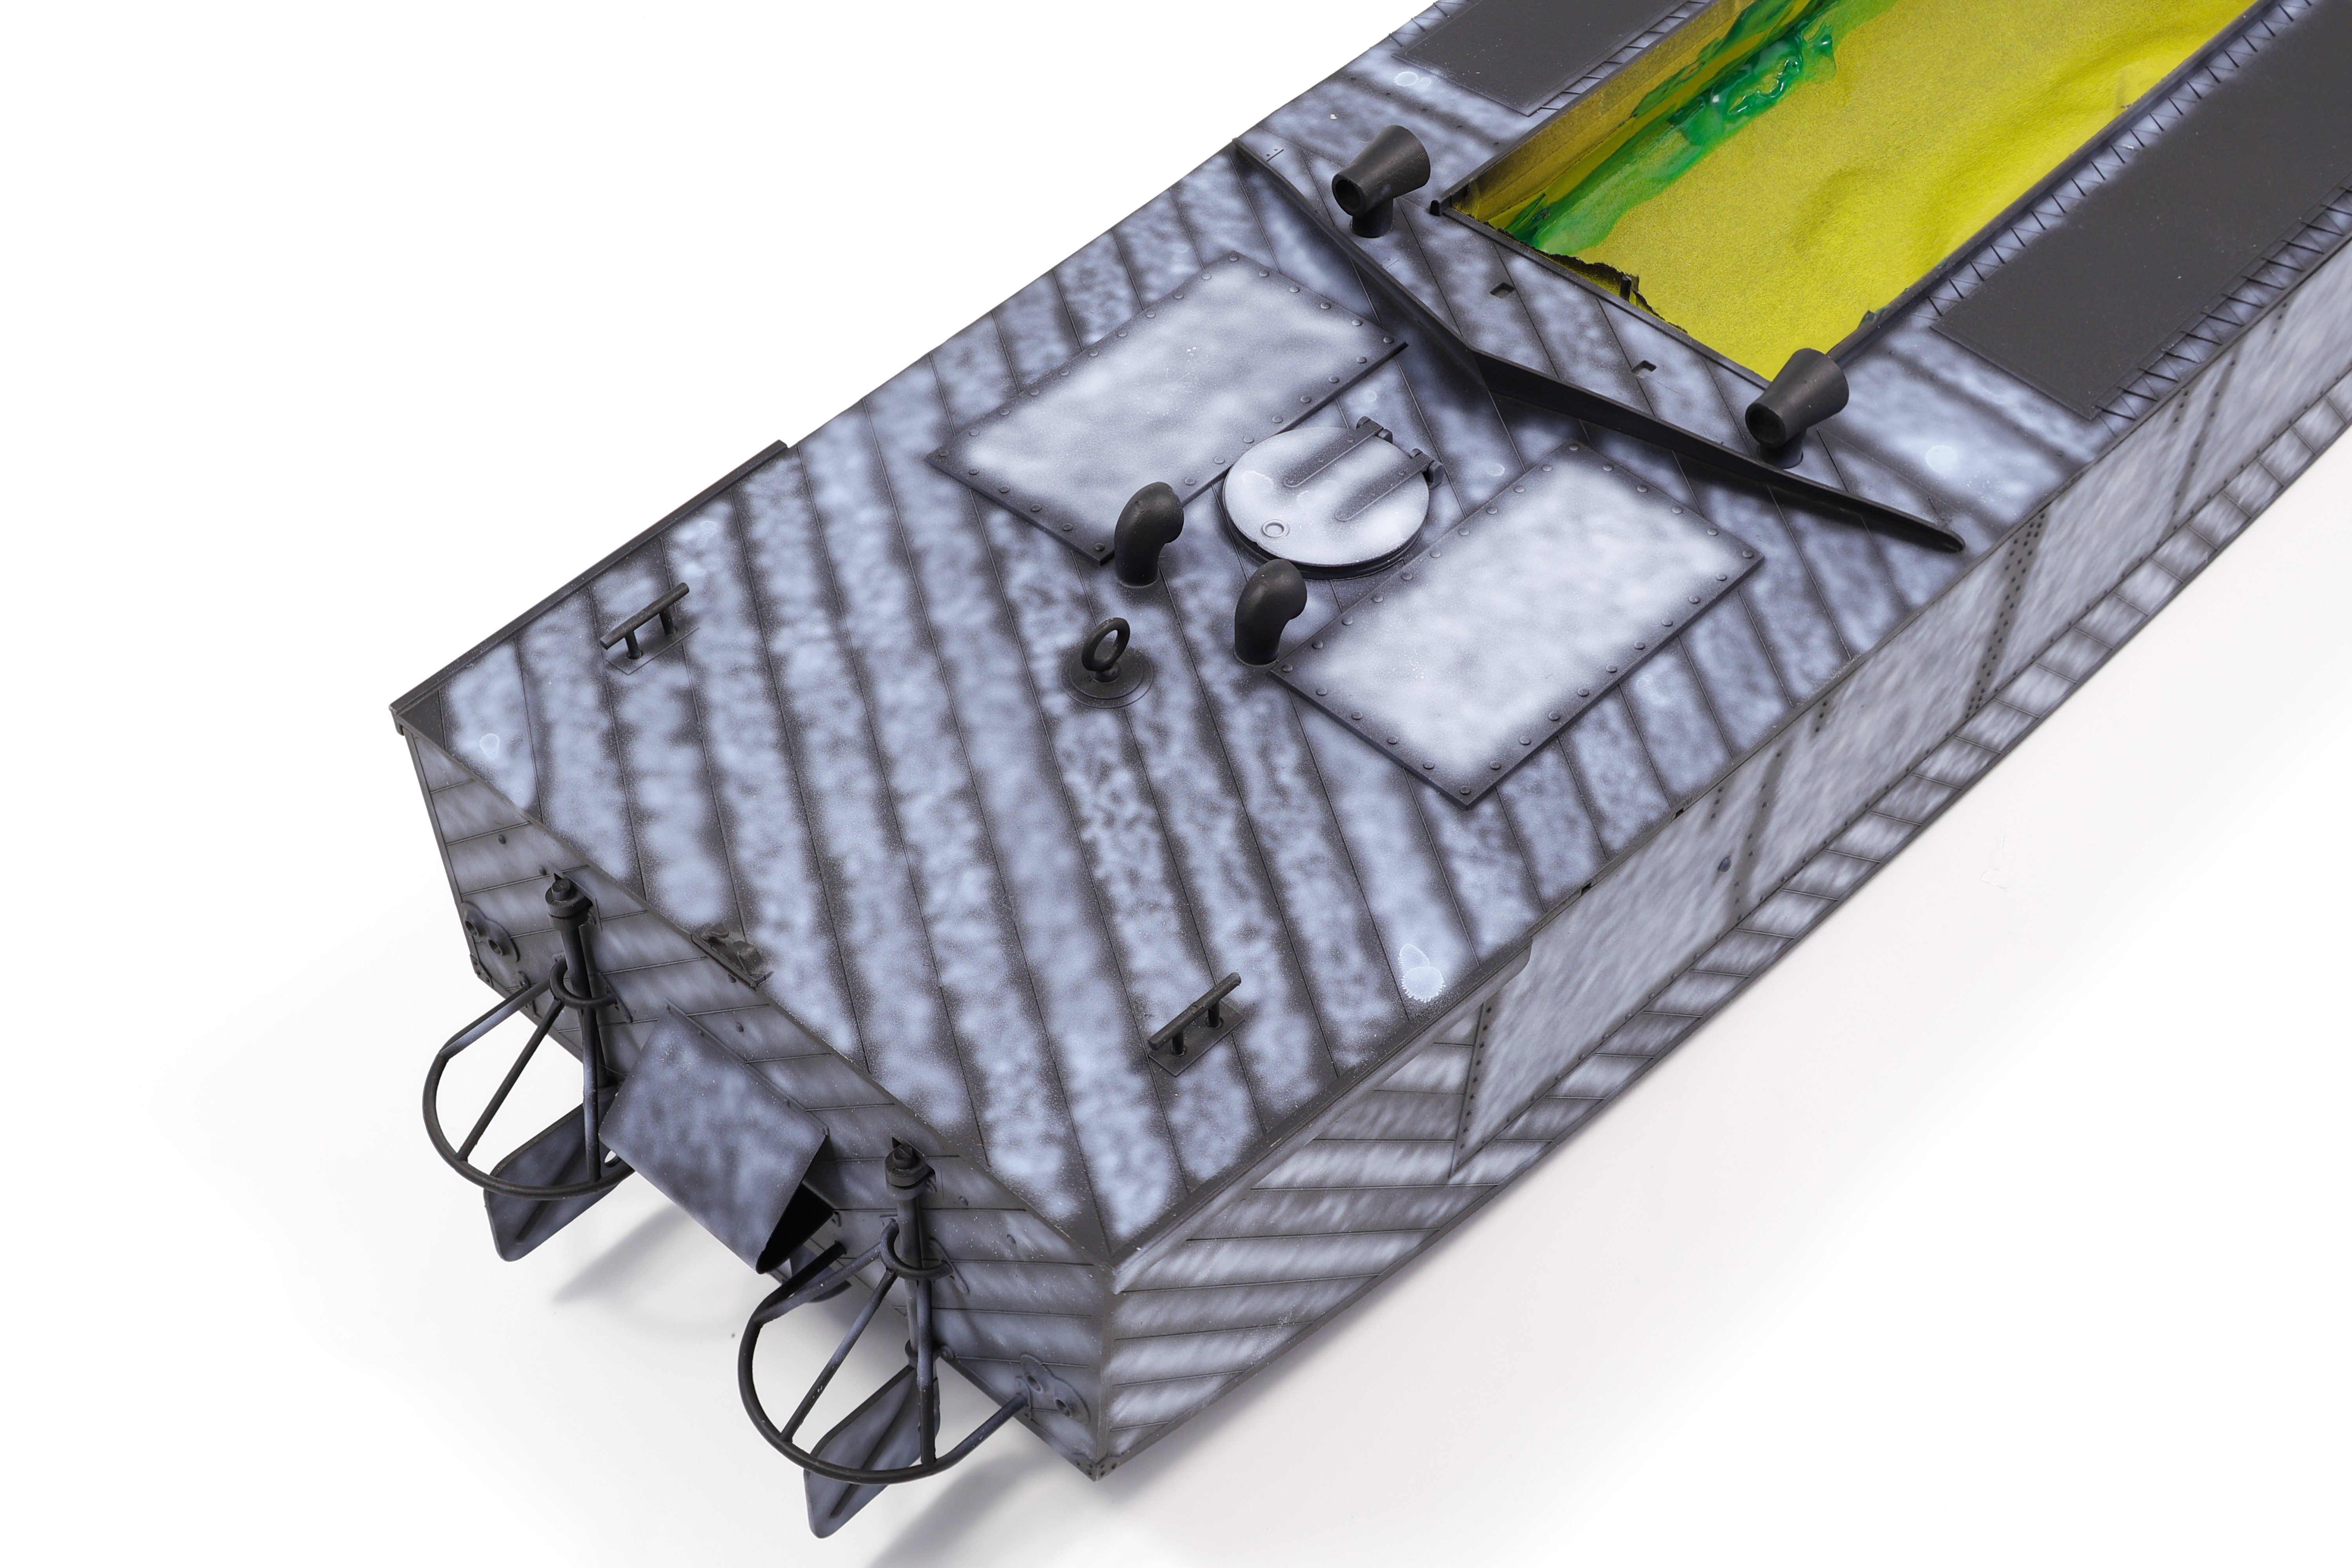
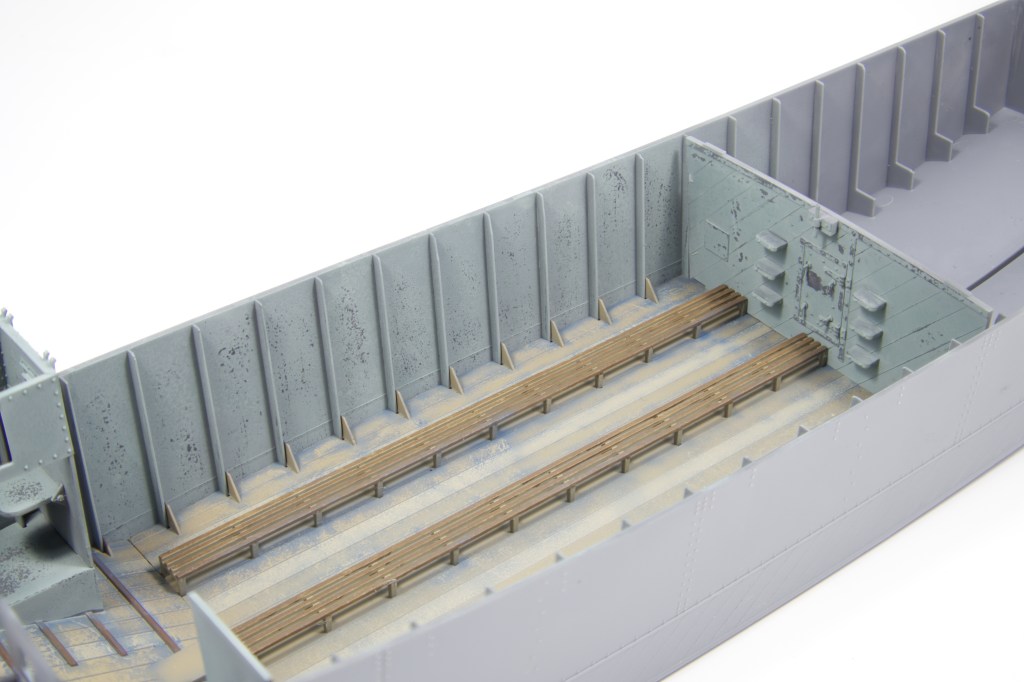
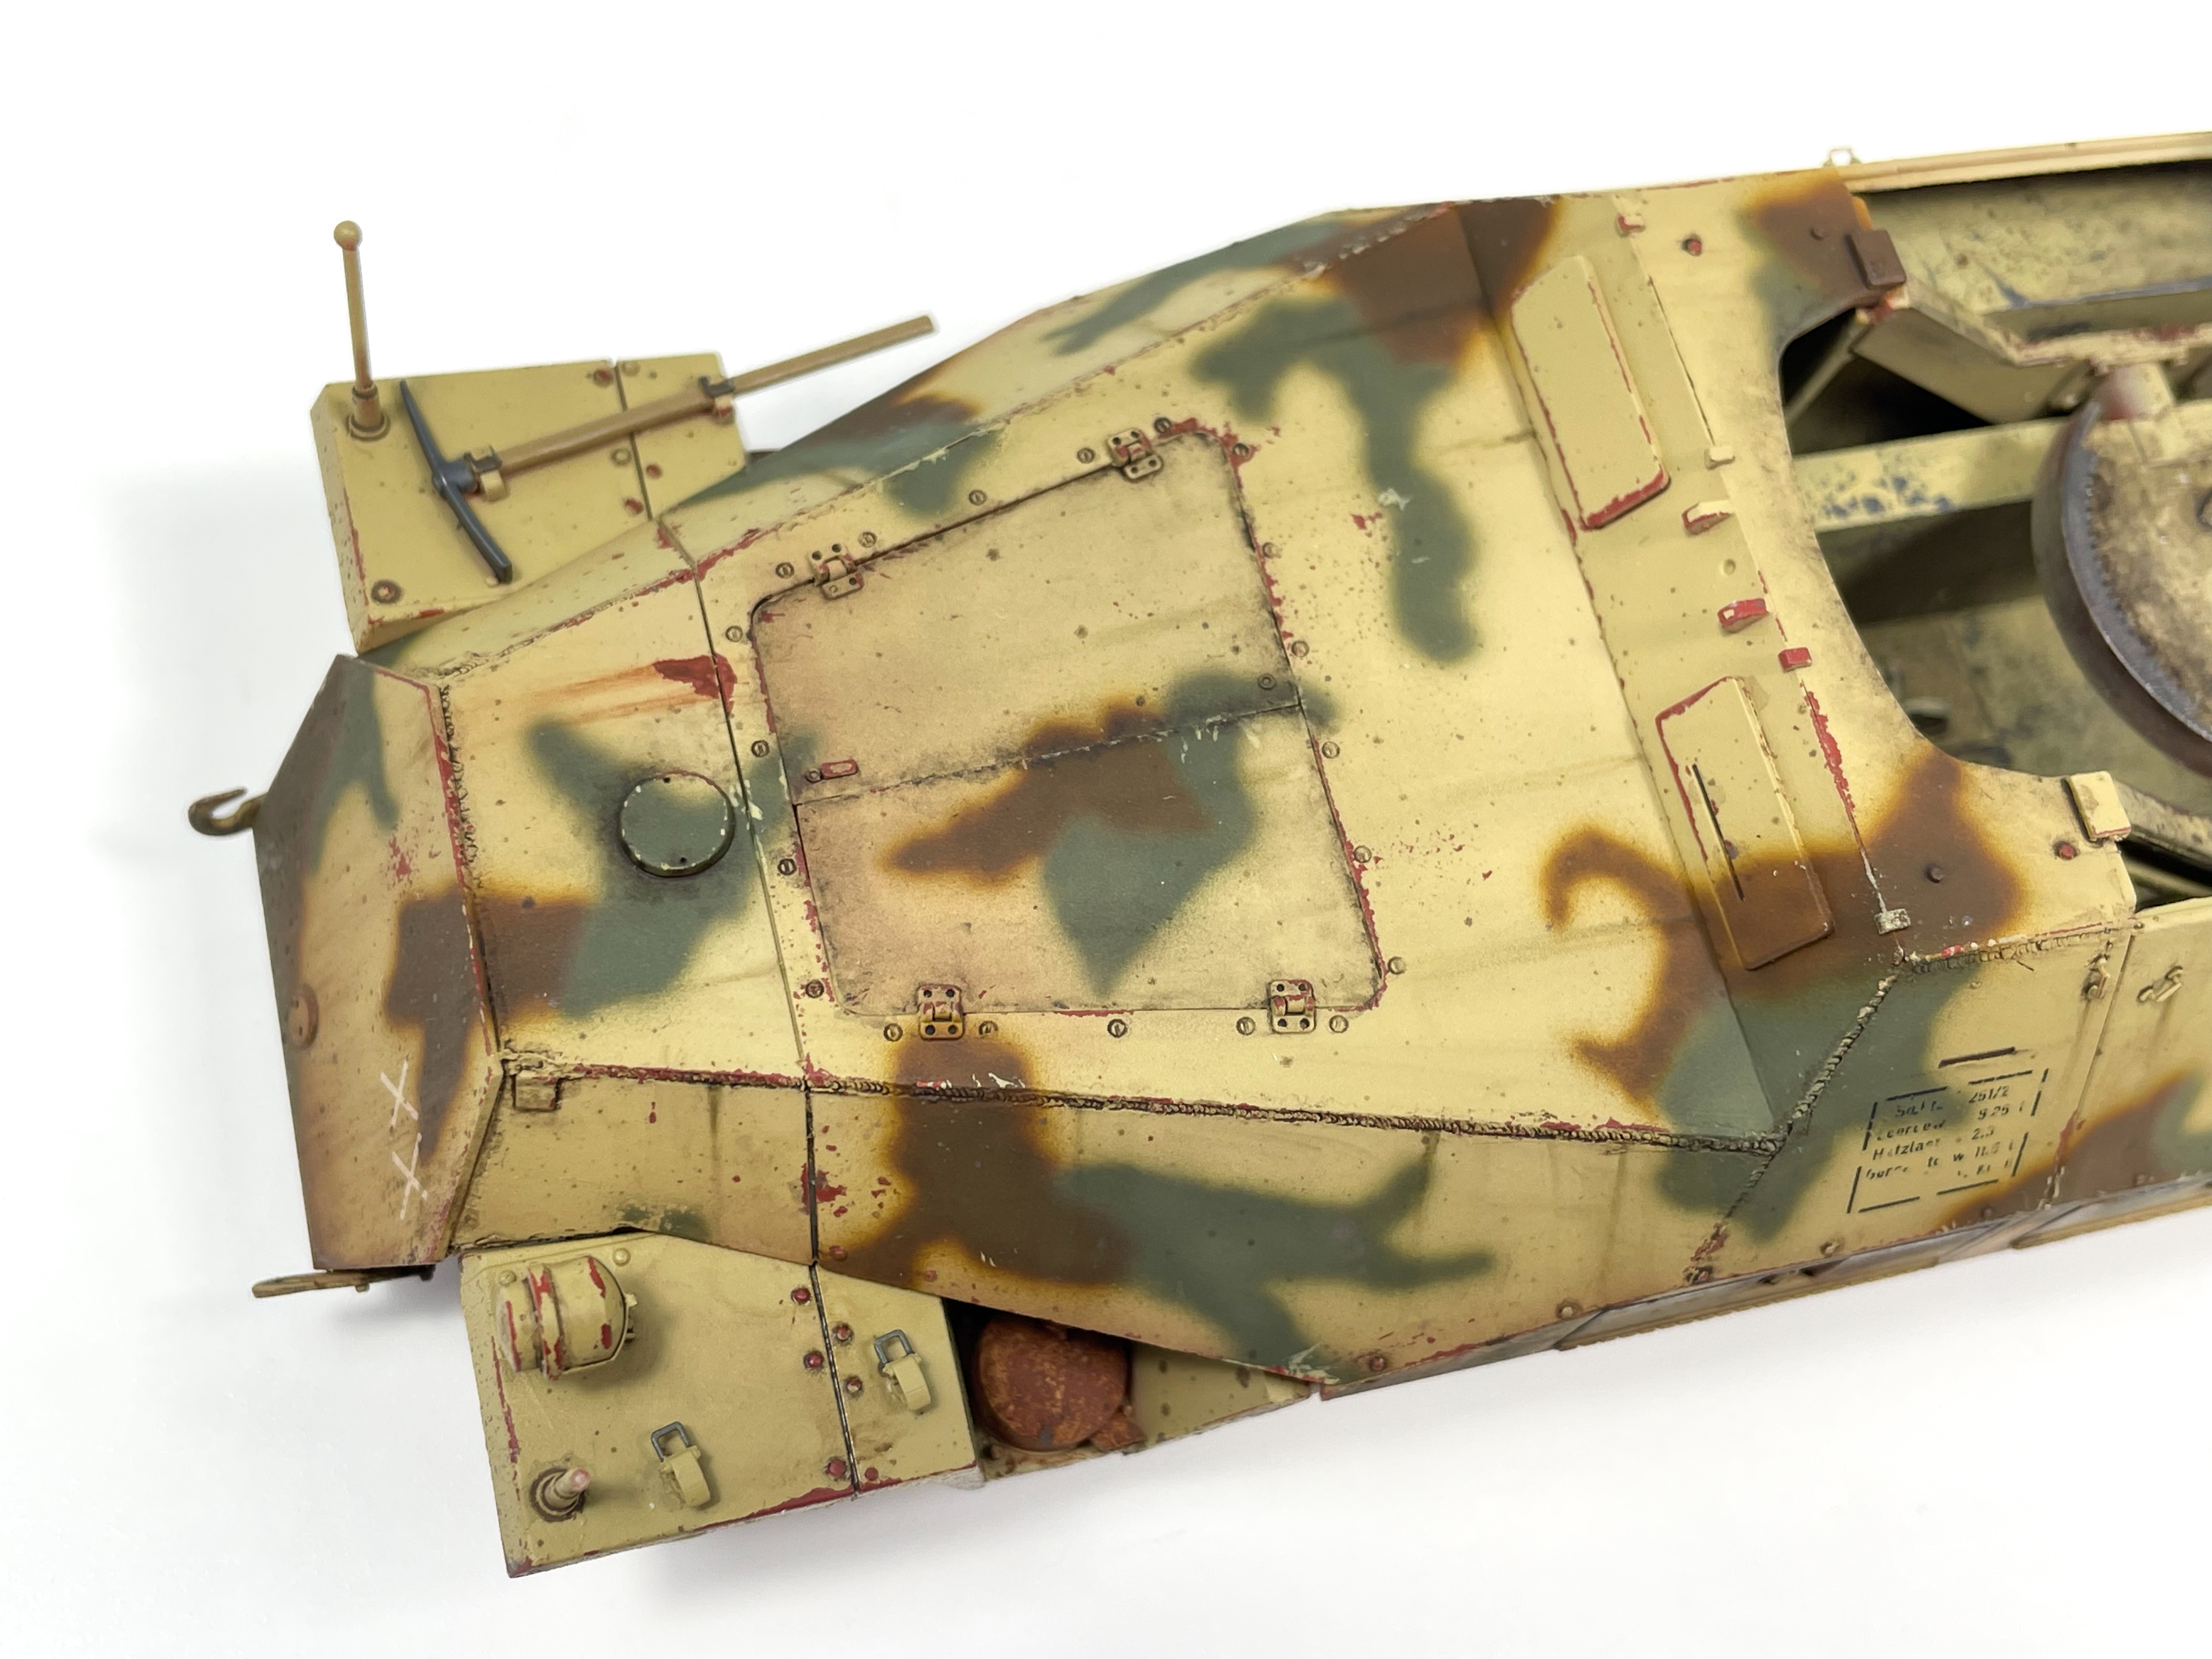
After the initial marble coat with the light sky blue I had a fairly good base for further pre-shading and paint variation. The LCA is a very geometric craft and has really distinct paneling, The large square armour plates are very distinct in contrast to the diagonal planks. I really wanted to take advantage of these shapes so I decided I wanted to implement some drastic pre-shading for this build. This would also help on the weathering side as the kind of finish this would produce was in line with how I wanted to depict the finished model.

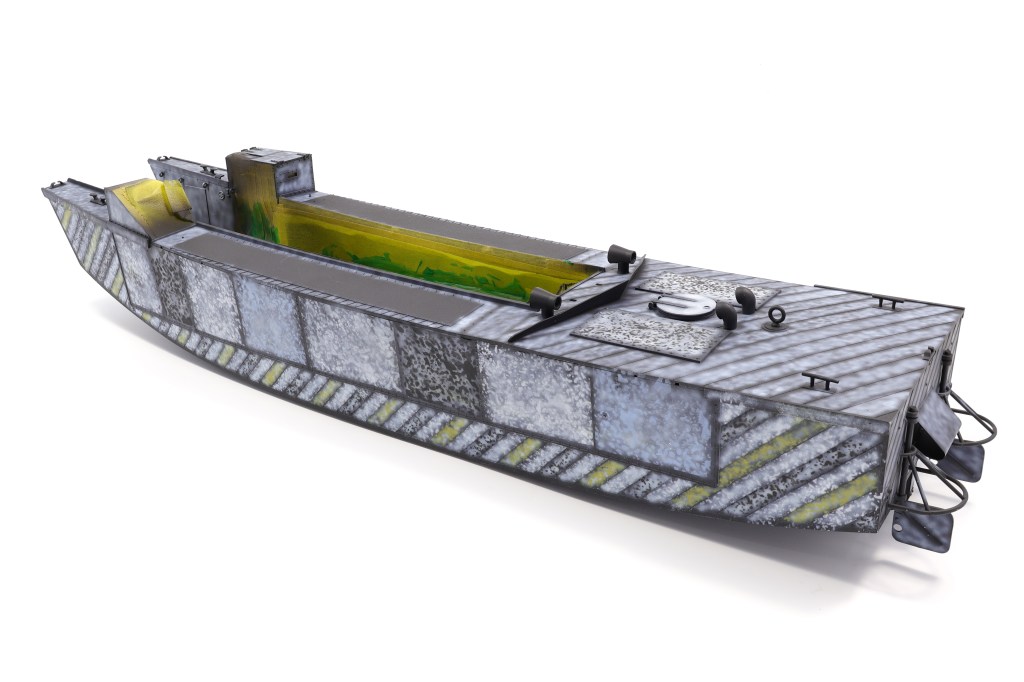
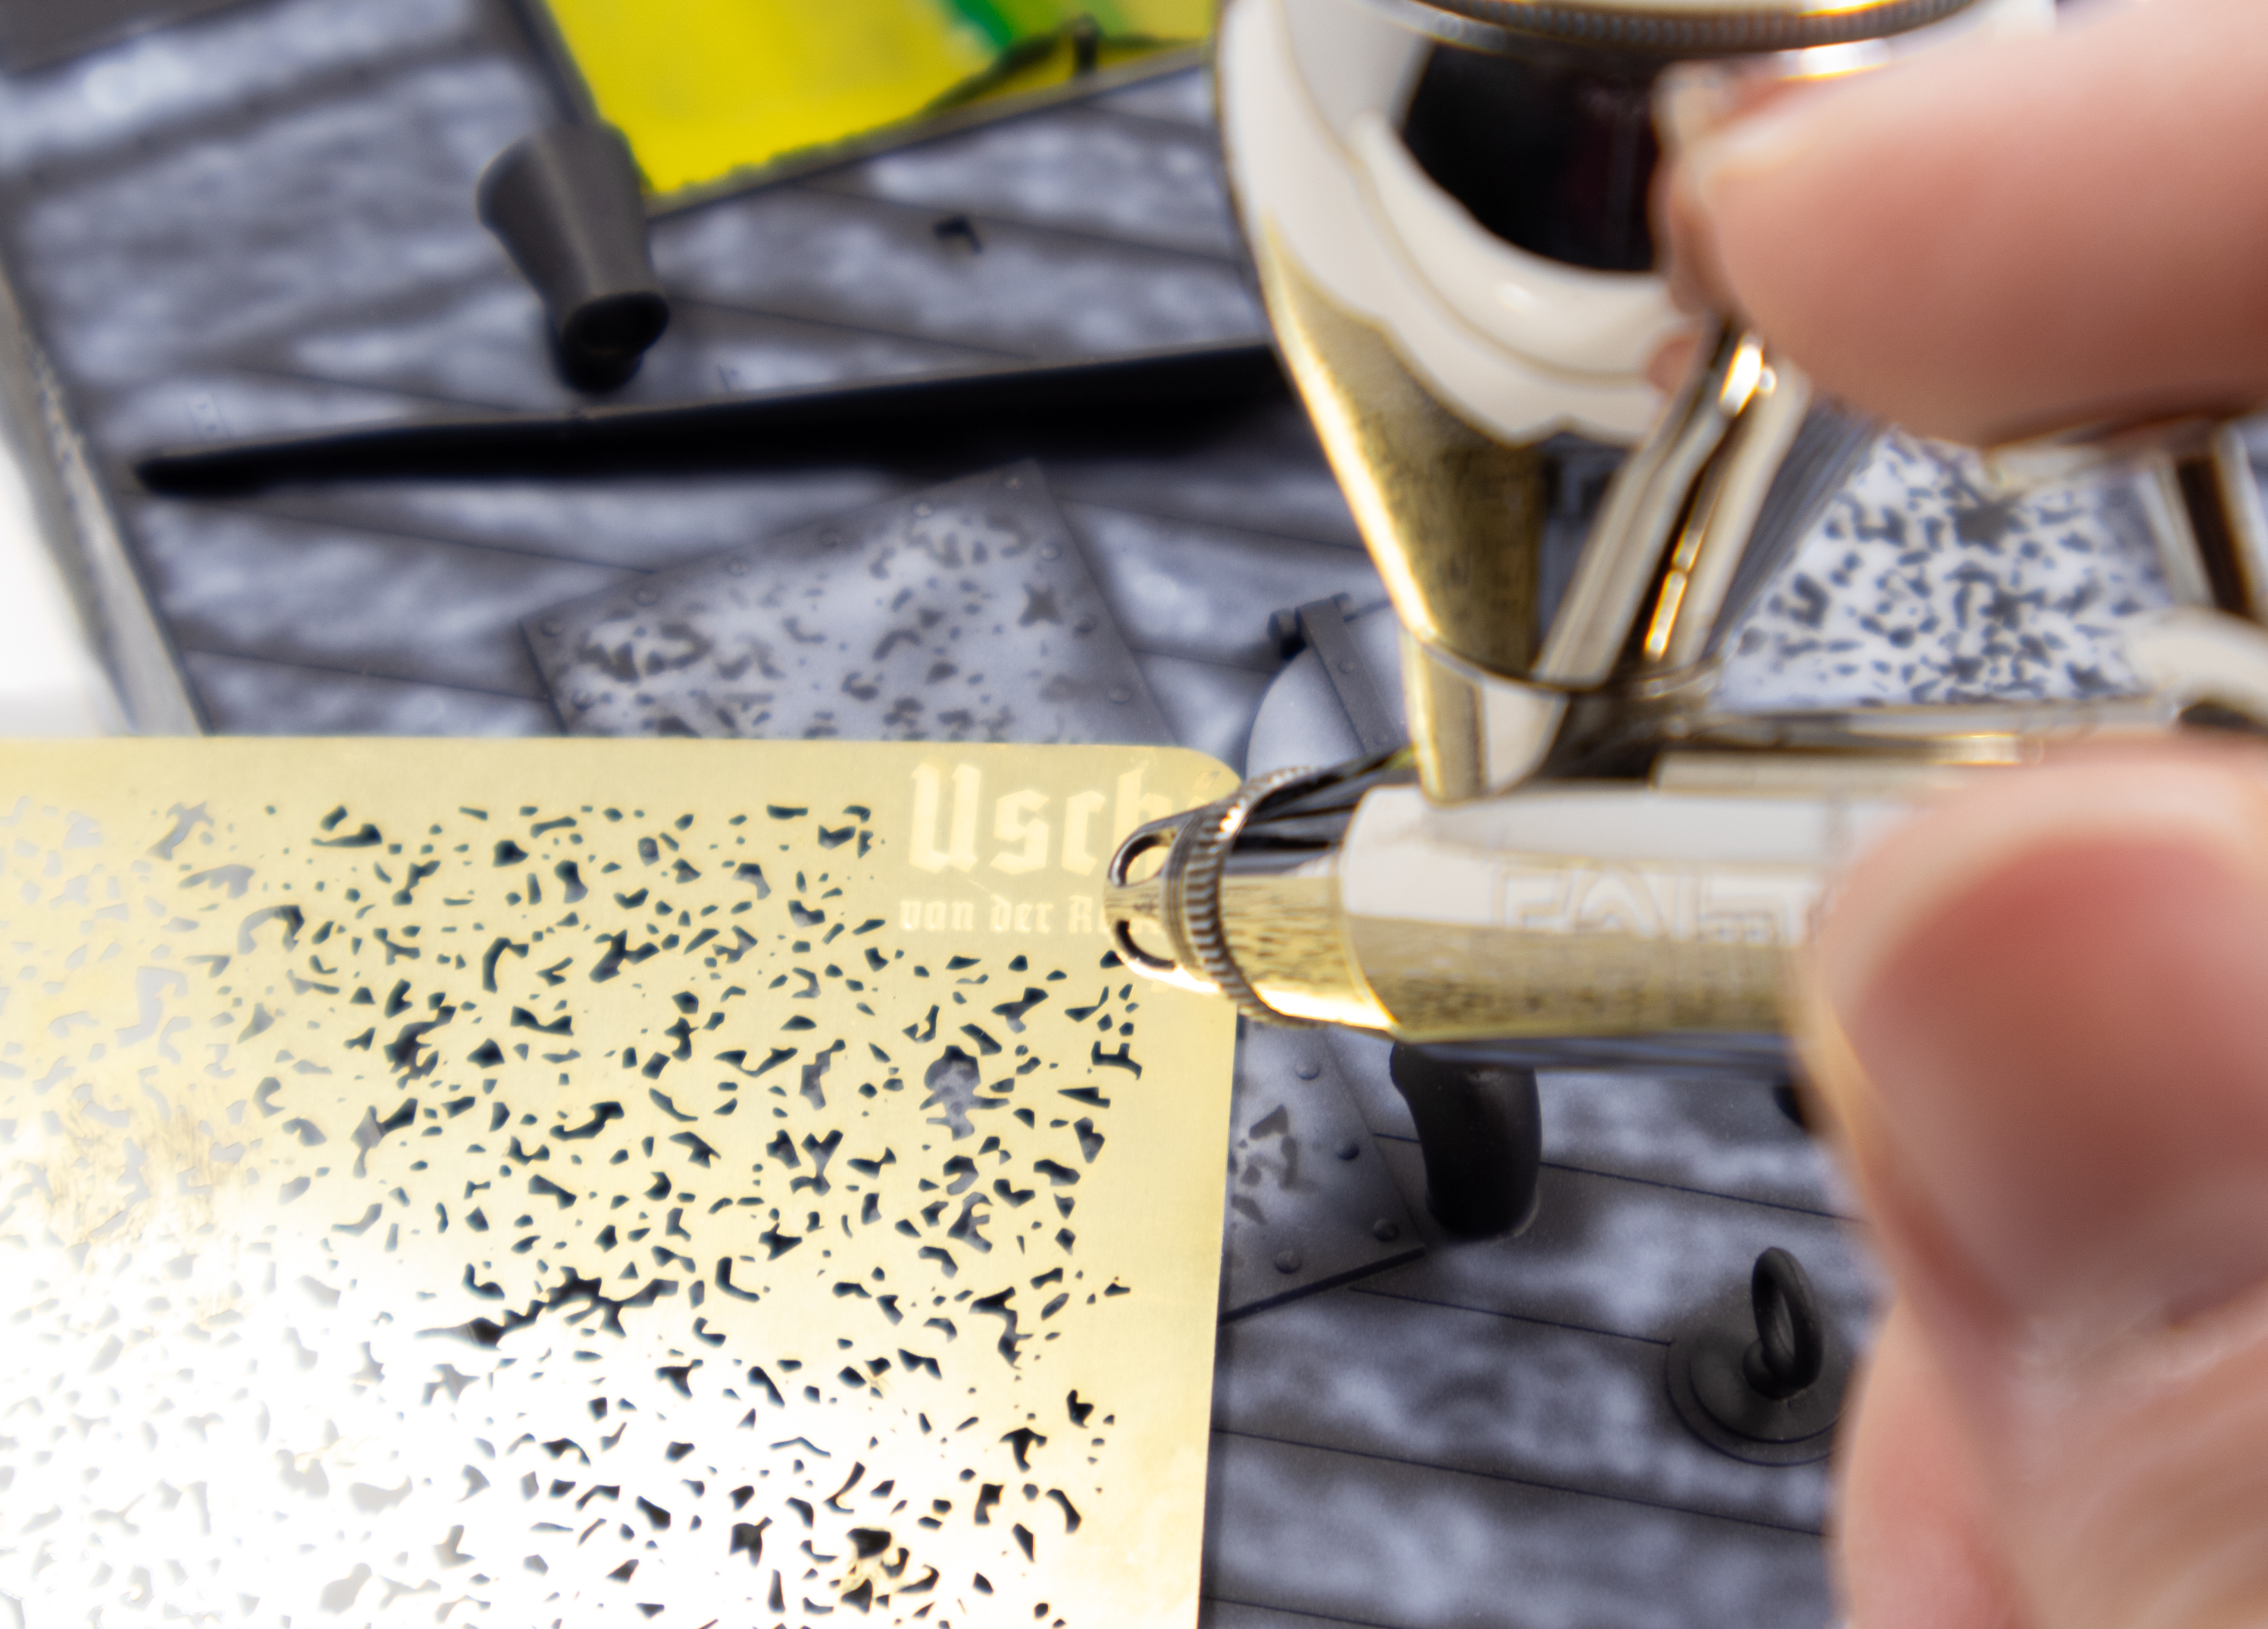
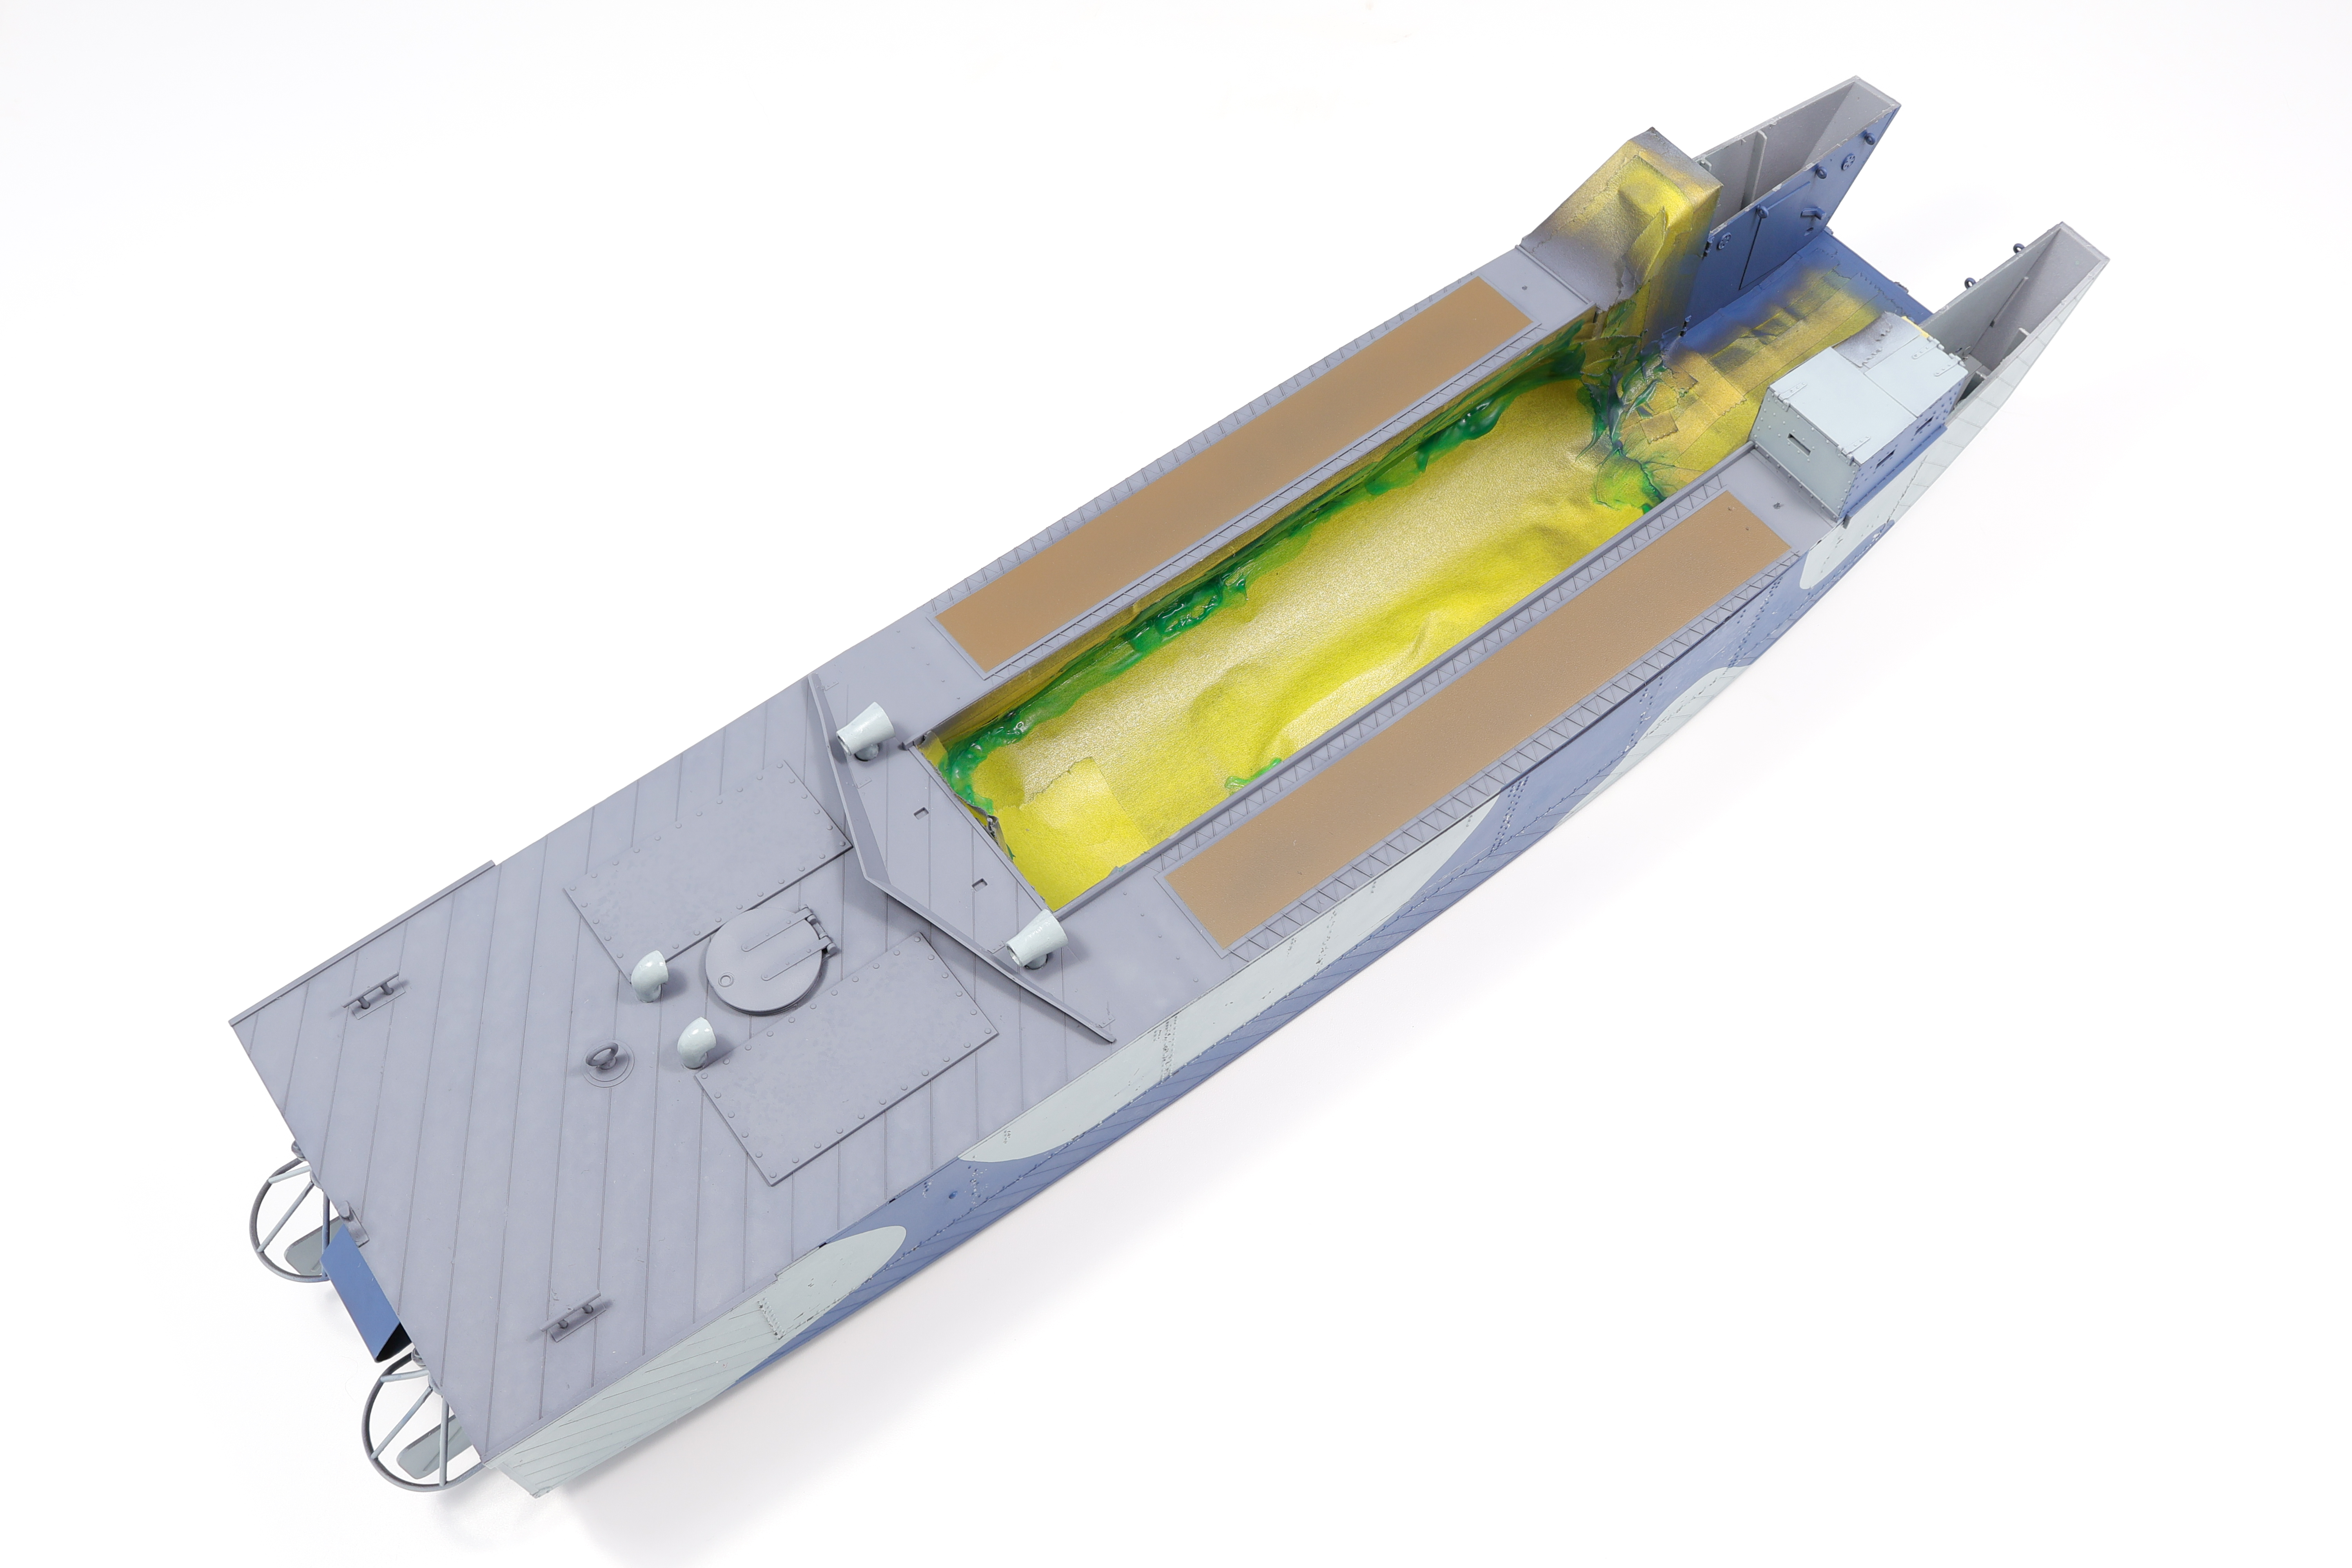
I used several new shades to introduce further paint variation, White, Black, Sky blue, and oddly enough, Dunkelgleb (which looks like lime green when sprayed lightly over light grey). For this stage I wanted hard transitions between these shades and the underlying marble coat and to get them I used Uschi metal airbrush stencils. They are quite good and I recommend anybody who is serious about incorporating presiding techniques in their workflow to pick up a set. One drawback to these however is the fact that they cannot be bent to contour a curved surface. This wasn’t a huge issue in this build as the LCA is a very boxy craft. That said you don’t need to have the stencil completely flush to get hard demarcation lines and holding them slightly away from the model will still yield good results. I sprayed these shades only over specific shapes, taking care the the colours did not spill over too much.

For masking I used AK’s hard edge masking putty. I’ve used it in the past and even though it can be a bit frustrating to use at times, I’ve been able to get good results with it. In fact part of the reason I picked this specific type of landing craft and not Gecko Model’s U.S landing craft was because I found this specific hard edge scheme quite interesting.

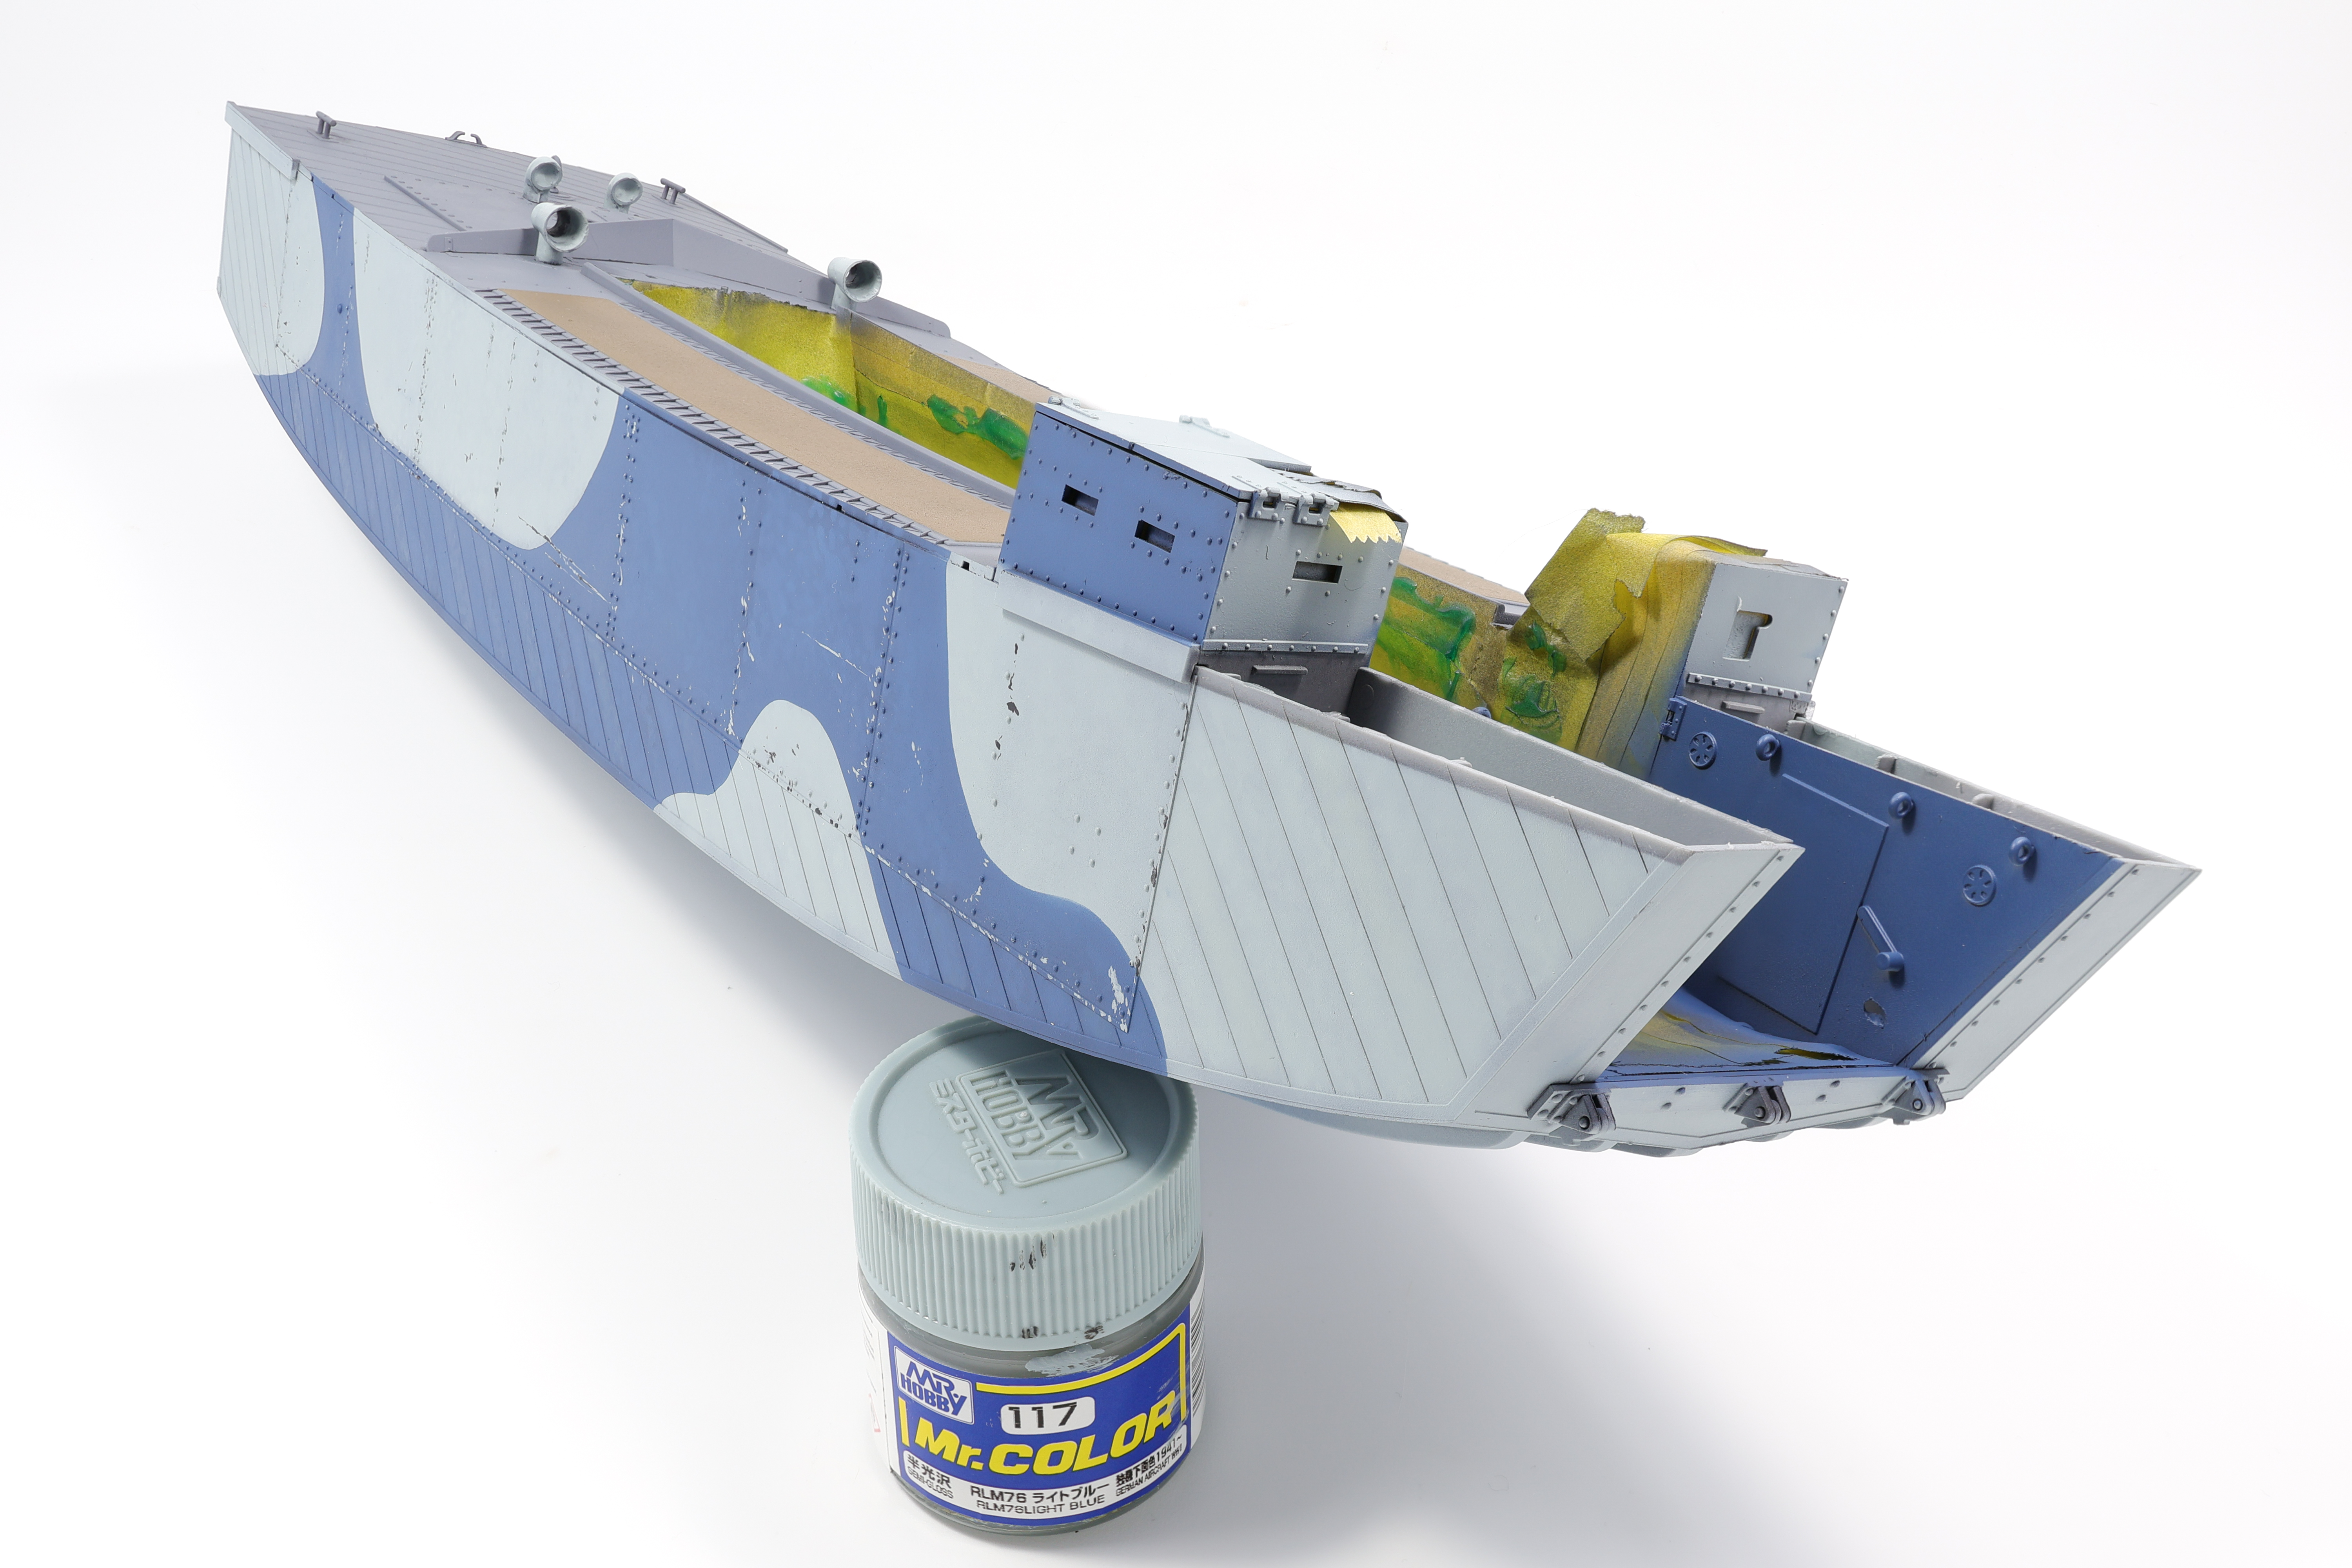
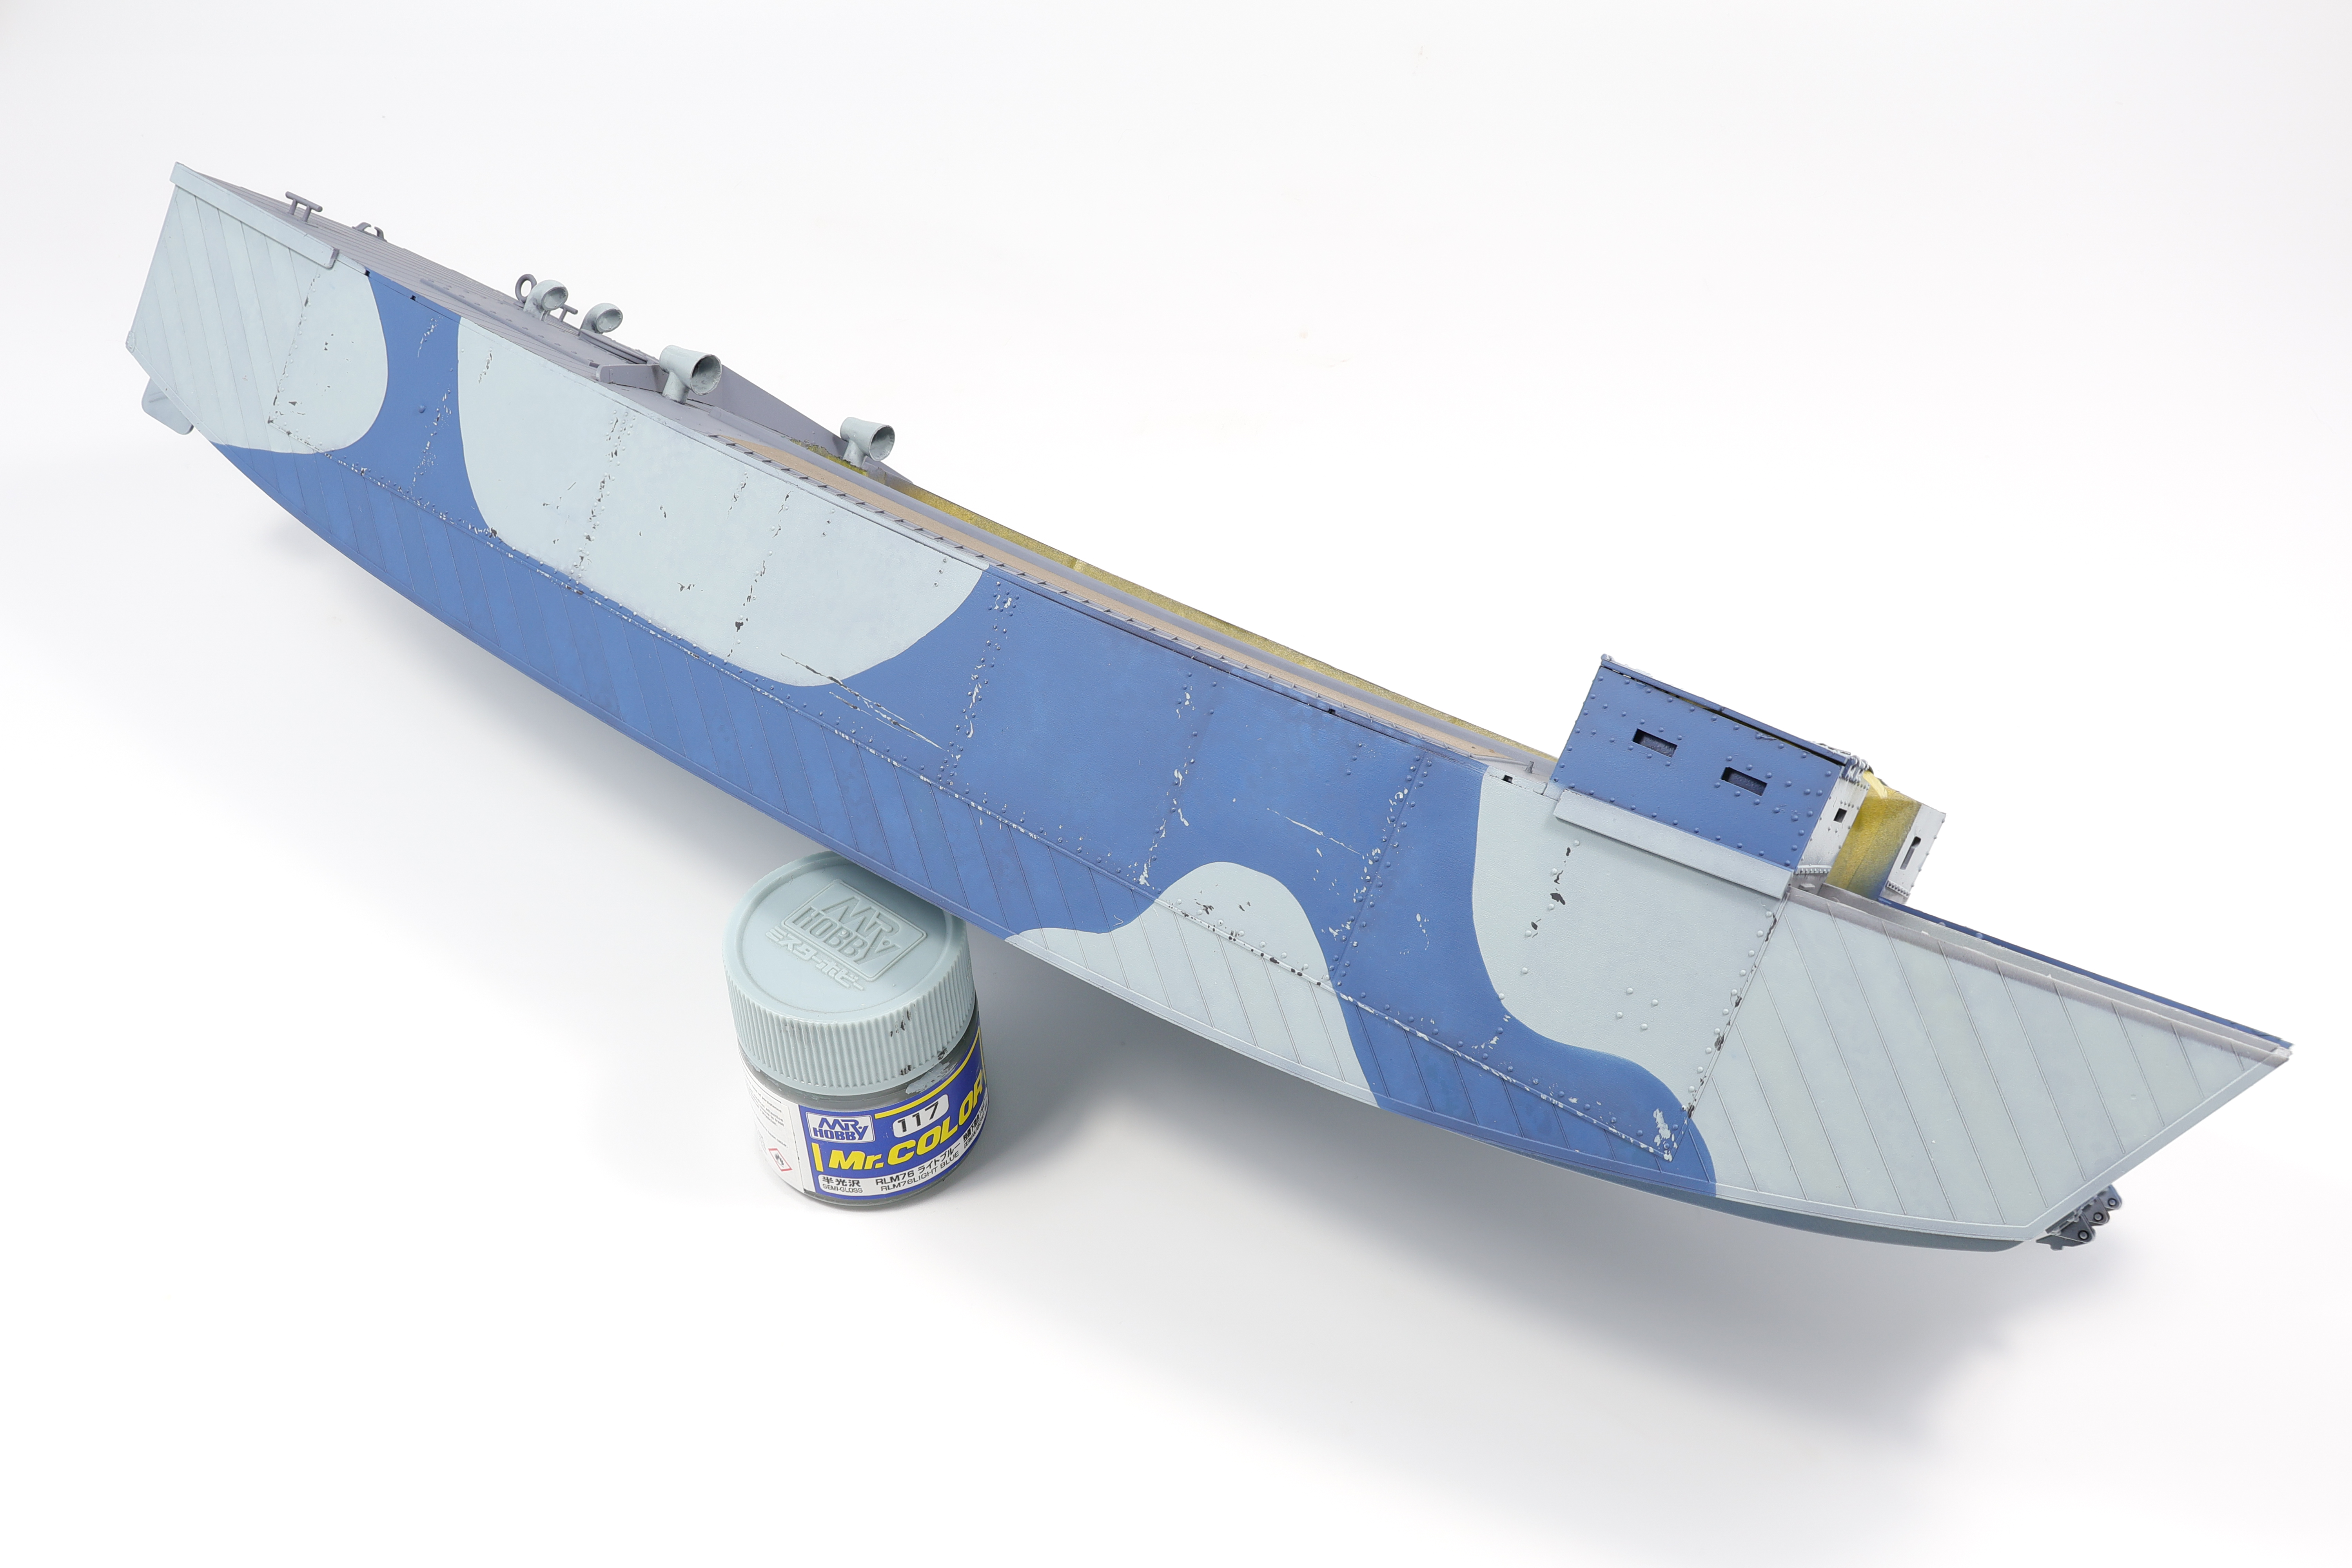
For the final scheme colours I used Mr. Colour Lacquers, with RLM 76 light blue used as the grey shade and Intermediate blue used as the blue colour. Even though the bottle says “light blue” this colour is very close to being grey and with the pre-shading underneath it has a further grey tint.

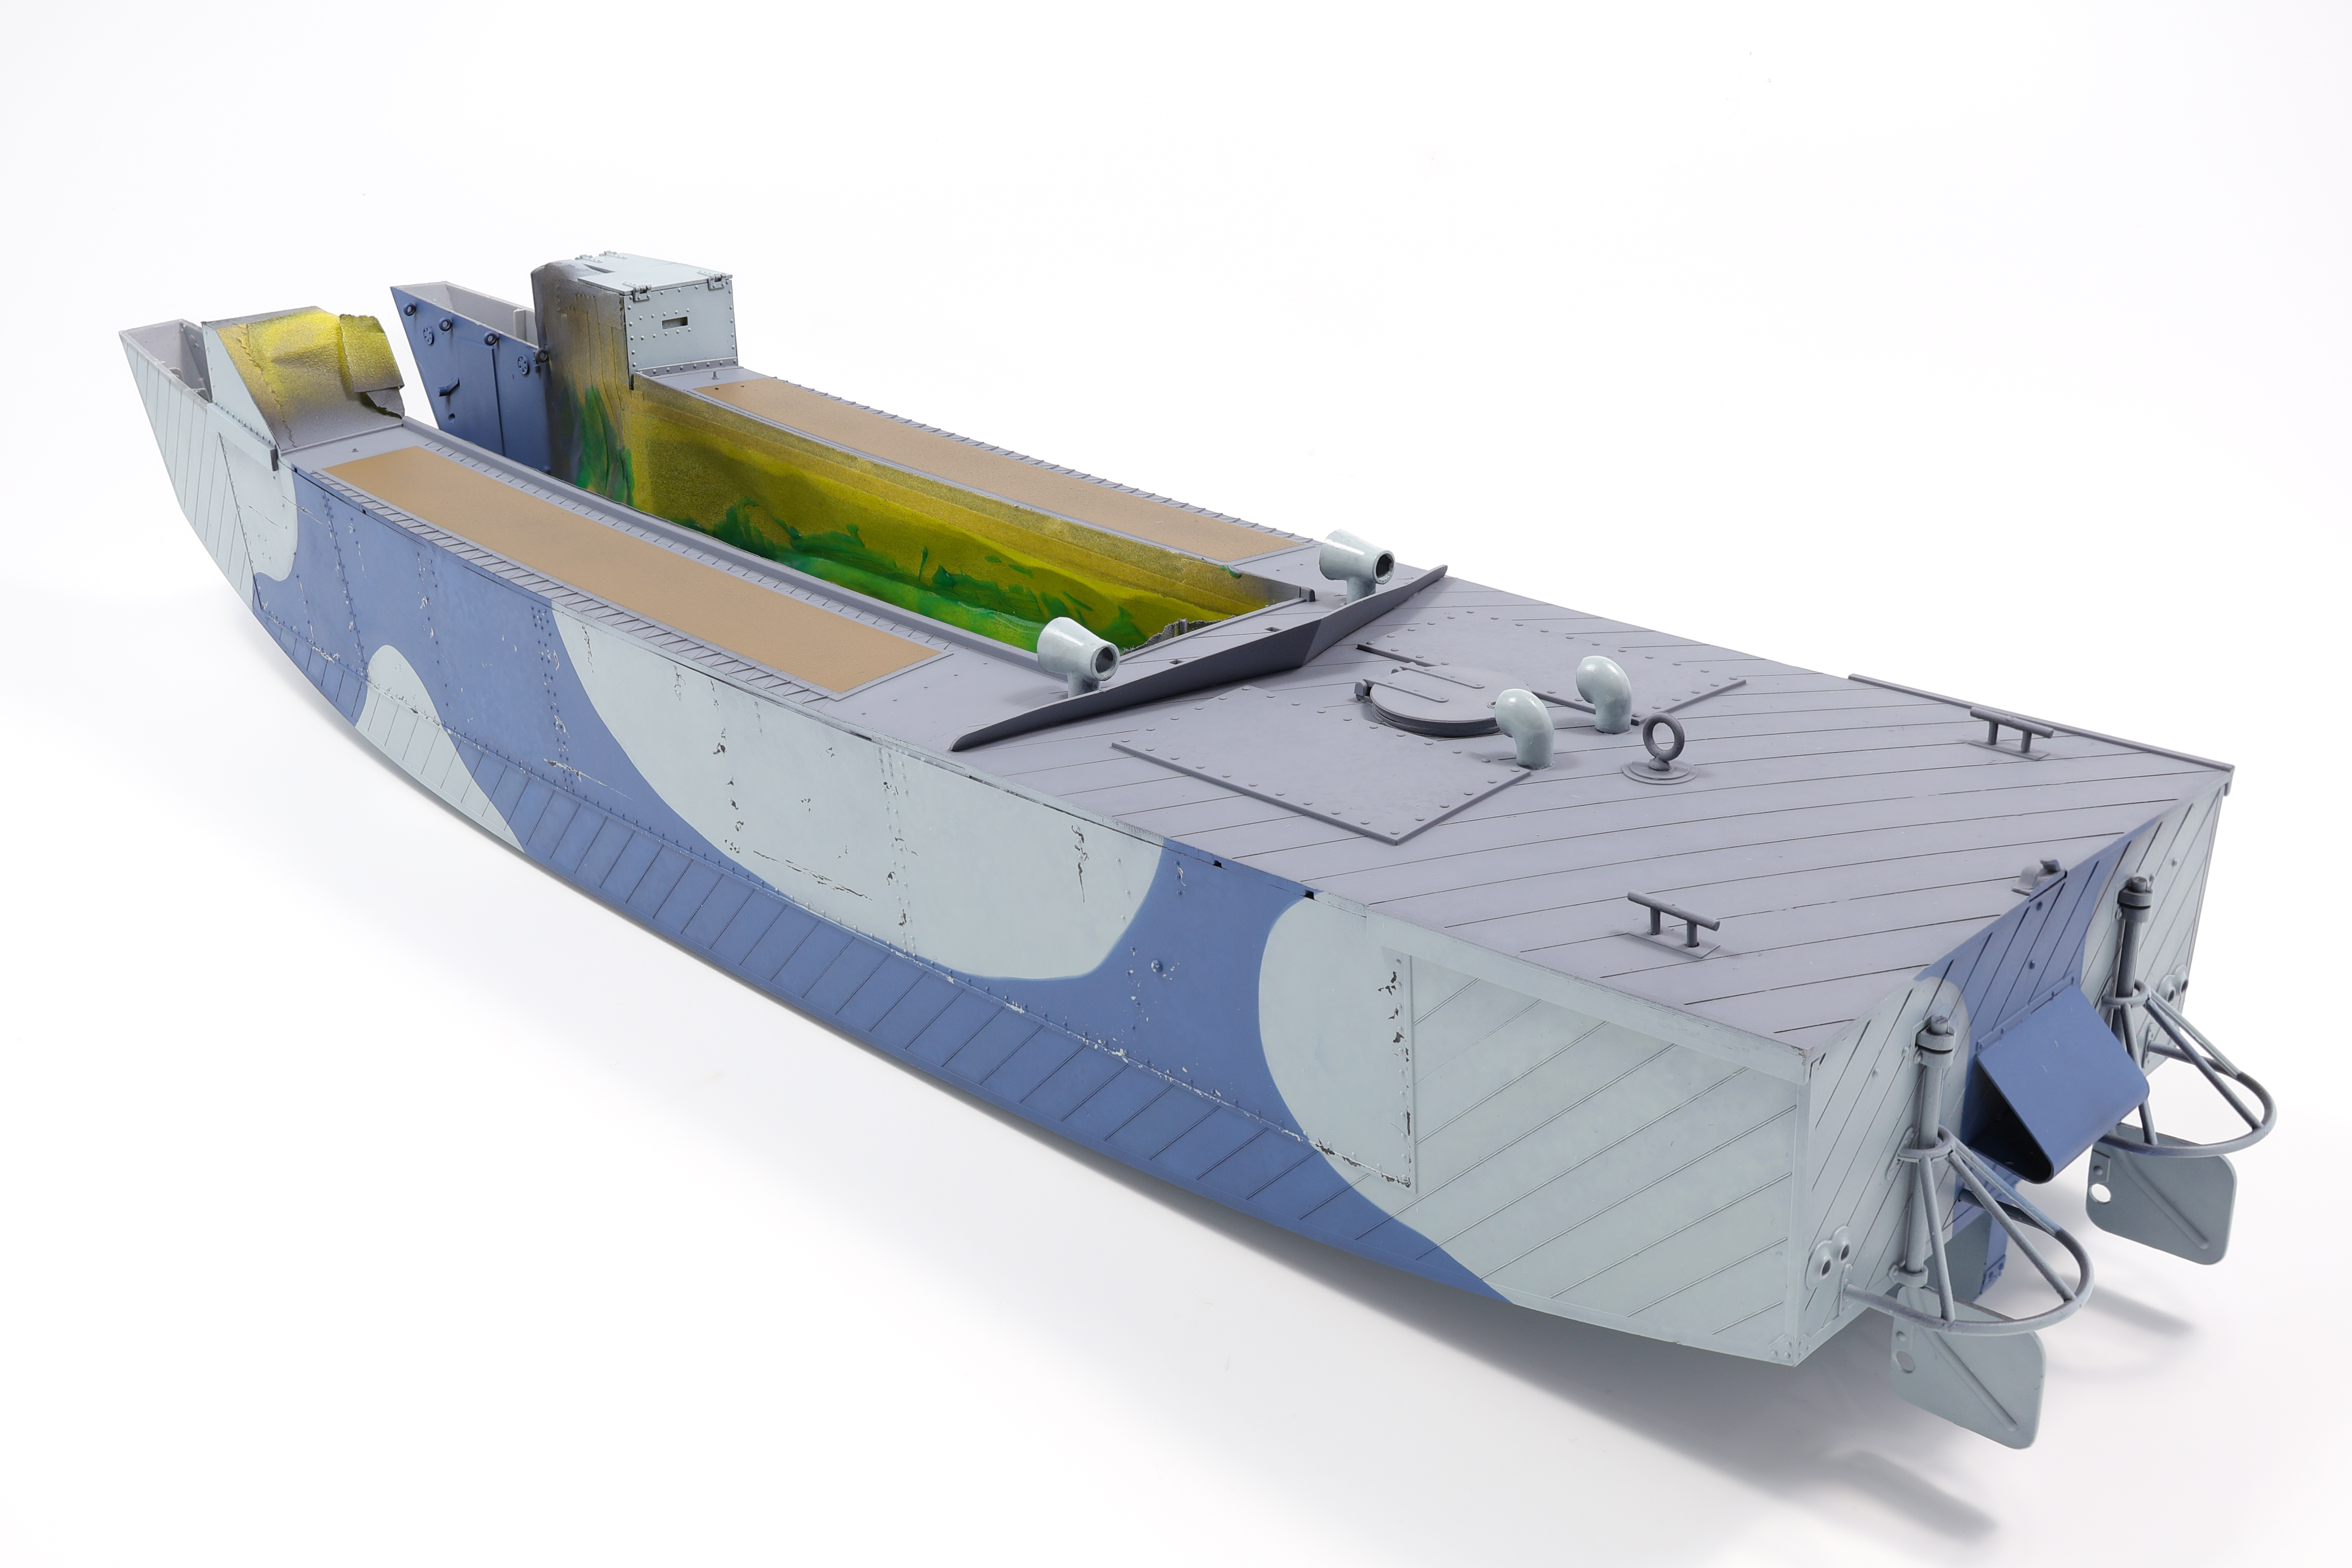
At this stage before applying any vanishes I started the weathering process in the form of slight paint chipping. I thought it was important to add some visual interest to the sides as not adding weathering in this area will cause the model to look uninteresting and boring in my opinion. All chipping was applied with a brush, a technique I’ve gotten good at over the past few months. I used to avoid brush chipping like the plague but since I got my hands on some super fine brushes I’ve found the technique a whole lot more easier than before. There’s also the fact that with traditional chipping methods such as hairspray chipping you can have a bit of a time limit in the sense that if you paint cures it can be difficult to get it to chip the way you want. There’s still a place for HS chipping but as my workflow shifts to include more pre and post shading I’m not sure where that place will be moving forward.

Decals were straightforward for this build, a grand total of 6 to apply. I used VMS satin coat to seal the model and after doing a test run on a chemical dummy I discovered that Tamiya mark fit super strong nearly melted the acrylic vanish I settled on the far more tame Micro sol/set combo. Decals were fine to use (If a bit thick) and settled around surface detail well. I was a bit concerned about how they would settle over the hull ribbing but it was no issue.

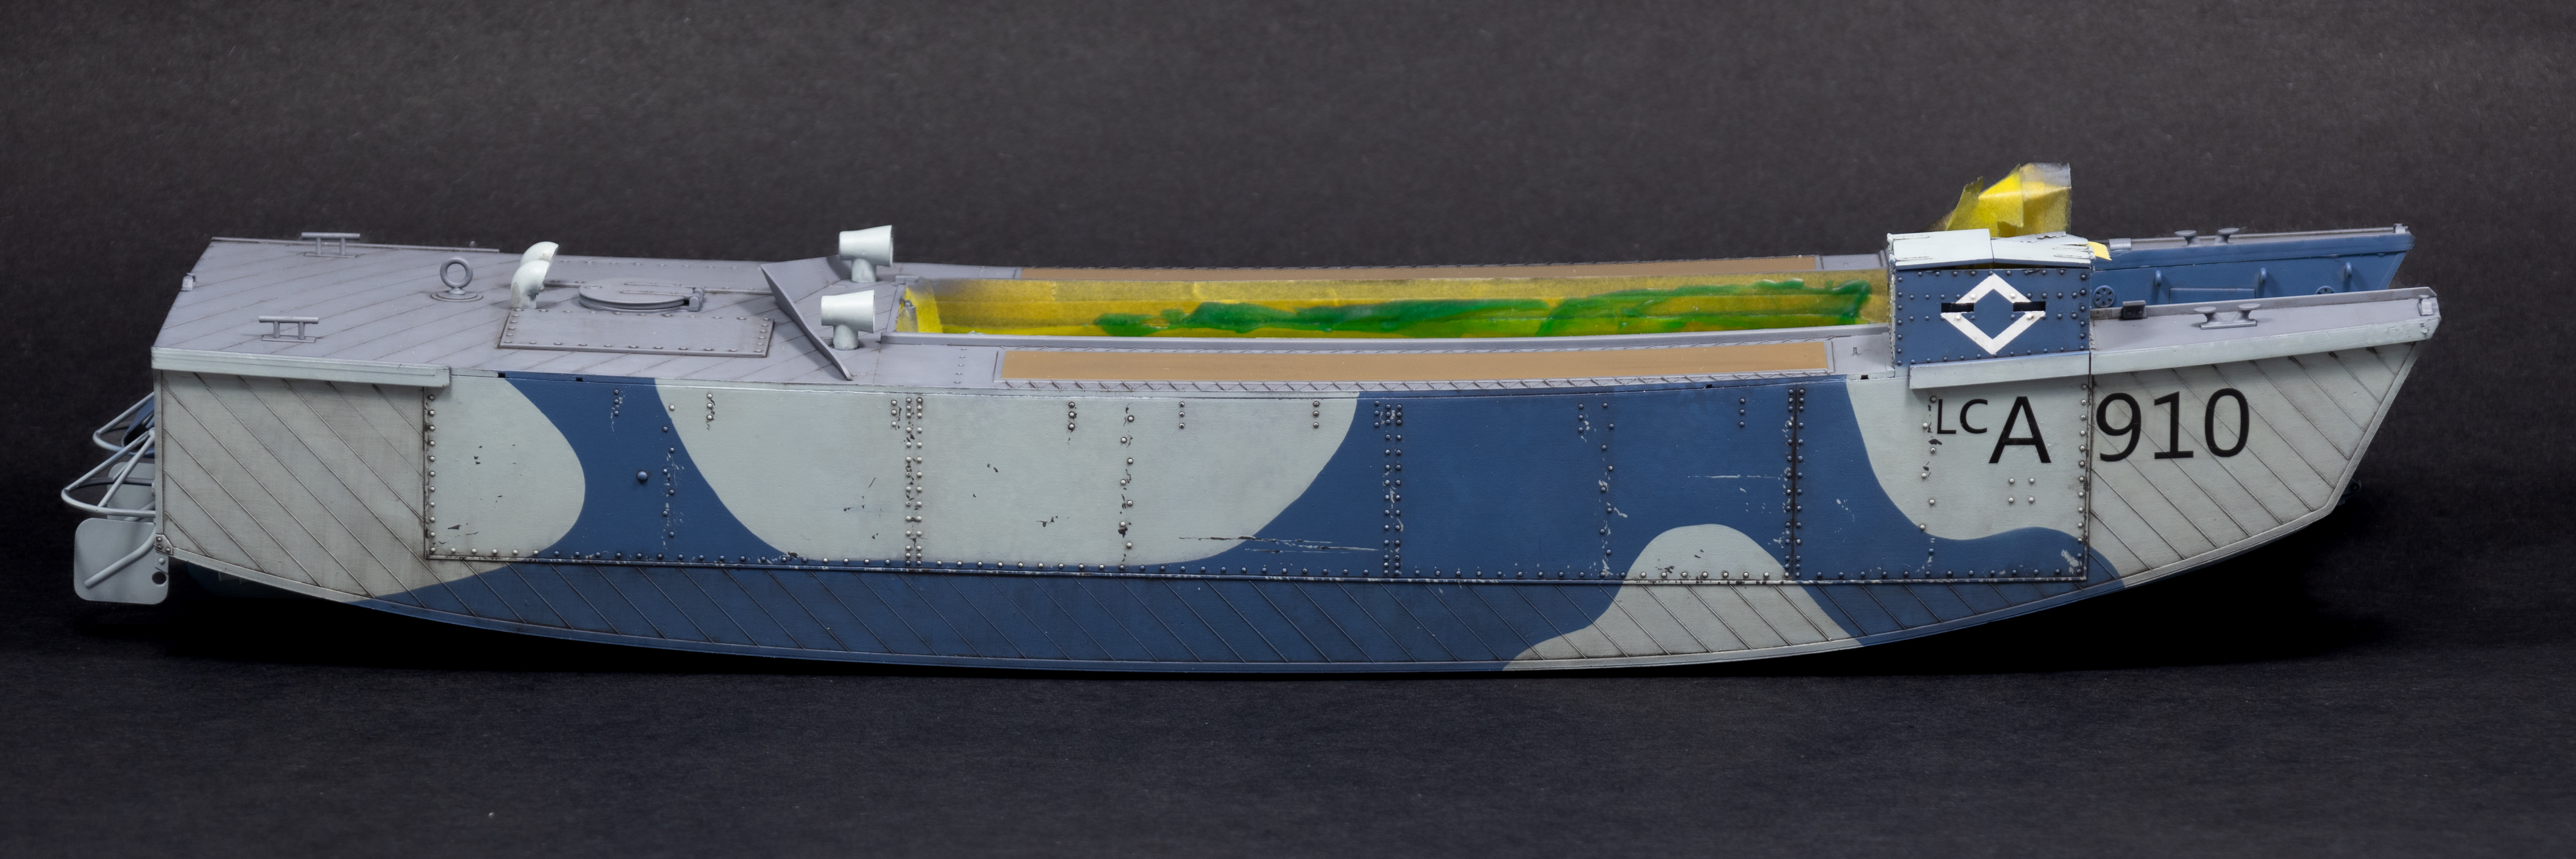
Initial weathering steps consisted of a dark brown (almost black) oil wash. I limited myself to a pinkish on the large steel plates and did a broader wash on the planks on the side. This had the effect of causing the large plates to appear cleaner than the planks further adding some colour modulation.

I wanted to add some algae deposits on the lower hull and to do so I picked out a dark green shade of oil paint. to achieve the desired look I added diluted oil paint in dots along the bottom and blended it with thinner. Like a lot of the weathering I did on this model the effect is really subtle but the cumulative effect of half a dozen techniques adds up.

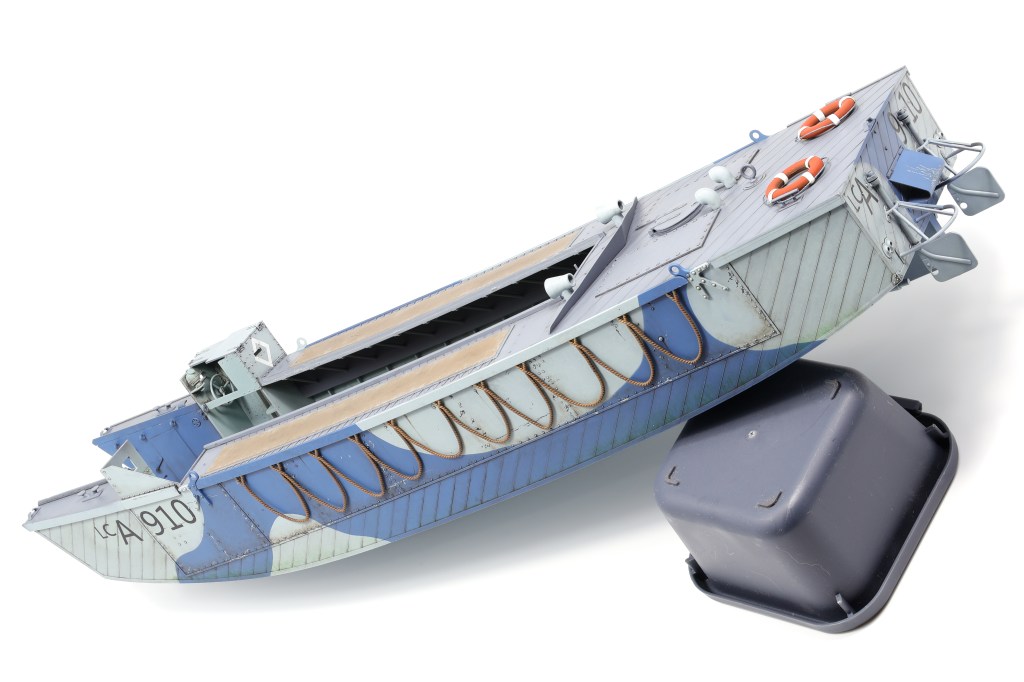
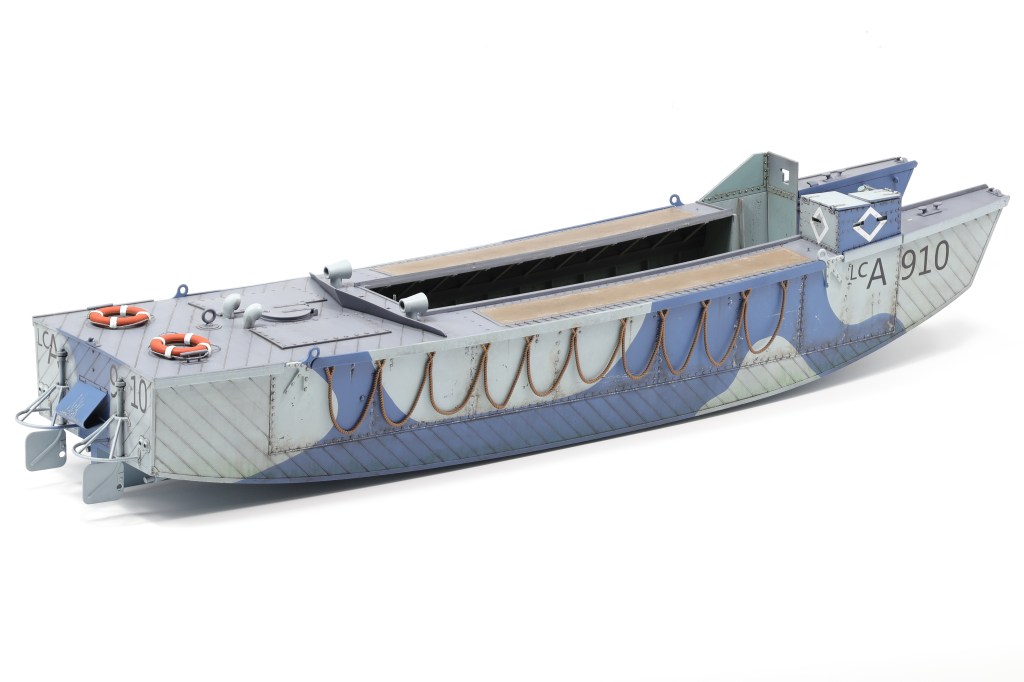
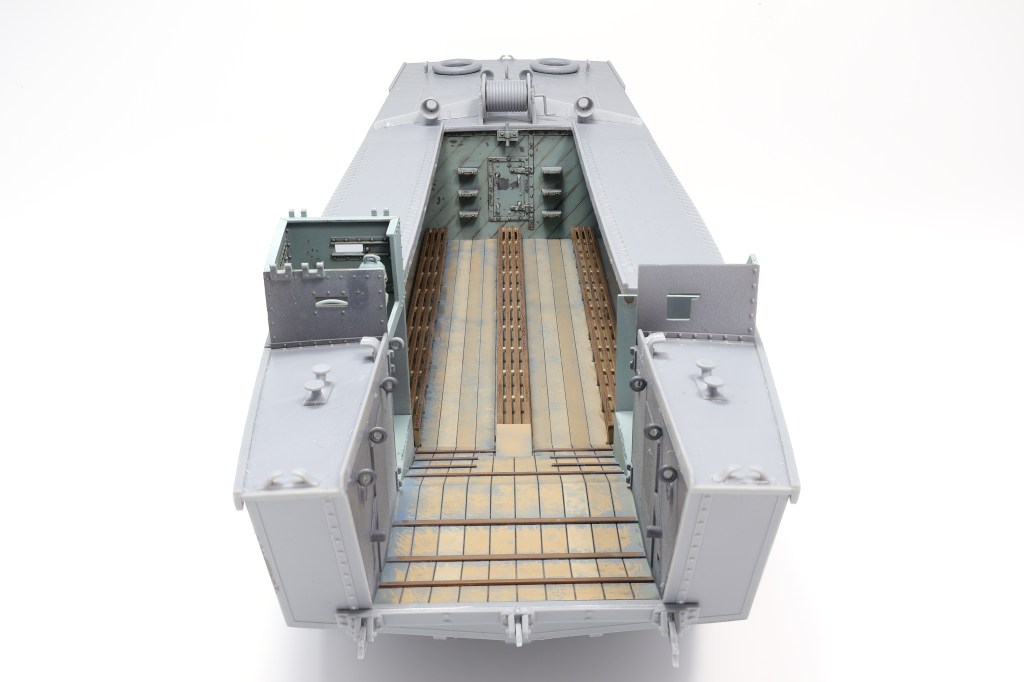
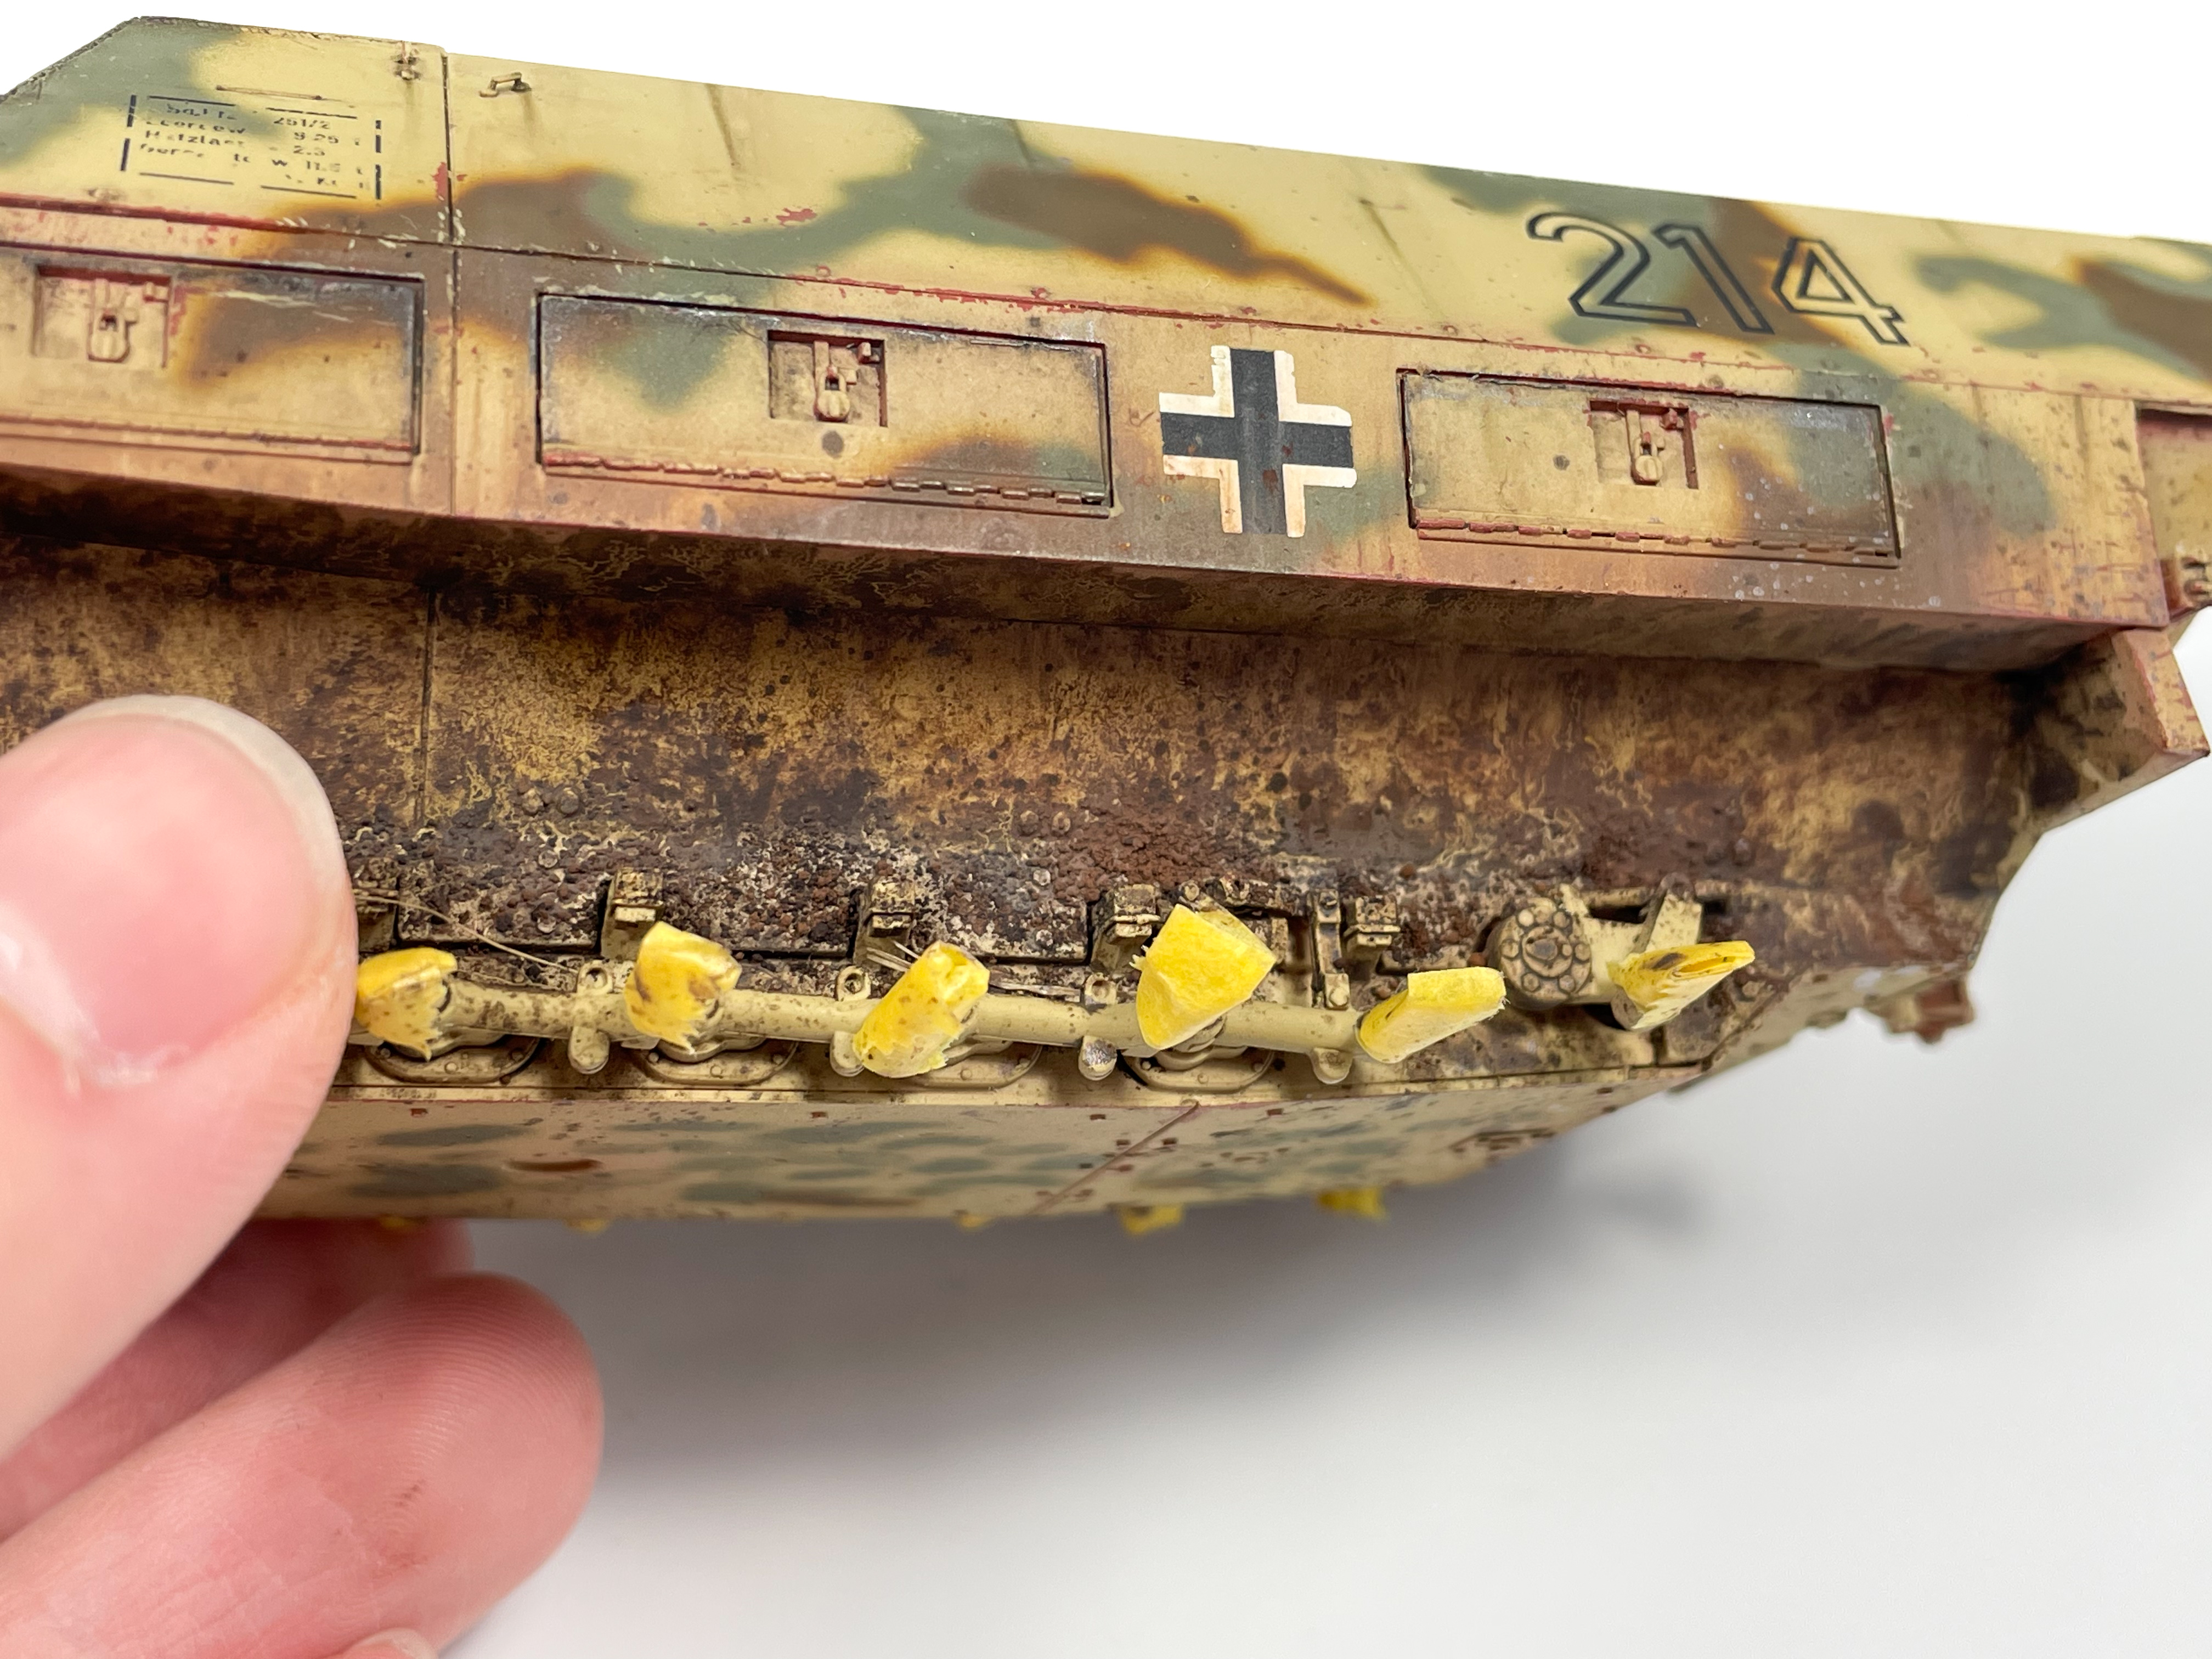
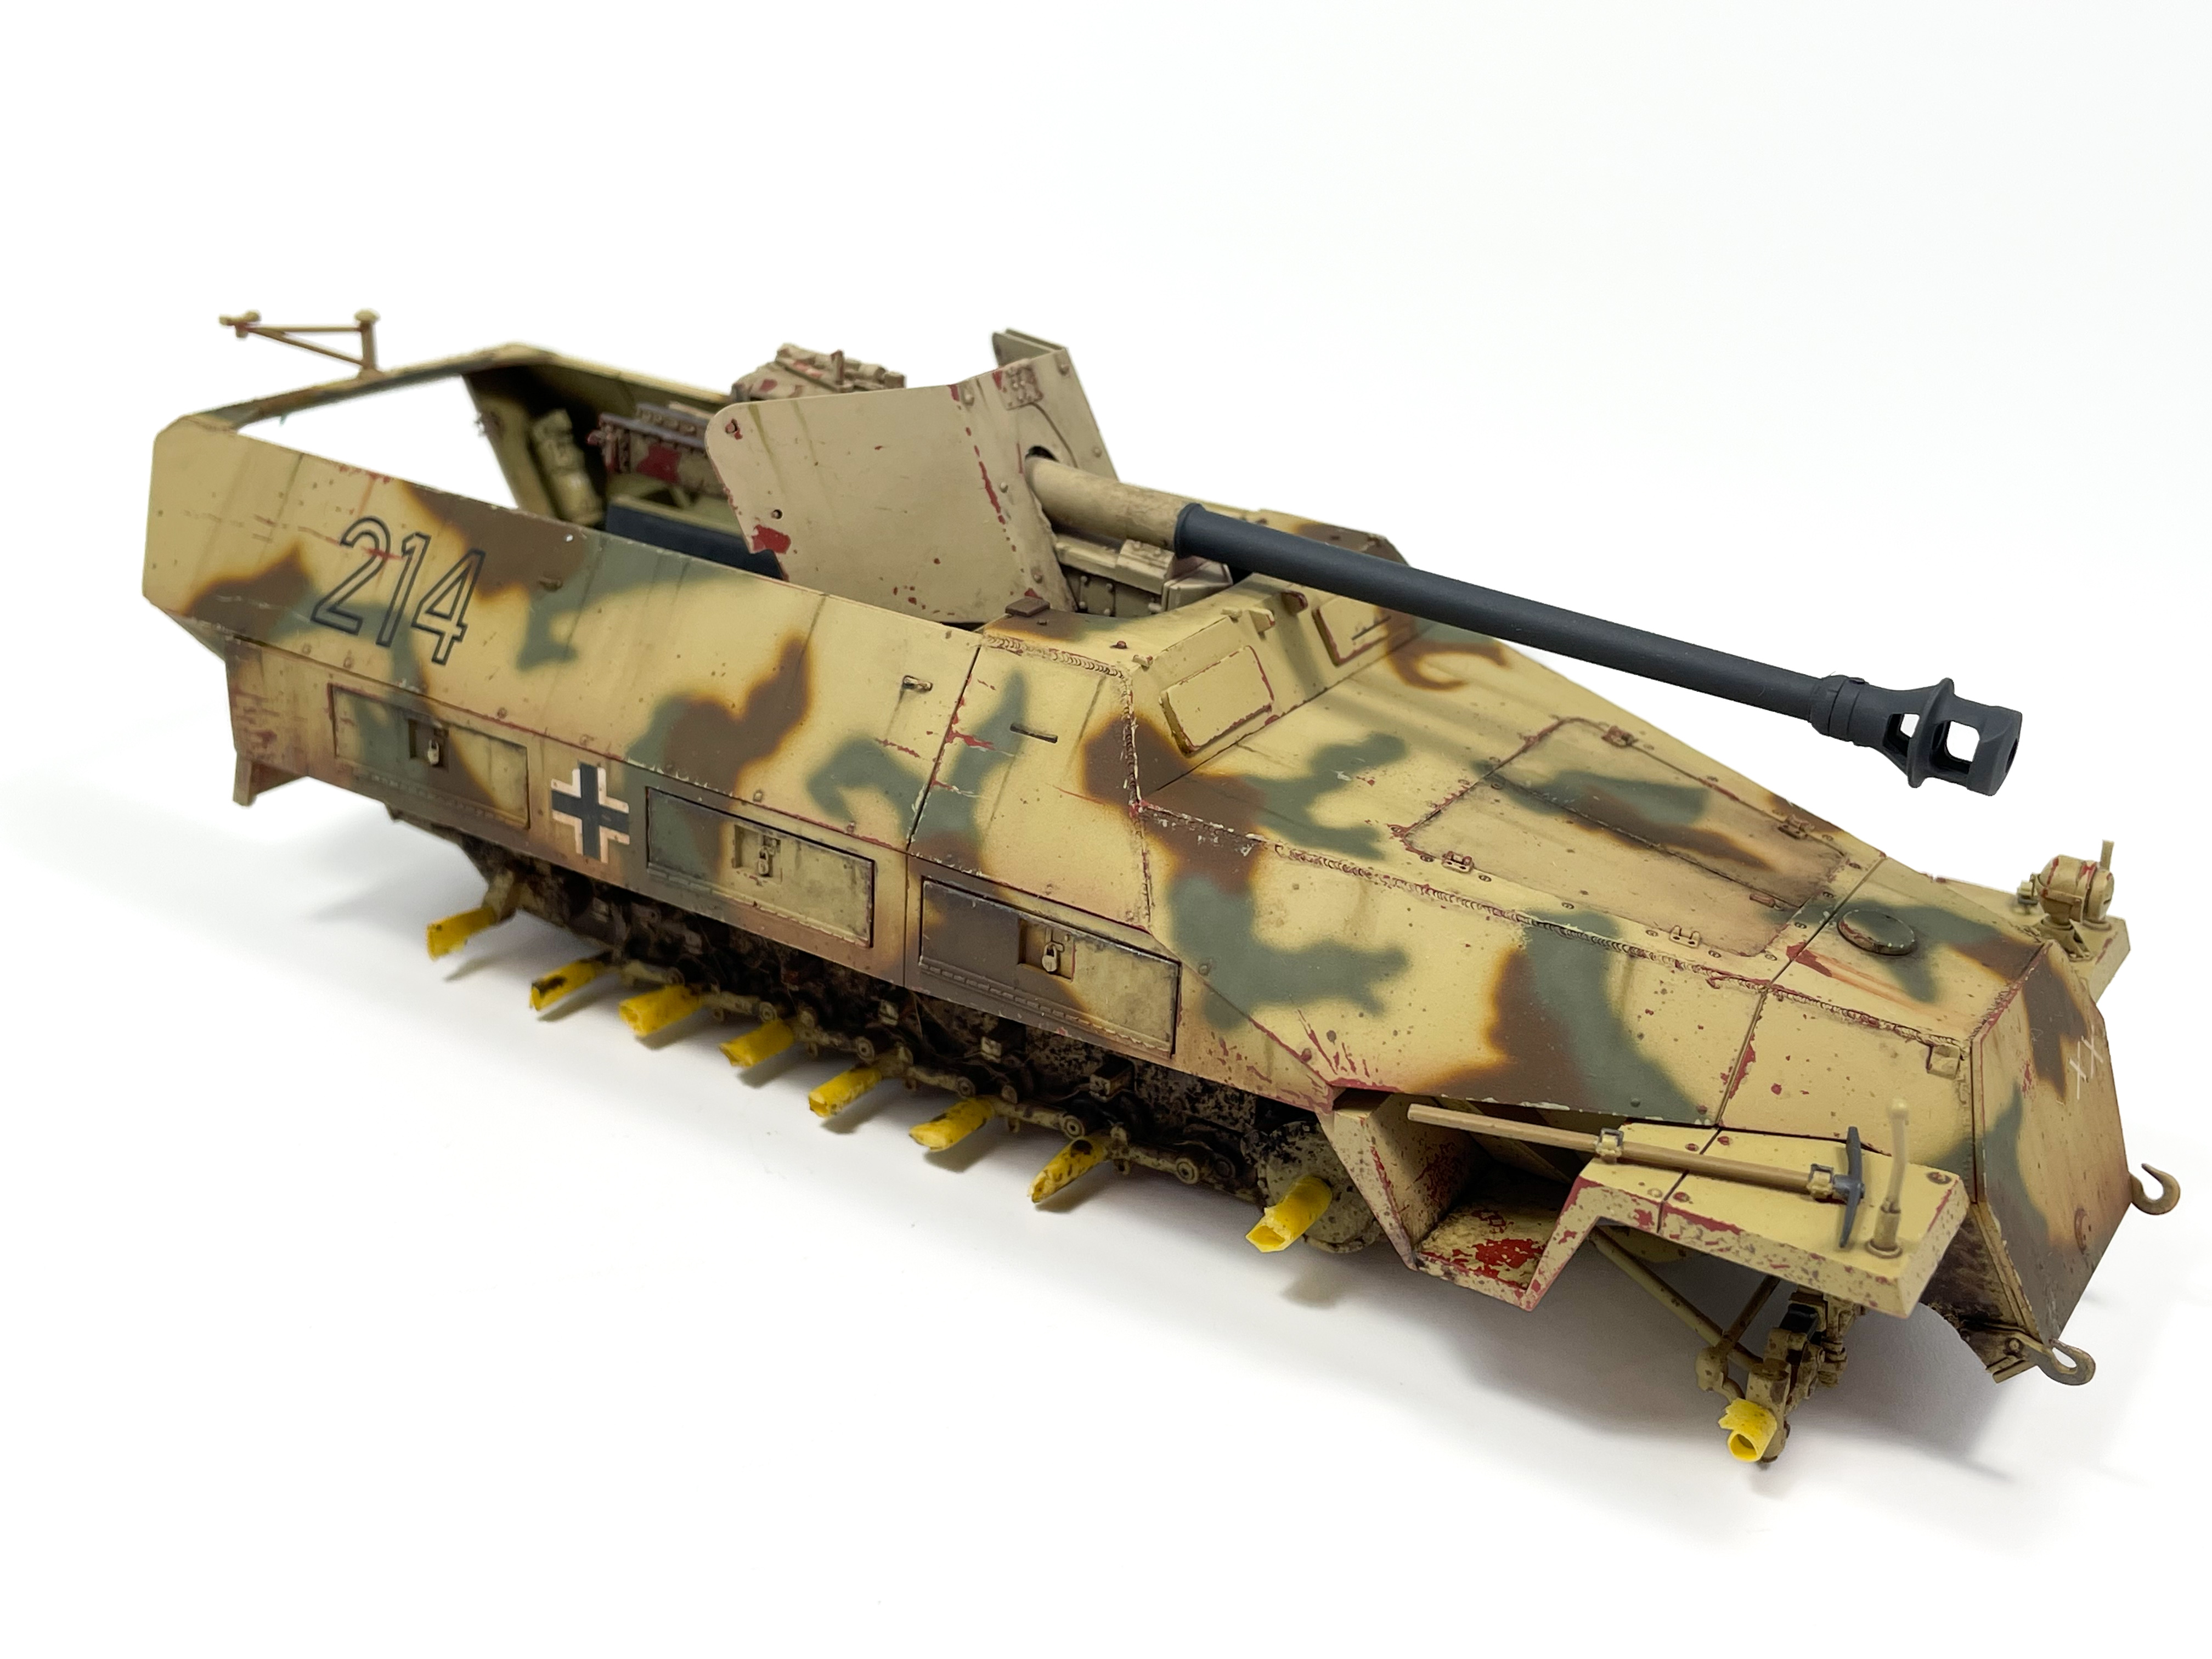
At this stage I also added some extra pieces onto the full after the majority of the watering stage was completed. This included the ropes on the side along with the lifting eyes. I left these off because painting and weathering the hull would have been a nightmare with them on and I could paint the ropes separately and not have to worry about overspray onto the hull. After these parts were added the last weathering effect I did was to add scratches to the anchor rest on the rear of the craft. This area would have seen the most wear on the entire vehicle as the anchor would have banged onto it each time it was lowered and raised, causing significant scarring.

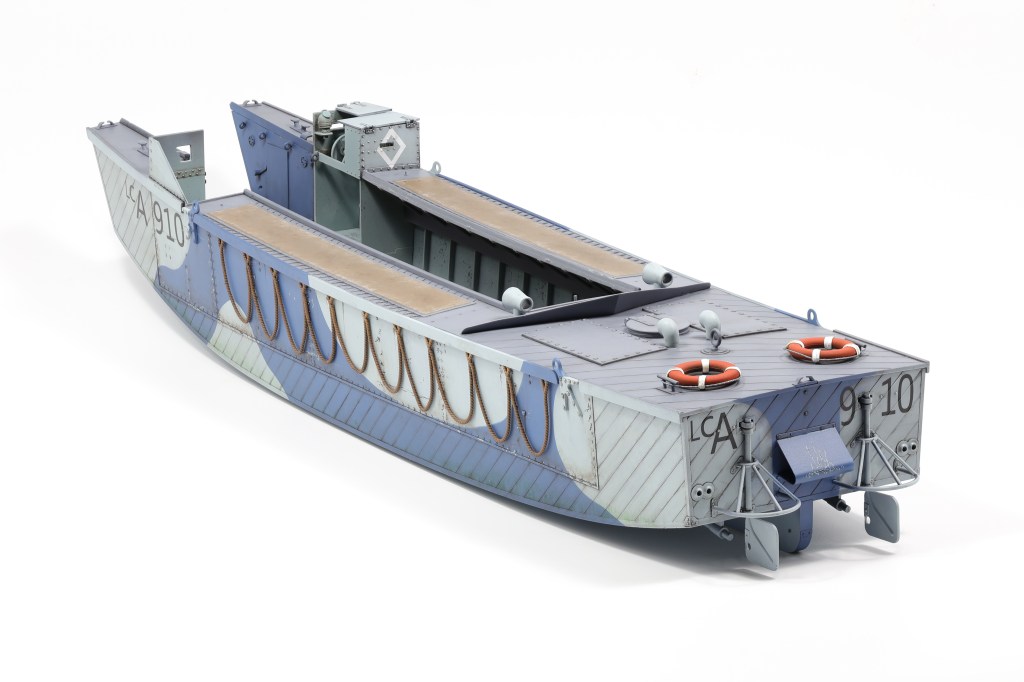
I also wanted to add some visual interest to the canvas covers above the cabin. I felt that this area would get significantly dirty with the exposure to salt water and crew walking on top. weather this area I mixed up a tan/white oil paint mixture and applied it around the outside of the canvas cover. Then, I applied a dark brown mixture on the inside to represent grime accumulated from crew activity. I really like how this area turned out and it added some much needed visual interest to a fairly boring part of the craft.

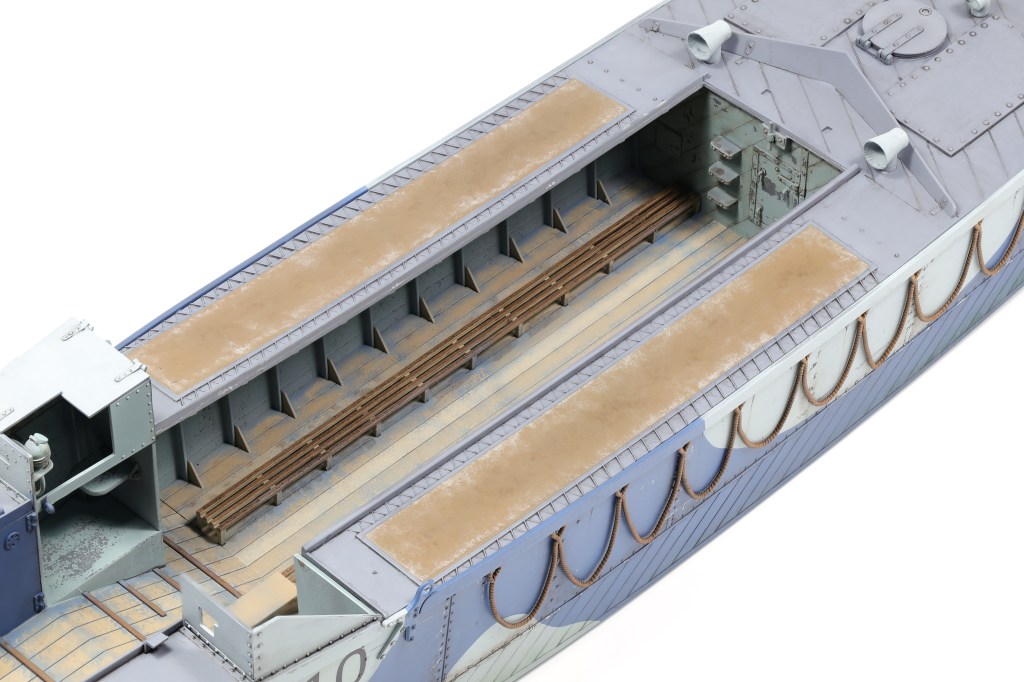
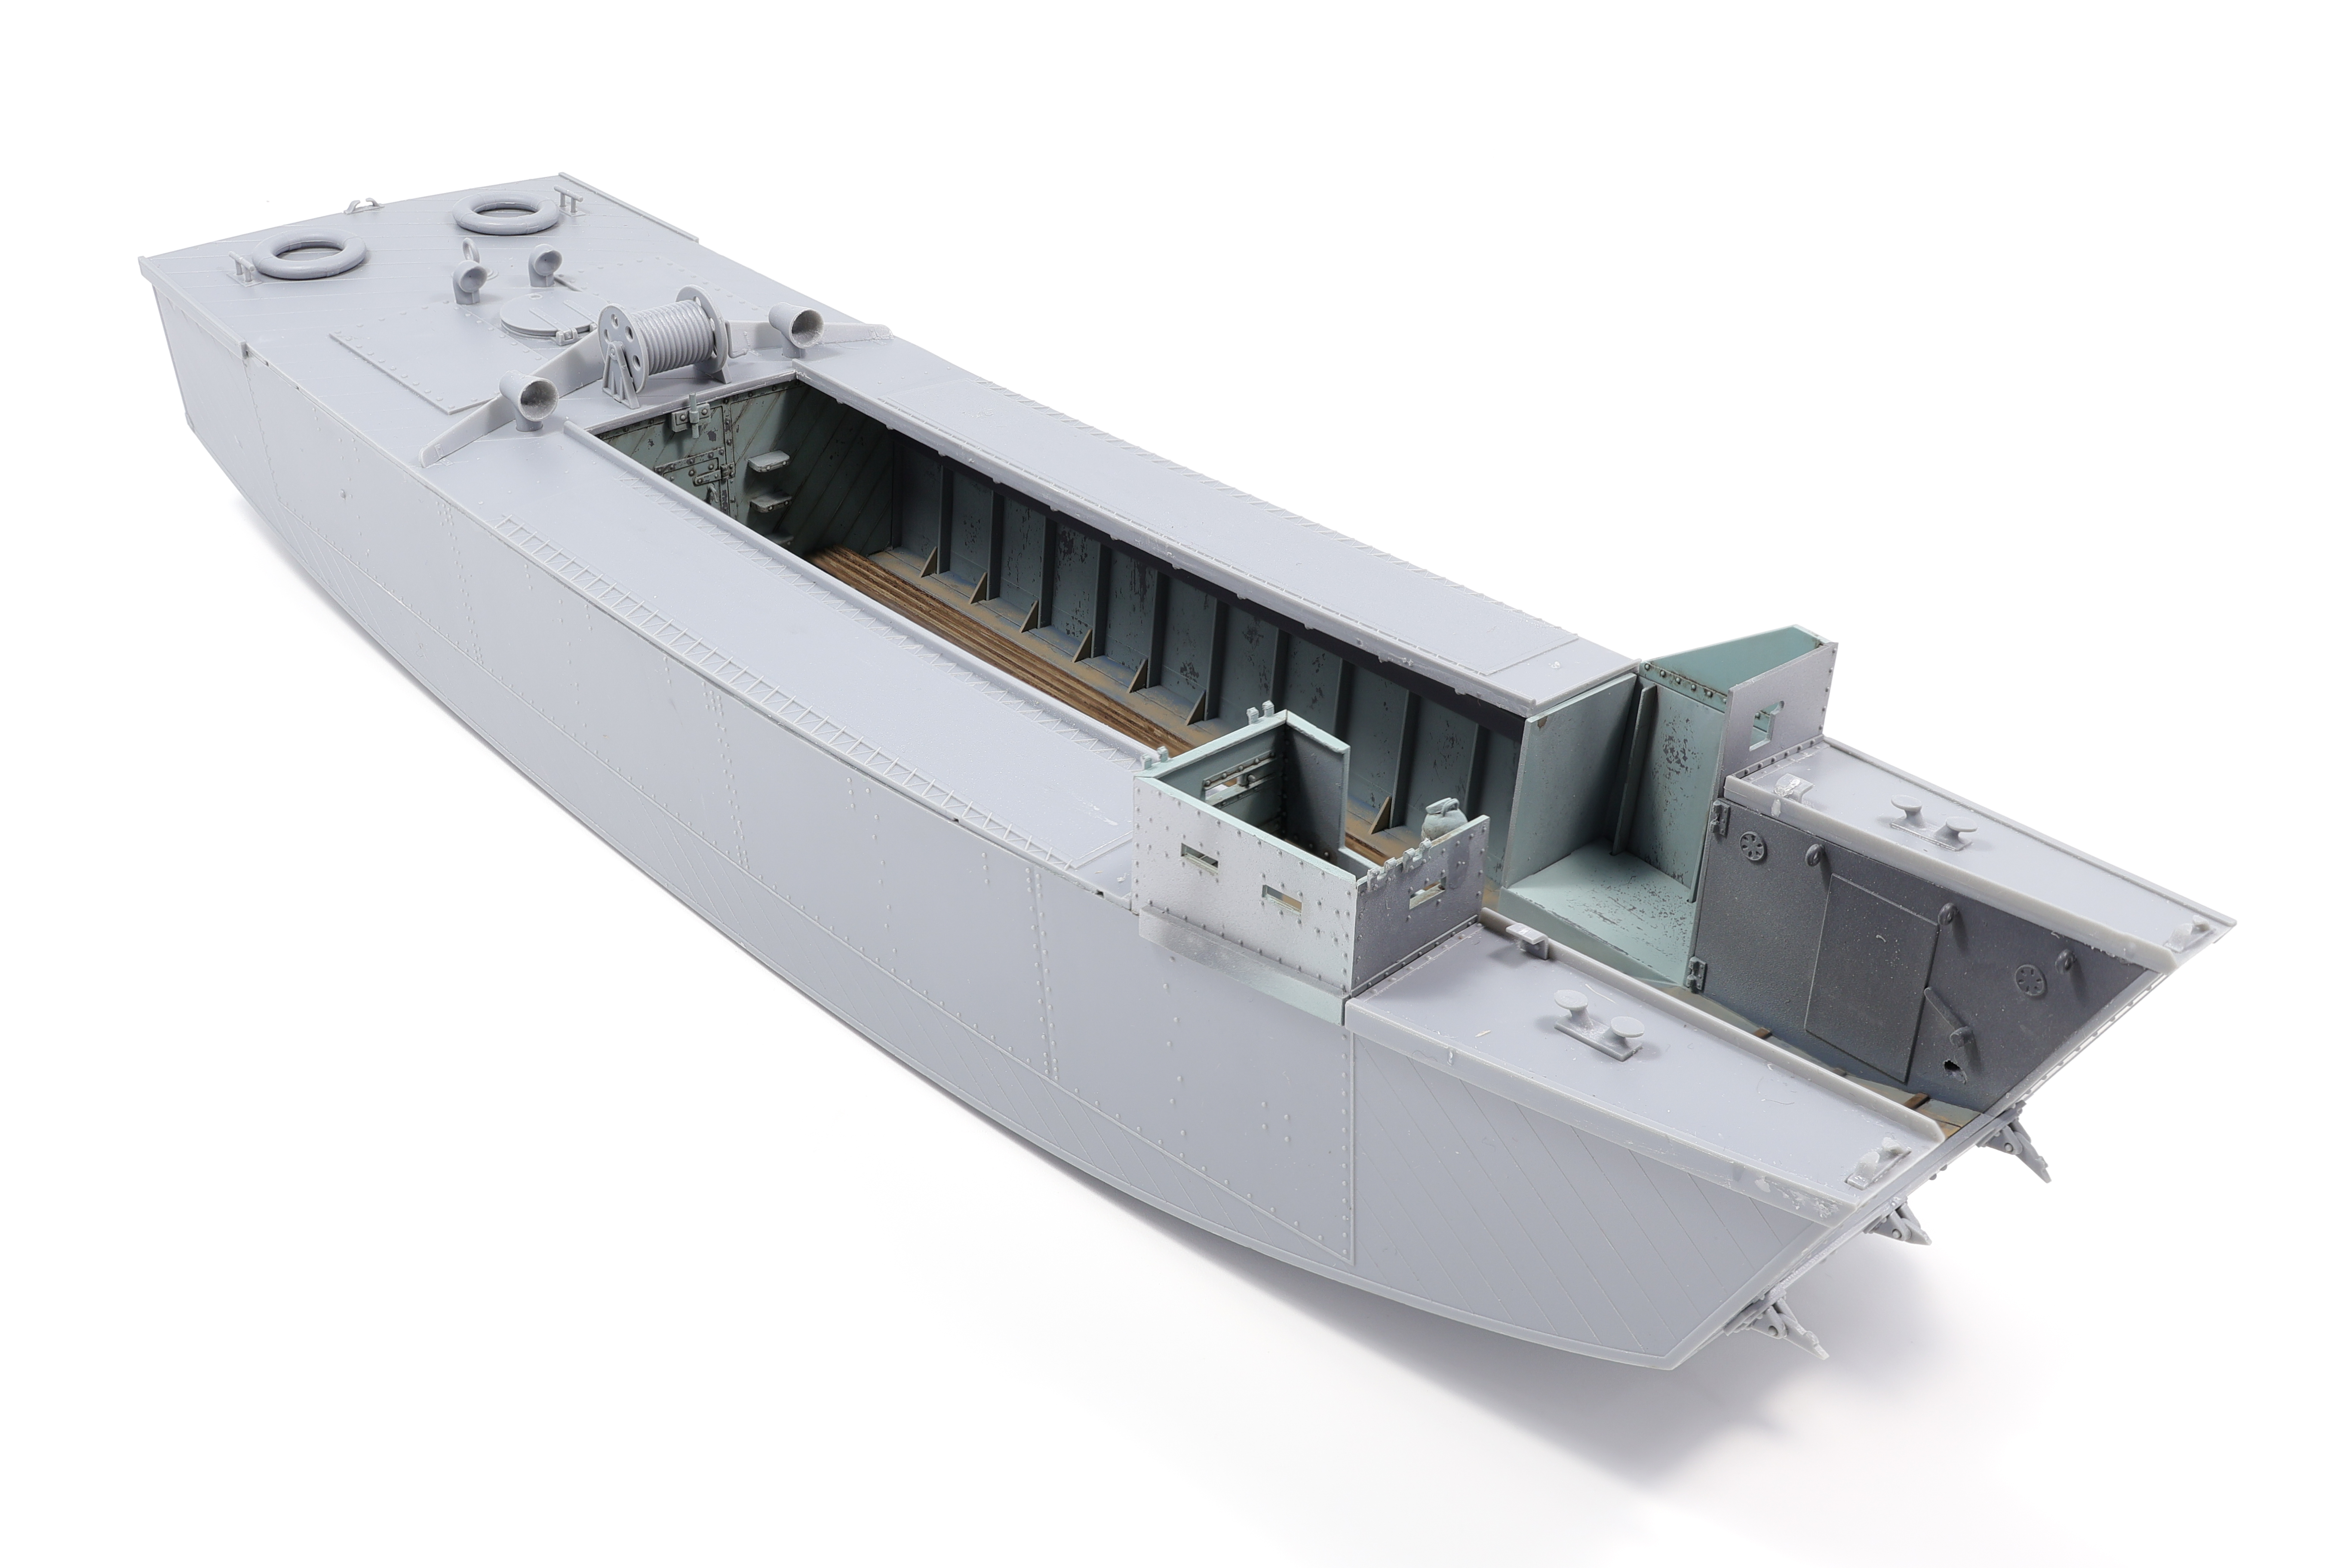
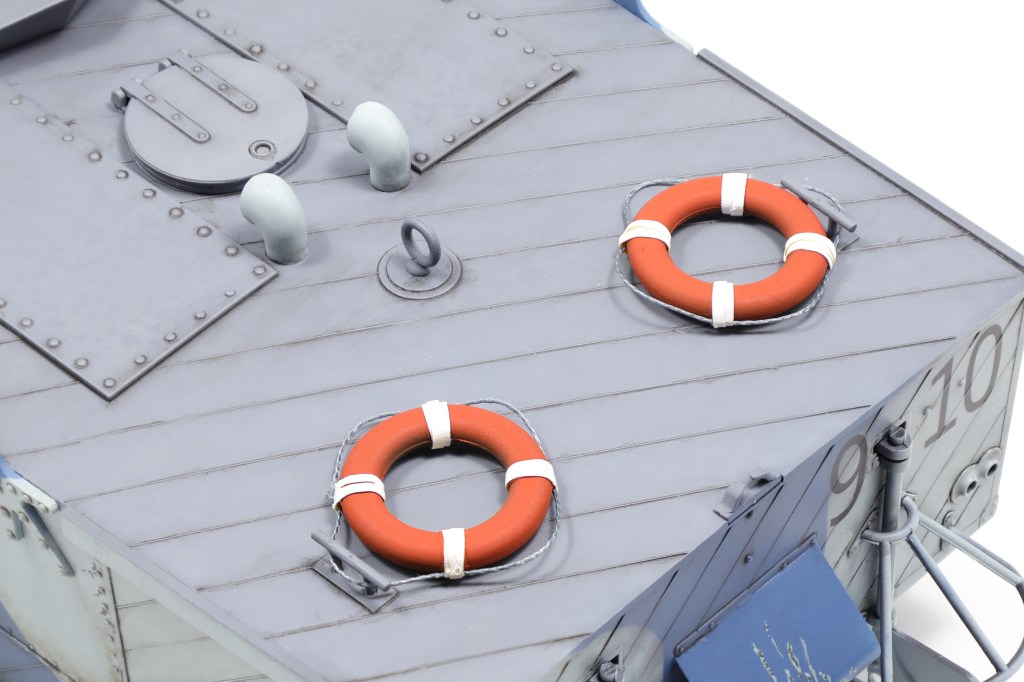
Also of note are the ring life preservers added onto the top of the hull. I made some considerable improvements to the way they came in the kit and I really like they way they improve the colour on the model. Gecko has you just glue them to the deck, however there’s no way that in real life they would actually stay in place so I had to come up with a way in which they would plausibly stay attached. I looked at reference photos and I saw that the majority of WW2 British life rings had a rope going around the outside of the ring and using some scale rope I had on hand I recreated what I had seen in reference photos and fastened them to the hull in a way that seemed natural.

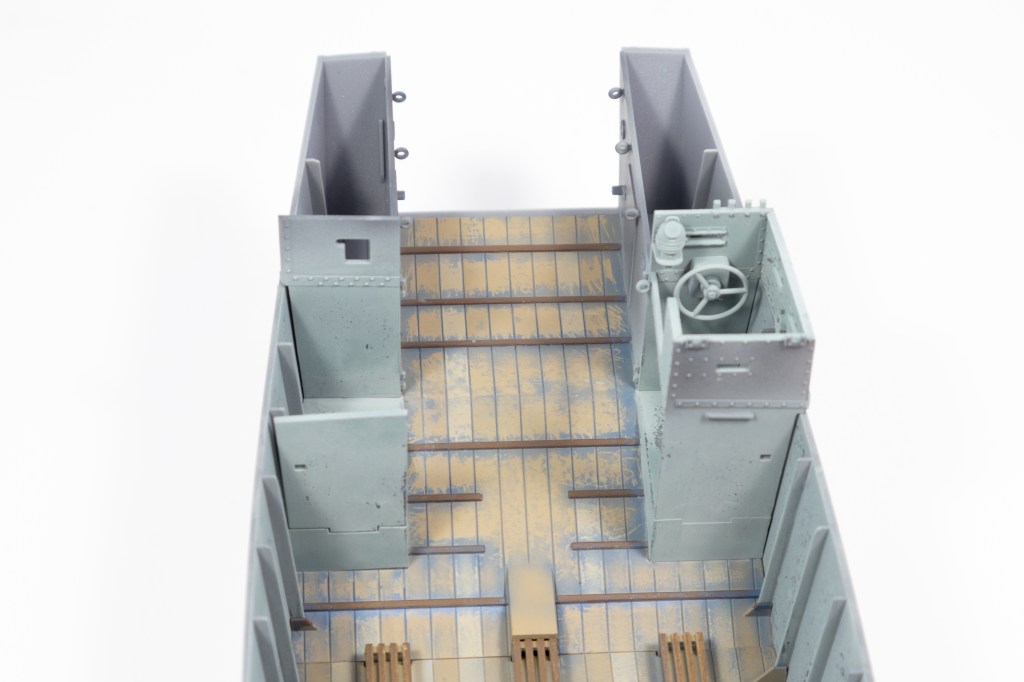
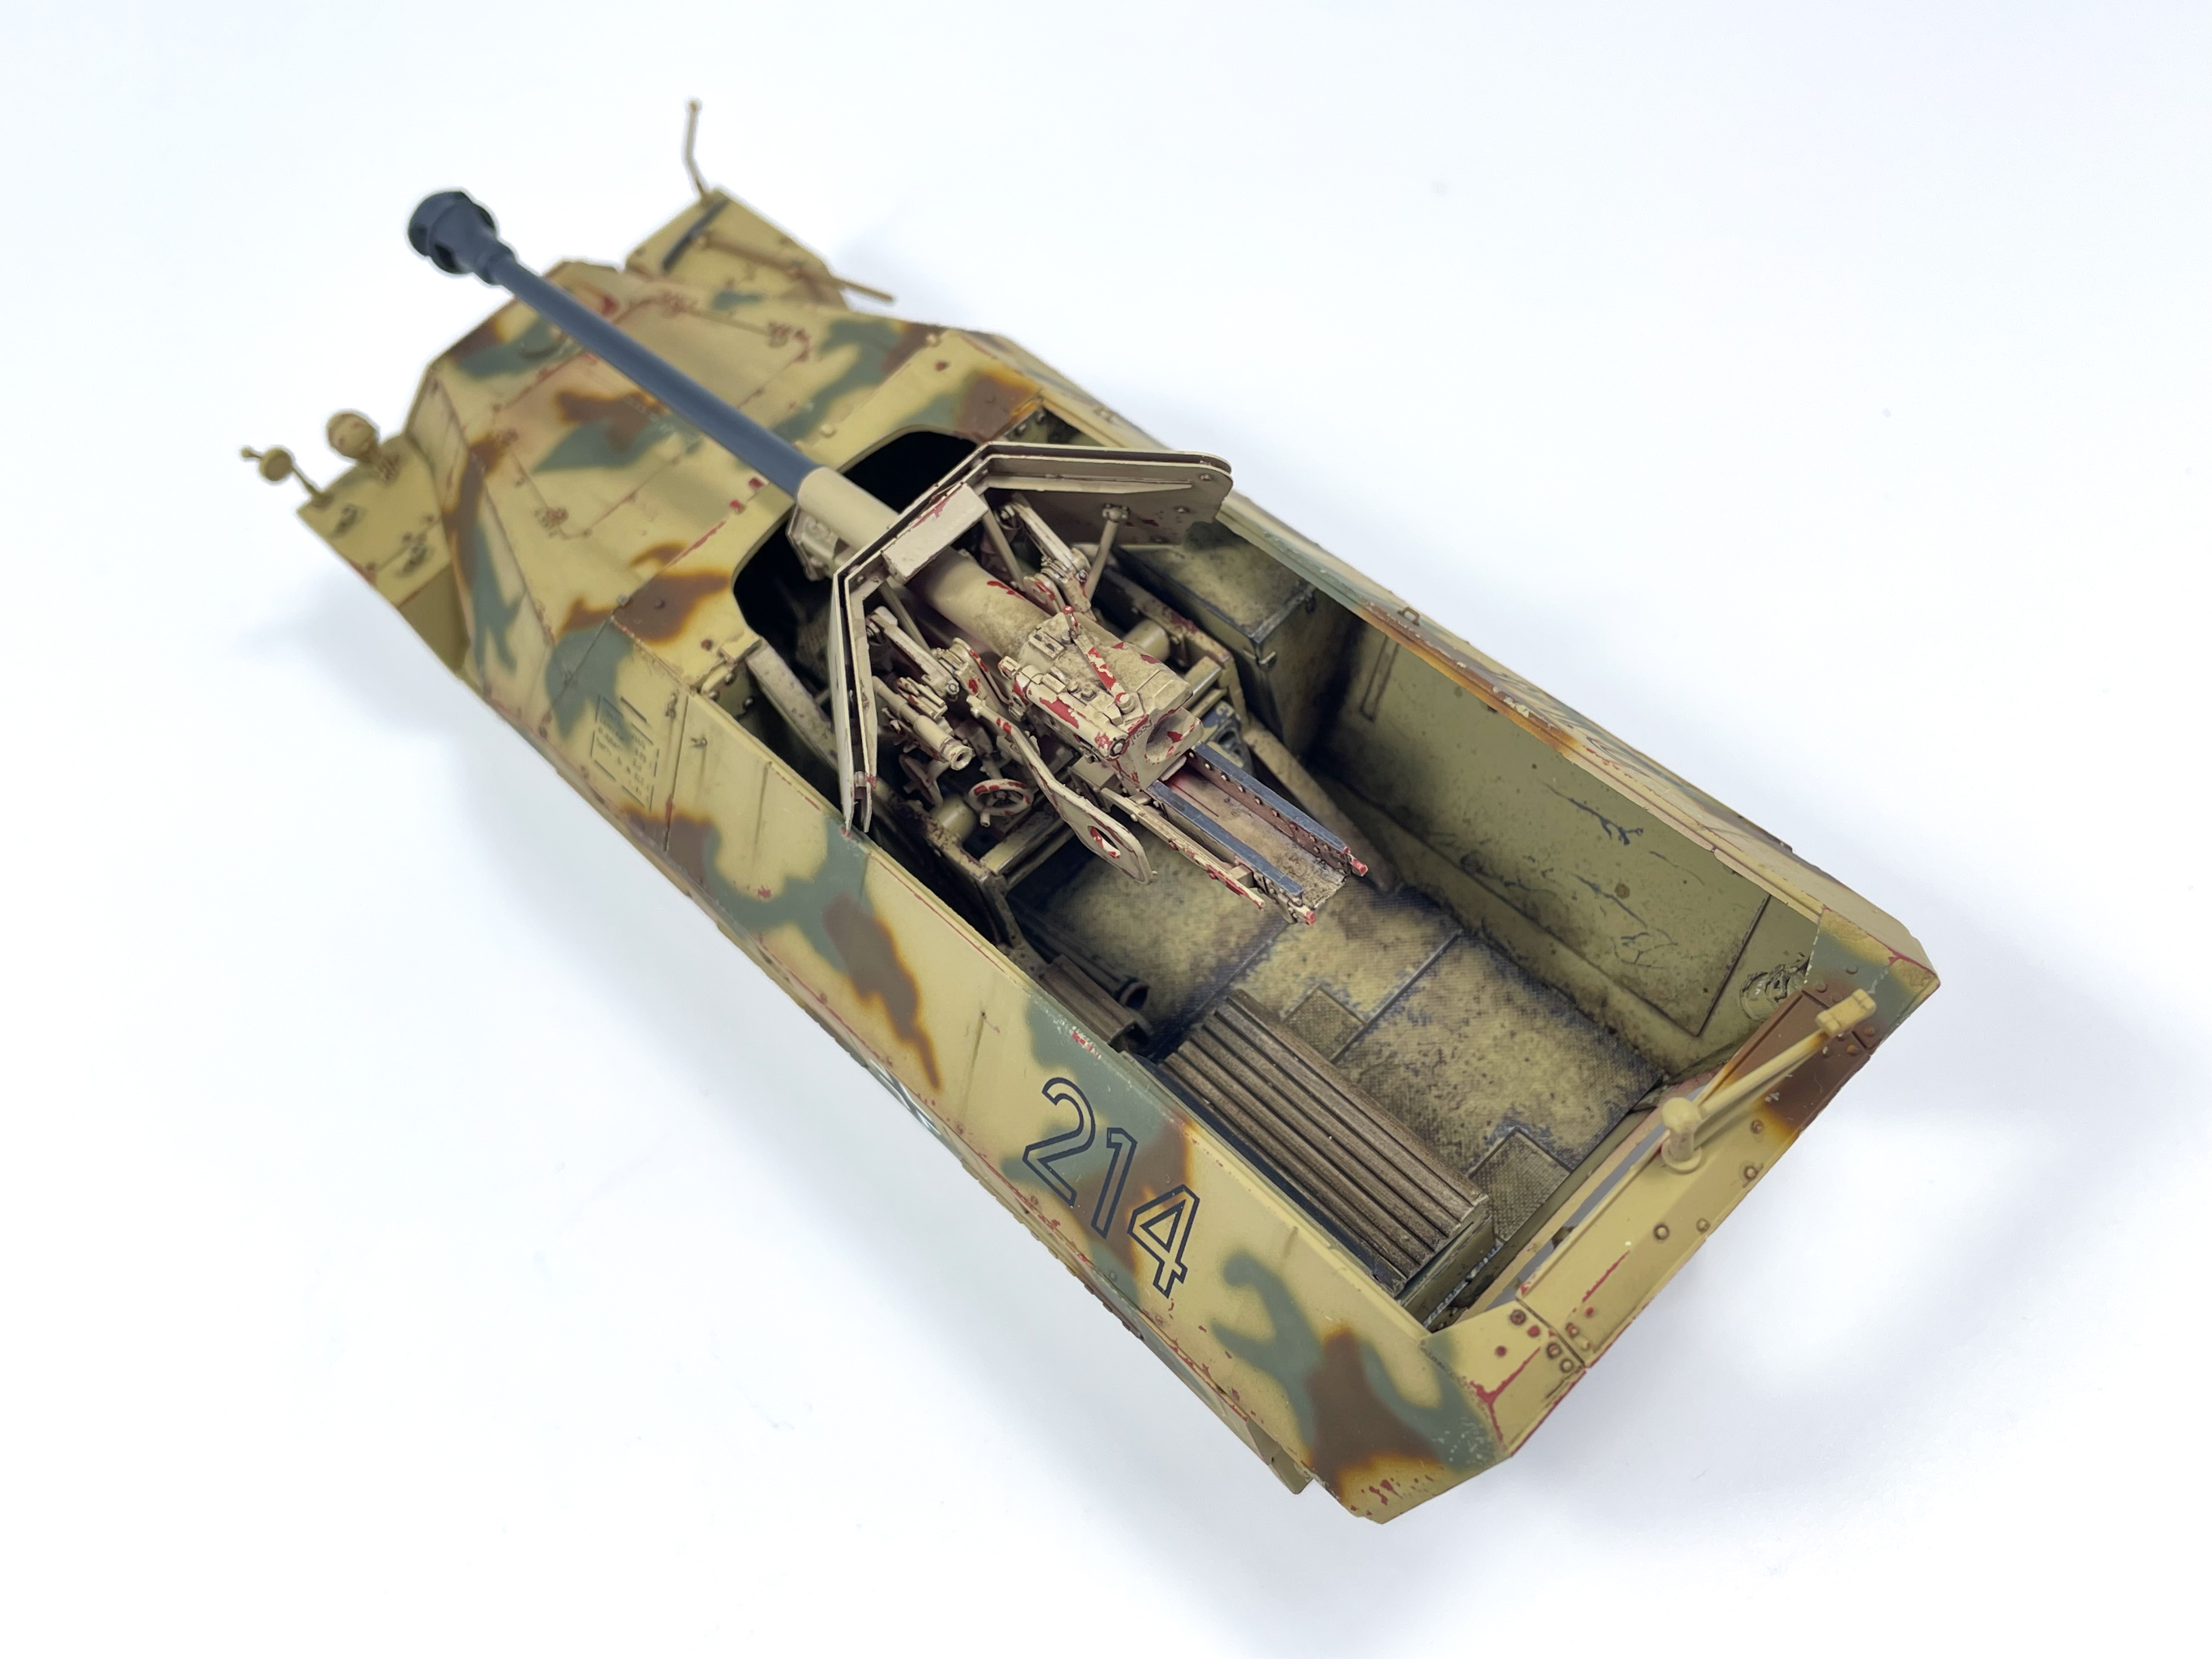
At this stage I hit the model with a coat of matte varnish and was finally able to unmask the interior wood planking inside of the vehicle. At this stage the weathering process was more or less done with just subassemblies and minor painting left to go on the build. Enjoy the photos below and thanks for looking!

Categories
1:35 Naval Projects

British Landing Craft Assault (LCA): Construction

I picked up Gecko Model’s 1/35 British landing craft assault (LCA) this past January while I was in Japan and my initial impression was quite good. Surface detail is quite crisp and the build seemed straightforward. I chose to build think kit as part of a D-Day 80th groupbuild I am participating in and I really wanted to step away from traditional armour/aircraft subjects and try my hand at a really unique and somewhat forgotten vehicle. This is my first “naval” subject if you can call it that, seeing as it has very few similarities (in terms of build strategy) with 1/350 and 1/700 warships. I’m aiming to have this project complete by June 6th so there’s quite a bit of work to be done.

Construction started with the wood floorboards and the interior spaces of the vehicle. I decided to completely finish the interior before moving on to more advanced stages of construction due to the fact that conducting and fine detail work after the deck was attached to the hull would be nearly impossible. Finding usable sources was a bit tricky and the painting and weathering of the interior was largely left up to my interpretation of the subject. I kept things simple due to the fact that I didn’t want this build to spiral into a super-detailed project. I opted to not add woodgrain texture but still added some variation to the wood paneling colour. I also decided to include worn paint on the floorboards. I didn’t have a reference photo to support this but chose to do so in order to add some visual interest. It’s plausible that the floorboards could have been painted over to protect them and I like the end result.

The interior work was tedious but not especially challenging. I did have some slight issues ensuring that the floor was completely set on the bottom and I also found that in one specific area the deck was not completely flat with the sides of the hull. These were just minor issues however and I had the deck glued on in short order.

In terms of the construction phase of this build that was pretty much it! The kit was extremely straightforward in its construction and only took about a week or two to get it to a stage ready for paint. I did chose to add some detail here however and I added a rough cast texture on the included anchor:

Thanks for looking! In my next post I’ll be going into detail on the painting and dealing process for this D-Day transport!

Categories
1:35 Armor In Box Reviews

Tamiya Somua S35 In Box Review

Box art of Tamiya’s Somua S35

Out of all the French-designed tanks of WW2, the Somua S35 is undoubtedly my favourite. I’ve been meaning to build Tamiya 2015 release of the S35 for quite a while now and my recent trip to Japan was the perfect incentive to pick one up at the Tamiya Plamodel store.

Kit Features: 12/20

Tamiya kits are rarely stocked to the brim with nice features but this kit is better than most. Included is one figure and most surprisingly, snap together tracks. Also included is a nice chain, something I’ve never seen before in a Tamiya kit. It’s only a modest amount of features included but to be fair, this is a modest kit. Tamiya is doing more than they need to here for sure, they could have just included standard rubber tracks or molded the larger sections together on other releases. It’s a nice touch having snap together tracks included out of the box. I also like that a figure was included as well. There isn’t a ton of selection of French armour figures so the figure is definitely appreciated.

Quality of Molding: 42/50

Any new-tool release by Tamiya in the last 15 years has fantastic molding and the Somua is no exception. The cast texture on the turret and hull is perfectly replicated and I’m not really sure if I’ll be making my own or not, the out of box texture is that good. Molding details are sharp and crisp and will look excellent under paint. of particular note is the rear engine deck where small amounts of cast texture make way for the exhaust vents, It’s impressive that the armor texture is still visible in such small areas. Also included is a tarp made up out of three pieces which are excellently molded and indicative of the kinds of results modern injection molding can achieve. Overall there is no readily apparent drawbacks to the molding, the only that I could see was that some of the belts and buckles are molded onto parts and the detail could just be described as “average”.

Instructions: 15/20

Typically Tamiya’s instructions are slightly better above average but fairly basic. While Tamiya does include an instruction manual that fits this description, also included is a fairly extensive full colour pamphlet that goes into detail on the history of the Somua S35. I also really like that each marking option gets colour profiles. It’s far more often for only a single option (usually the box art) to get colour profiles with Tamiya releases and I like that they did all three. Only thing missing in my option is the backgrounds of the various marking options. Tamiya only tells you what unit each vehicle was a part of and nothing else, no year or location of any kind is provided.

Miscellaneous: 6/10

Included with the kit are three options for markings and seeing as the Somua was a fairly colourful tank I like that they included these three. I do feel however that there was an even wider range of schemes the Somua appeared in and a fourth even more pronounced scheme would not have been out of the question. That said, the marking options are still good and have given more than the bare necessities to the modeller

Total: 75/100

Recent releases from Tamiya (within the last 10 years) have been reliably solid kits and this Somua is no exception. Some nice ammenities in the form of snap together tracks and a figure only help to further increase its score which is largely held up by the immaculate surface detail. Also worth considering that Tamiya is really the only game in town all things considered when looking at the S35.

Categories
1:35 Projects

Sd.Kfz 251/22 Ausf. D “Pakwagen”: Completed Project

A few weeks ago I was finally able to declare the Pakwagen project complete. The scope of this project continuously kept increasing and increasing and in the end I was left with a fully completed diorama. I’m considering this build my best work so far so I’m hardly complaining.

I also decided to make a significant investment in the form of a new camera, a Canon EOS R50. Since starting this blog I’ve largely been taking photos with my phones, a iPhone 8 before and more recently a iPhone 12. The quality was passable at best but this new camera is amazing at being able to capture detail on the model. I’ve also been able to start incorporating a new technique, Focus stacking! Being able to see the entire model clearly in focus is such a huge improvement and I love the shots I’ve been able to take and share.

Also new is the base that the model is sitting on. I first tried out a workflow for building diorama bases with my work on Miniart’s T-55 and I’ve honed that process here as well. It’s comprised of insulation foam with styrene sheet on the edges. I used AK terrain paste along with foliage from green stuff world. Believe it or not, the base was in limbo for a while, I was convinced that it was going to look terrible and that I should just cut my losses and move on to the next project. Despite the rocky start I stuck with it and I’m so glad I did. It’s still got some shortcomings but I’m happy with the result, especially considering that this was my first swing at a base with heavy foliage.

I utilized a set of Tamiya late war German figures which were fantastic, the best figure set I’ve ever used. Amazing surface detail and plenty of spares were par for the course here. It had been years and years since I hade done any kind of figure painting and this set was perfect for getting the rust off. I love the way these turned out, especially the splinter camo.

That’s it for this project! Thanks for looking and enjoy the rest of the gallery below!

Categories
1:35 Armor Projects

Sd.Kfz 251/22 Ausf. D “Pakwagen”: Painting and Weathering

With the completion of the interior of AFV Club’s Pakwagen, I could move on to a phase of the build I was really looking forward to, the painting and weathering. It has been a long long time since I’ve done a German camouflage scheme (I don’t count the DAK Pz.III I did last year) and they are undoubtedly my favourite kind of paint job to recreate.

I wanted to simulate some hairspray chipping, so I opted to use Tamiya LP-18 “Dull Red” and to be honest, I’m not a huge fan of this shade. It’s a little too red in my opinion and almost looks like blood. For my next kit to utilize this shade I’ll probably add in some dark brown to tone it down a bit.

Following the primer red I hit the model with a coat of hairspray before moving on to the camouflage colours. Tamiya released a new set of German camouflage colours some time ago and I wanted to try these shades out and see if I liked them enough for future builds. I used XF-88, 89 and 90, Dark Yellow 2, Dark Green 2 and Red Brown 2 respectively for the base colours. I throughly enjoyed how the Dark Yellow and Dark green shades came out however I have my doubts about Red Brown. For starters, it can look quite green in the bottle and unless you spray quite an opaque layer over dark yellow the edges will look somewhat orange to my eye. I’m not sold on this shade and may look elsewhere for future builds.

I unfortunately don’t have any more “in progress” photos of the painting process as I was fairly busy during the couple of days it took to apply the camouflage scheme. I also added some excellent dry transfers as the unit markings. I loaded up with some of Archer’s dry transfers after they closed down and I’m really glad I did, I’m very happy with how they perform and look.

Overall, the initial painting stage went very well and I sealed the model with a coat of VMS Satin varnish to protect the previous work and prepare the model for an oil wash. I used the Bitume shade oil paint as a general starting point for the weathering as it it a good base to build off of with more focused weathering effects.

Following the pinwash, I started some streaking effects with AK’s “Winter streaking grime” I often don’t pay much attention to what the name is on the label and the dark brown shade of this product contrasted well with the dark yellow main coat.

I also unmasked the interior as I had laid down my last (anticipated) coat of matte varnish. I’ve been aiming to get out of the habit of over-sealing my models between weathering steps as I’ve come to realize that too many varnish layers can really diminish the realism and overall look of the final product. I think that the vertical streaking effects done help to break up the lines of what is a very angular vehicle and enhances the overall look.

Weathering the main gun also progressed quite smoothly with a few applications of oil and grime washes. I wanted the breech area of the pak40 to both contrast with the dark yellow interior but also be subjected to the same level of dirt and grime as the rest of the interior. I’m still not 100% satisfied with it and I may do more work with this area of the build but I’ll have to see.

I then moved on to the mud and dirt application of the build. Seeing as this vehicle would be situated during the spring thaws of 1945, it would make sense that the vehicle would see a liberal application of mud in and around the running gear. Still, I had to be careful as I wanted to strike a balance between almost black (winter) mud v.s more brown (summer) dust/dried mud. I’ve begun experimenting a lot more with enamel dusting and it’s quickly becoming a favourite technique of mine. The general process is as follows:

  1. Spray a highly diluted layer of enamel paints in areas where dust may accumulate.
  2. Let the enamels dry for approx. 10-15 minutes.
  3. Brush a light layer of enamel thinner onto the painted area.
  4. Streak the brush in a vertical motion until the painted enamels begin to shift in accordance with the brush strokes.
  5. (Optional) add another light coat of enamel paint to depict dust/dirt that has not been disturbed yet.
Enamel dusting along with light splatter effects.

Next I applied a liberal application of mud to the underside of the vehicle and the running gear. To do this I applied AK’s “Damp earth” and “Fresh mud” fairly sloppily. I then sprinkled two shades of pigment, MIG’s “Track Brown” and Abteilung 502 “Trench Earth”. These various shades were used to provide variation in the final product. While I think that the final result looks good, It is fairly uniform and I’ll have to work on achieving greater contrast between different shades of mud and dirt.

Before and after the Enamel dusting and mud application

These comparison images really show how powerful the enamel dusting and mud splatter techniques can be. An area I wanted to target was the vertical plates with the storage lockers. Seeing as this area of the vehicle would see regular use by the crew and would be exposed to mud and dirt being flung up by the tracks I made a dedicated effort to single out this area for a little more attention than other parts of the model. The effects can further be seen by comparing the unweathered balkenkreuz in the before and after images.

Despite my minor issue with the lack of contrast in the mud tones, I really do like how this area of the build turned out. To my eye, I think that the end result is realistic and ascetically pleasing. I’m looking forward to adding mud and debris to my future models!

That’s it for this update! Really happy with how the painting and weathering process has turned out so far. There’s not a whole lot left to complete on the vehicle itself but there is still a fair amount of work to do on the accompanying figures, stowage and diorama base I have planned for this kit. Thanks for looking!