Category: Aircraft

  • Tamiya F-35C Lightning II In Box Review

    Tamiya F-35C Lightning II In Box Review

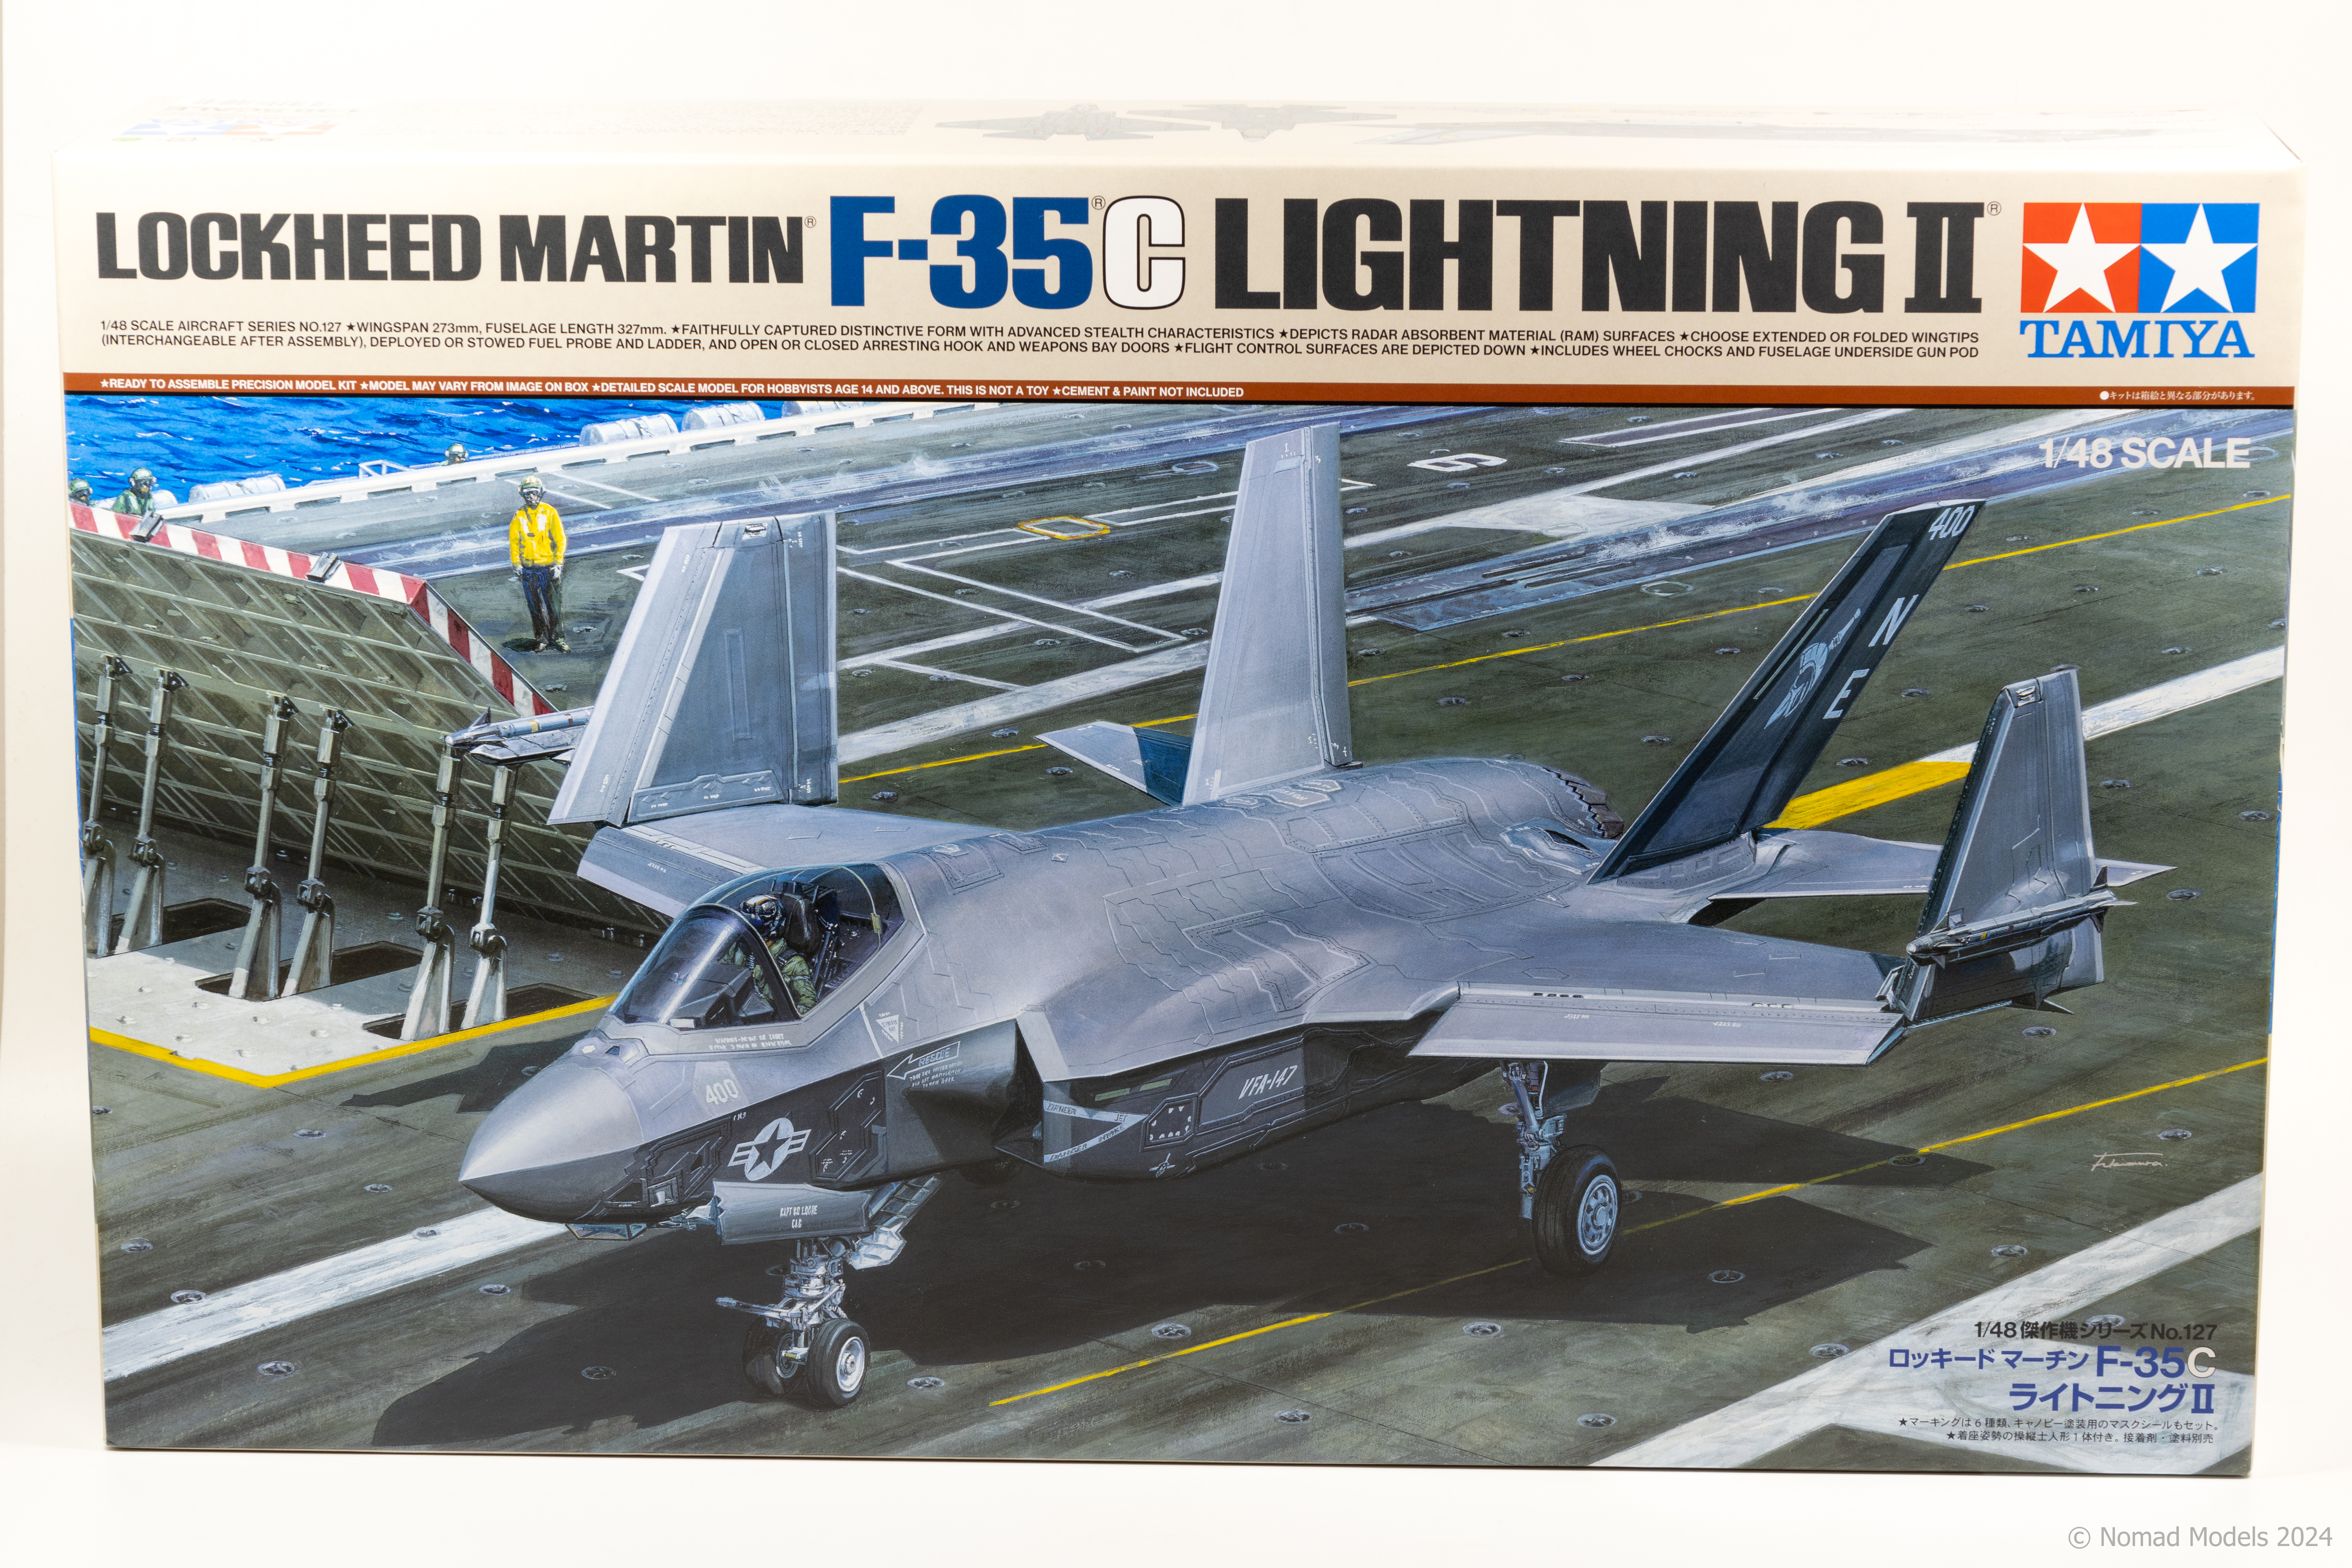
    I knew when going into this review that Tamiya’s F-35C was going to be a serious challenger for the best kit I’ve ever reviewed. Both the A and B variants have recived critical acclaim since their releases in 2022 and 2023 respectively. Back in 2020 I rated Meng’s Jumbo Sherman a 92/100, will Tamiya’s latest lighting take that crown?

    Kit Features 17/20

    Tamiya’s F-35 offers some really nice features, some of which are unique to the subject matter here, a stealth aircraft. Modellers are offered a wide range of options to choose from in depicting thier own F-35. The canopy, wingtips, ladder, weapon bays, gun pod, arrestor hook, and fuel probe are all optional accessories to the modeller. I was also surprised to see RCS enhancers included in the kit, these are little nodules added to the exterior of the F-35 to increase its radar cross section to civilian radars. These are examples of small additions that really show how much effort went into designing this kit. The kit includes a nicely molded pilot figure along with helmet specific decals. Also included is a healthy amount of ordinance so that the model can be built in “beast mode”. Other manufacturers might skimp on the included weapons (considering that this IS a stealth aircraft) but Tamiya is not guilty of this here. The kit features various paper masks for the canopy and other parts, although you will have to cut them out yourself. Masks for the RAM panels are not included however and decals are provided instead. For modellers wanting to paint their own RAM panels the lack of masks will be felt as it’ll take some time to mask off the fine details.

    Quality of Molding: 50/50

    I’m hesitant to give any category a perfect score on any kit, but considering that this kit (and the rest of Tamiya’s F-35 lineup) features arguably the most impressively molded part in all of modelling there’s just no way I can justify anything less than a perfect score here. I’m of course referring to the weapons bay.

    The quality of the modelling isn’t just limited to this area however as each and every part is intricatley detailed from the cockpit to the RAM panels. The detail is just so fine and impressive, it’ll be a real joy to see these parts painted up.

    Instructions: 19/20

    These are the most substantial instructions I have ever seen from a Tamiya kit and at first glance they guide the modeller through the build effortlessly. Make no mistake, This is a complex kit and not one I’d recommend for beginners. With the amount of options that the builder has in completing this kit, it’s not a surprise that they are filled with “Do this if A, Skip B, See steps 35-45, attach parts in numbered order.” That said, these are as clear as clear can be for indicating the significance of your choices in the build. The colour profiles included are hugely impressive and nothing like I’ve ever seen in this hobby. Included is a massive 1/48 sized poster detailing the “A” markings with full colour sheets for the rest of the 5 markings. In all the kits I’ve built I’ve never seen such impressive colour profiles included in a kit, they stand in as some serious wall art!

    Miscellaneous: 9/10

    A whopping 6 marking options are included in the kit, 2 Marine and 6 Navy jets. The F-35 is a pretty boring aircraft when it comes to markings so Tamiya has done their best here, you get some colour in one option but the rest are fairly similar, not that this was unexpected. The decal quality is excellent as well with very clear printing. The decal thickness may be another issue however.

    Total: 95/100

    Tamiya’s F-35C is undoubtedly at the apex of the hobby right now, and for good reason. It’s by no means something I’d recommend to a beginner, as there is a number of small parts and keeping focused on a specific aircraft and loadout might be a tall order for somebody new to the hobby. In all other areas however this kit excels.

  • F6F-5 Hellcat: Completed Build

    F6F-5 Hellcat: Completed Build

    A few weeks ago I completed Eduard’s F6F-5 Hellcat and I’m finally getting around to post the photos and compile my thoughts about the build.

    If you’re just here for the photos check them out below 👇

    As for my thoughts, this build was a pretty fun, short project. I really didn’t invest a ton of money or time into this project but it was still a blast.

    Weathering was fairly straightforward and basic seeing as due to the extensive pre-shade, a lot of the work was already done in creating surface variation. I started with a grey wash completed with oil paints. Washes can be tricky with dark base coats as using a dark colour can really blend in and be hard to see. With a grey colour it’s a lot easier to see the panel lines and added rivets and, in my opinion, looks more realistic.

    After the wash I did some oil paint rendering, primarily on the fabric control surfaces in order to show some colour variation in the different type of material. I did some further OPR on the gun access panels in order to represent crews servicing those areas with oily hands.

    I knew I wanted to pay specific attention to the exhaust staining as well. From my reference photos I could tell the Hellcats had the tendency to build up both dark and light soot if left uncleaned. I even found a photo of the specific aircraft I was building which showed a substantial buildup of exhaust gasses.

    To re-create this effect I first did a pass this the airbrush painting a heavily diluted coat of a dark brown (almost black) mixture in the area I wanted the staining. I then went back over the area with a grey-white mixture, being careful to remain in the larger area covered by the black soot.

    After the paint dried I then added some oil paints directly over the previous layer to further add colour variation. I added straight black over the darker areas while a light tan colour was used with the grey tones. I think the results speak for themselves:

    To wrap up the build I did some light oil streaking around the cowling which almost disappears into the Navy Blue finish. I added ultra fine wire as the arial and that was it!

    Enjoy the photos below!

  • F6F-5 Hellcat: Painting and Decals

    F6F-5 Hellcat: Painting and Decals

    For the past few weeks I’ve been steadily building Eduard’s 1/48 F6F-5 Hellcat as a sort of “reset” build to complete before diving into the painting stage of the Tiger project. I picked the Hellcat because I’ve always had a soft spot for U.S Navy fighters and also because I wanted to move this kit out of the stash.

    Construction was straightforward although a bit disappointing. This kit is by no means a new Eduard release with the molds dating back to 2008. This is not that ancient but in the grand scheme of things it’s a far cry from the hyper detail kits the brand is releasing nowadays. If you’d like to hear more about my thoughts on this kit, I did a out of box review on it last year:

    Eduard F6F-5 Hellcat (Late) In Box Review

    Eduard’s Profipack Hellcat has impressive features including photo-etched parts, resin wheels, mask set, and armament options. However, its quality of molding is below-par as it lacks detail and crispness. Eduard’s excellent instructions and various marking options are commendable, albeit limited in color and vibrant prints. With a challenging price, the kit’s weekend edition provides better…

    The chipping effects on this build required a two stage chipping process. The first stage consisted of a metallic colour underneath a custom zinc chromate mix chipped with standard hairspray chipping. This was done somewhat quickly as the results didn’t matter too much in that only a small fraction of this coat would be visible in the final model. After this coat was chipped, I hit it with a coat of hairspray and re-primed with 1500 black for the preshading coat.

    The preshade/marble coat took an entire day to complete and I was very happy with how it came out in the end. I was able to get a lot of variability in the finish which I knew would be needed to show through the very dark blue final coat.

    For the main coat I selected Mr. Colour 14 (Navy Blue). It’s a semi gloss paint to start and I added some GX100 gloss to increase the sheen which worked well I found. I knew that I’d be finishing this model in a gloss finish and wanted to make sure that my base coat was as smooth as possible.

    I then got to work removing the masking fluid left behind as part of the weathering process and I was really happy with how this approach turned out. It was difficult at first to remove the fluid but with a plastic tool I was able to scrape it off quite efficiently. I was worried about paint peeling off in areas where the fluid was not applied but this ended up not being an issue as the main coat of Navy Blue was very durable.

    After removing the masking fluid I hit the model with a coat of GX100 gloss varnish in anticipation of the decals.

    Decals were out of the box, and went down somewhat well. Being from Eduard, I decided to experiment with removing the carrier film with Tamiya Enamel thinner. This went well and helped achieve an even greater painted on effect.

  • CF-18A Hornet:  Completed Build

    CF-18A Hornet: Completed Build

    This past week I was able to finish Kinetic’s 1/48 CF-18 and just in time for the holidays! (currently finishing this write-up out of Toronto Pearson) This build took around 3 months to complete and although I’m definitely happy with the end result (probably my best result to date!), the build itself was challenging to be completely honest.

    The kit was plagued with rough fit and unclear instructions. The infamous nose/windshield assembly lived up to its reputation and fought me the entire way.

    As I had been thinking about this build for the better part of this year, I spent the months leading up to it gathering various aftermarket pieces to enhance the build. The full list is as follows:

    • Leading edge “Combat Hornets” decal set
    • Aries Resin ejection aeat
    • Flying Leathernecks 3d printed accessories
      • Wheels
      • Hud
      • Pitot tubes
      • Weapon pylons
    • Eduard Resin Aim-9 Sidewinder and Aim-7 Sparrow missiles
    • Anyz decals and 3d printed parts
    • Various scratchbuilt wiring and tubing

    The Leading Edge decals really were the catalyst for the build, I knew I wanted to build a Canadian Hornet but that I also wanted build a specific aircraft, No. 188780, one of the participants of Operation Friction, Canada’s contribution to the 1991 Gulf War. This aircraft stood out because of the Cyrillic writing “oсмотри назан” on the Lex fences, with some sources translating the text as “check six”. This marking was specific to aircraft based at CFB Cold Lake which were responsible for “greeting” Russian aircraft over the arctic. As far as I can tell 780 was the only aircraft with the Cyrillic writing present in Desert Storm.

    Refocusing back to the build, I tried to scribe my own panel lines for the first time along with adding rivet details. While I feel my scribing skills need improvement, I think that the rivet details I added really stand out and were a worthwhile addition to the model. Kinetic is missing some pretty prominent rivet details on the wing and vertical stabs and the custom detail really enhances the area IMO.

    A more detailed breakdown of the painting and weathering stage can be found on that phases’ separate post but the basic overview is as follows. I primed the model in black, added an initial marble coat, followed by a blend coat and detail coat before tying the entire finish together with a final blending coat. I really do enjoy this technique, the method of slowly raising the opacity of paint layers comes very natural to me and is a straightforward (if time consuming) process. That said I do think I need to experiment in this area, and possibly start to add more post-shading to my workflow. As it stands now I see two distinct disadvantages to my current process, the first is that this is a very “dark” method in that since the model is being primed black I often need to finish the model in a shade lighter so that the end result is tinted the correct shade. The second issue is that the best gloss varnishes like to burn hot and will reduce the opacity of the paint by about 5% or so which needs to be taken into account when spraying the final blend coat.

    One area I wanted to pay specific focus on was the cockpit, and took extra care and time to get it looking how I wanted. Of immense help was Kris Sieber’s book, “Superdetailing the F-14 Tomcat” which is a must buy for anybody serious about building modern jets. Even though the book is about the process of detailing a Tomcat the techniques can be applied to any ghost grey jet.

    All in all however, I really do feel that this is the best kit I’ve built so far and I was able to use everything I’ve learned over the past year or so to really enhance both the building process and the painting/weathering process. Enjoy the final build photos below!

  • CF-18A: Decals and Weathering

    CF-18A: Decals and Weathering

    After the paint was down, it was time to clear coat. I’m always on the hunt for a better product or method for sealing a model as it’s my least favourite part of model building. I find that adding a gloss coat is the step I always have the least control over and it has the most ability to fuck up all the hard work I’ve put in the model, I learnt this the hard way when I built my Mp4/13 a few years back:

    What happens when you put a Laquer clear coat over Enamel paint.

    As such, I’ve always tended to choose a “low risk, low reward” method for clear coating. For the longest time that was Tamiya clear + Mr. Color levelling thinner (MCLT) as it was always a pretty safe way to get a clear coat on the model and didn’t take too much thinking beforehand. I switched to VMS clear a little while ago as the application was even more simple, just drown your model in it and it’ll shrink down into all the panel lines no problem. For a while VMS was my go to but I found it wasn’t the most chemically stable, it frosted very badly over a week-old layer of paint and nearly ruined a Spitfire I was working on:

    Had to remove paint in some areas down the primer, I was luckily able to salvage the build.

    As a result I switched back to Tamiya clear but still wasn’t quite happy with the results I was getting out of it. I found that I wasn’t able to get as smooth surfaces as I’d like with it. I then discovered Mr. Hobby GX 100 Super clear III. GX 100 is to other clears as what MCLT is to other thinners, the stuff is absolutely fantastic in so many ways. Easy to apply, durable, chemically neutral, and most of all a fantastically smooth surface.

    I shot a layer of 50/50 Gx100/MCLT then misted straight MCLT over the still drying first layer. This technique can be a bit difficult to achieve but basically you want to spray the straight MCLT on the model until the very point in which the surface becomes “wet”. You want to avoid drenching the model because you are spraying straight thinner onto the finish and can burn through the paint if you’re not careful, this is a very “hot” method of painting. The end result looked a little semi-gloss rather than gloss in the final result but it was still the smoothest (in terms of feel) finish I’ve ever had, which is what really matters for the decals.

    Speaking of decals, I used the “Combat Hornets” set by a local company, Leading Edge Models. If you want to depict a combat Cf-18, this is the set to get. You get options from the early 90’s to present day and enough stencils to build two jets. It includes specific markings for almost two dozen aircraft and the ability to depict any Cf-18 with the assorted numbering (which is what I did) They are durable and settled down excellently there is no competition in this category right now, These are the best Cf-18 markings out there right now hands down.

    Oil paints, as always, were used entirely for the weathering process. I first hit the model with a mixture of very dark brown and dark grey oil wash. This mixture had the intended effect of not being super noticeable over the grey finish, which is typically desired for more modern aircraft finishes. I sealed the initial wash with VMS Satin before moving on more detailed oil work. I used Abteilung Bitume oil paint in this stage, it’s by far my favourite oil shade to work with. I taped off where I didn’t want the oil effect to appear and stippled the paint in order to get a smooth transition.

    I like to use this tactic because it’s so versatile IMO. If you want only a very subtle effect you can load your brush up with thinner and blot out 95% of the paint. On the other side you can leave most of it and it’ll create a very striking contrast. After that I also did some various streaking effects on the wing. This is a common effect to create for Cf-18’s as the streaking fluid is typically very visible in a lot of reference photos. I hit the model with a coat of VMS Matte and the weathering stage was complete!