Category: Projects

Where various build projects are documented and posted.

  • Sd.Kfz 251/22 Ausf. D “Pakwagen”: Construction

    Sd.Kfz 251/22 Ausf. D “Pakwagen”: Construction

    For the last little while AFV Club’s Pakwagen has been a priority for me to build. There are a few reasons for this, namely I just think it’s a cool subject and I’ve been meaning to build one for a while now. There’s also the fact that I’m a bit out of practice when it comes to painting and weathering German vehicles and since I have a few slated to be built this year, this kit will serve as a nice test run prior to starting those planned builds.

    I had intended for the construction phase of this build to be as smooth and painless as possible. I didn’t want to invest a ton of time building the kit because like I said, the focus was supposed to be on the painting and weathering. Unfortunately for me, AFV Club had other plans.

    In short, the kit doesn’t fit well at all and has significant engineering issues. This entire process has been frustrating to say the least. It’s been so bad I’ve considered swearing off this brand all together, however there are a few Israeli Shot Kal’s they offer that may tempt me. Bottom line however, I’m not buying another AFV Club kit for a while.

    Construction begins assembling the lower hull and suspension components. There’s nothing to write home about here, and the fit for the suspension arms is vague at best. To my surprise the whole frontal steering and suspension assembly section fit together well and was level when completed. Of particular note was how the drive wheels (Not the steering wheels) fit together. AFV Club has you completely sandwich them together (Step 3) and it takes a significant amount of force to do so with one of mine even cracking under the pressure. it’s amazing this was the solution that was some up with.

    The dashboard fits together alright and I opted to add some wiring despite the fact that it won’t ever be seen. Fitting the dashboard to the hub however is tricky and you really have to make sure that it’s seated well because if it’s not that will impact how the upper hull will fit. Next I filled out the various fittings for the main compartment and by far the cradle for the Pak 40 (assembly J) was the worst subassembly of the kit so far. I opted to assemble the thing attached to the hull then glue the parts together to ensure the final product will fit properly. I thought that this was a good idea until I actually tried to assemble it and here’s what went wrong:

    • Part Ho2 is too big and will cause the legs (Ho3 and Ho4) to bow out.
    • Part Ho5 doesn’t fit it’s attachment point and it’s not close.
    • Part Ho1 has “steps” for the legs to slot into but these “steps” are more like “curves” and it’s impossible to get concrete fit.
    • The pins for the entire assembly used to fit into the hull are incredibly small/weak and you’ll shear them off easily.
    • The entire assembly is too tall and you need to remove 1-2 millimetres from the top to allow the upper hull to fit.

    This kit had various other fit issues such as the engine access doors, the exterior storage doors, the rear doors for example. Now that I think about it, virtually all the doors in this kit had problems fitting. AFV Club, how hard is it to make a rectangle fit in a hole?

    With all these issues I was dreading working on the Pak 40 Anti-tank gun. With numerous fiddly parts I did not have a ton of hope with how it was going to go together. The answer? Not great, not terrible. Really, it wasn’t the worst, and was better than other parts of the kit. It wasn’t great by any means but the end result is a somewhat good looking Pak.

    For this build I used a set of 3d printed tracks from DEF Model and while I’m typically wary of 3d printed products I don’t have direct experience with these went together beautifully. They came off their supports with little to no effort with not a single link broken or unusable. Additionally, they went together great and just snap together. If there are any downsides to these they are as follows: first, since they are snap fit they tend to deform under tension and one “pin” will slip out (without coming apart all together). Second, I don’t think they fit the model that well as they have to be posed under high tension or fairly slack with the addition of one link. Despite these issues I don’t regret picking these up and always like to try new tracks.

    Construction had to take pause here as I needed to complete the painting of the interior before moving forward. The assembled vehicle would have zero space for any kind of painting or weathering of this area when built up so I decided to finish this task now. I knew I would be painting the interior in German dark yellow and opted for German grey as the undercoat chipping layer, seeing as the exterior of the vehicle would be chipped with red-brown.

    To be honest the chipping fluid method did not work as well as well as I intended. It was difficult to get the paint to chip the way I wanted and I ended up with small flakes coming off instead of larger, more controlable chips. I used Tamiya dark yellow thinned with the Tamiya acrylic thinner and I’ll have to investigate more into how to get the results I’m looking for. All in all I’m not too disappointed because A; this area won’t be hugely visible and B; I got to practice doing hand made chips. I think this went ok seeing as I have next to no experieince creating the chipping effect this way.

    I also tried making some basic woodgrain texture using oil paints. It’s quite an interesting technique and somewhat straightforward. I painted the wood parts in Tamiya Buff, and then using a dark brown oil paint colour I streaked the paint across with a dry brush. This creates visible brushstrokes that simulate woodgrain that looks very realistic in scale. I like how this turned out!

    At this point I sealed the interior with a coat of VMS satin varnish prior to going further with the weathering. I next used oil paints for a pin wash but also to create some surface definition on the vehicle floor. I did this to represent general dirt and grime that would get caught on the grippy steel surface. It’s important to mention that this was a very general approach and in this phase I didn’t pickout specific details (aside from the pinwash). Additionally, I speckled on some MIG enamel weathering product “fuel stains” and “Oil and Grease stains” to create points with a little more contrast to the dark yellow base coat. I didn’t want too much contrast however and I used a brush damp with enamel thinner to slightly feather the drops to create a more subtle gradient.

    This was largely the end of the general weathering and a sealed the model in a coat of alclad flat before moving on to more specific, focused weathering effects. For this stage I’ve been really drawn to three products in particular, MIG’s “Fuel stains”, “Oil and Grime stains” and “Engine Grime” The names of these products can be deceiving as they are very versatile enamel products that can be used in many different applications. In this stage of the weathering I would apply one of these products near a detail I wanted to highlight and then stipple the slightly dry product with a brush damp with enamel thinner to create a gradient and blend the stain into the model.

    The rear bulkhead weathered with “oil and grease” stain mixture.

    Overall despite some atrocious fit issues, AFV Club’s Pakwagen is slowly shaping up and is looking fairly good at the moment. More posts to come on this subject!

  • T-55A Mod. 1981: Completed Model

    T-55A Mod. 1981: Completed Model

    After almost three years in the making Miniart’s T-55 has been completed! This kit has been sitting in my “in progress” drawer for well over a year now and it feels great to finally have it completed. I decided to try to push myself and try out new techniques in completing it and I’m glad I did. One goal of mine was to not use any pre-shading at all in the painting process, a technique that is very familiar to me and I use in a lot of my builds. Instead I used the dullest coat of Russian 4bo as the main base coat and tried post shading the model to create colour modulation.

    I’m glad I placed these limitations upon myself because I’ve felt that when I have a technique or process that I like I can tend to stay entrenched in said process and not grow as a modeller. I definitely feel like this build exposed me to new ways of doing things that I’ll be incorporating into future builds. One new technique I tried out was weathering over a matte coat. In prior builds I had always done my weathering over a gloss or satin clear coat and left the matte coat until the end to tie things together. I decided to stray from this process in this build with the majority of heavy weathering being doing over the final matte clear coat. It went better than I expected and it’s something I’ll be doing going forward.

    I also made an effort to use a lot of different weathering products and mediums together. In prior builds I may have just stuck to one specific type of medium in my weathering and as a result I may have not been as familiar weathering with enamels or pigments for example. For the T-55 I made heavy use of these mediums with the various fuel and oil stains being created with MIG enamel products. I also used quite a bit of pigments and applied them basically where I felt dust and debris would collect on the vehicle. In short, I think that the three pronged approach to the weathering on this build (Oils for a general wash and streaking, Enamels for fuel stains, oil leaks, and rust effects, and pigments for dust and dirt deposits) worked well and it’s a process I’ll keep in mind for the future.

    That’s it for now! Enjoy the final build gallery below!

  • T-55A Mod. 1981: Weathering

    T-55A Mod. 1981: Weathering

    Miniart’s T-55 has been in progress in one form or another for almost two years now. It’s survived being stuffed in a box and a move across the country. There’s a few reasons why I’m only getting around to finishing it now, namely that I was more interested in other projects and that it’s a complex kit and not one you’d try to finish when being away from the hobby for a sustained period of time. I’ve slowly picked away at it for the past year but with a new year returns an old build as I’m determined to start the year by finishing off this shelf queen.

    In starting the weathering process I’m reminded that conceptualizing the final result *before* beginning the painting process is needed for a good result. In slowly chipping away on this build I painted a layer of 4BO with no real direction as to what I wanted the final result to look like. Looking back this was a mistake, as I would have liked to add some chipping effects via the hairspray method. This mistake could be salvaged however and I decided to use this build to experiment with post shading, colour modulation and other heavy weathering effects. Basically I want to push this build and really go far with the weathering and pigments to get a better understanding of what works and what doesn’t. I settled on a dusty finish of a vehicle set in a desert environment and I think the green of the tank will contrast nicely with the brown environment it will be set in.

    The weathering process started with adding some rust highlights by spraying some various rusty shades on the fuel tanks to create some contrast between the tanks and the vehicle hull. I then opted to treat the fuel tanks to a chipping effect to simulate areas where the paint has peeled away and exposed the rusted metal underneath.

    Hairspray chipping helped to start a rust effect on the fuel tanks.

    After getting the tanks where I wanted them, I hit the model with a gloss coat to seal the paint prior to an oil pinwash. Normally I’d stick with satin finishes on armour but seeing as there were a lot of details for a wash to skink into I opted for the gloss coat in this stage. After the pinwash I used VMS Satin to seal the model again before moving onto further effects. I opted for a satin coat instead of working over a gloss surface because it would allow for easier blending between the various effects I wanted to use.

    Initial weathering was comprised of enamels from MIG using various grime and fuel stain effects. I like how this initial stage turned out although I think I need more practice with enamels as they are not my go to as much as oils are. That said, I like how “grimy” I was able to make the surfaces look and how the staining interacts with the colour modulation. This phase was only meant to be a base for the pigment work which will come next.

    Since I knew I wanted to pose this vehicle in a Desert or Arid setting, I wanted a significant amount of dusting done to the model. I started on the running gear and underneath the fenders and stippled on AK’s “Kursk Earth” along with various other pigments. I also utilized a “light mud” product from AK to get very light splashes to add contrast. With it having been quite a while since I had really dirtied up a tank much of this process was experimenting to see how I liked the end result. I also cut up some static grass and mixed it with a light pigment before applying it to the model to simulate foliage being stuck to the underside of the vehicle.

    For the initial dusting I utilized two pigment shades with pigment fixer and while I think it was good experience to practice with using pigments I think my application of this medium would use some refinement. I do think I need to slow down a bit and put more effort into blending while the pigments are still drying which is something I’ll need to keep in mind for the next build.

    I used T-Rex tracks for this build and couldn’t be happier with how they turned out. I painted them in Gunze Mr. Metal Color “Iron” which if left unbuffed will remain a dull dark grey but will result in a really great shine if you rub the surface. I added some more “Kursk Earth” long with several different pigment shades to create a dusty weathered look. I then used several q tips to wipe away the pigments where wear would occur and revealed a nice shine to represent polished metal. I also added graphite onto the cleats on the reverse side to represent where the track would contact the ground the hardest and buff them metal.

    This is where I’ll leave this update for now but there are sill a few things I’d like to do before declaring this one complete. I’d also like to put this one on a proper base so I’ll need to get that completed as well. Hoping to get the T-55+Base all done by the end of February so not a whole lot of time left!

  • CF-18A Hornet:  Completed Build

    CF-18A Hornet: Completed Build

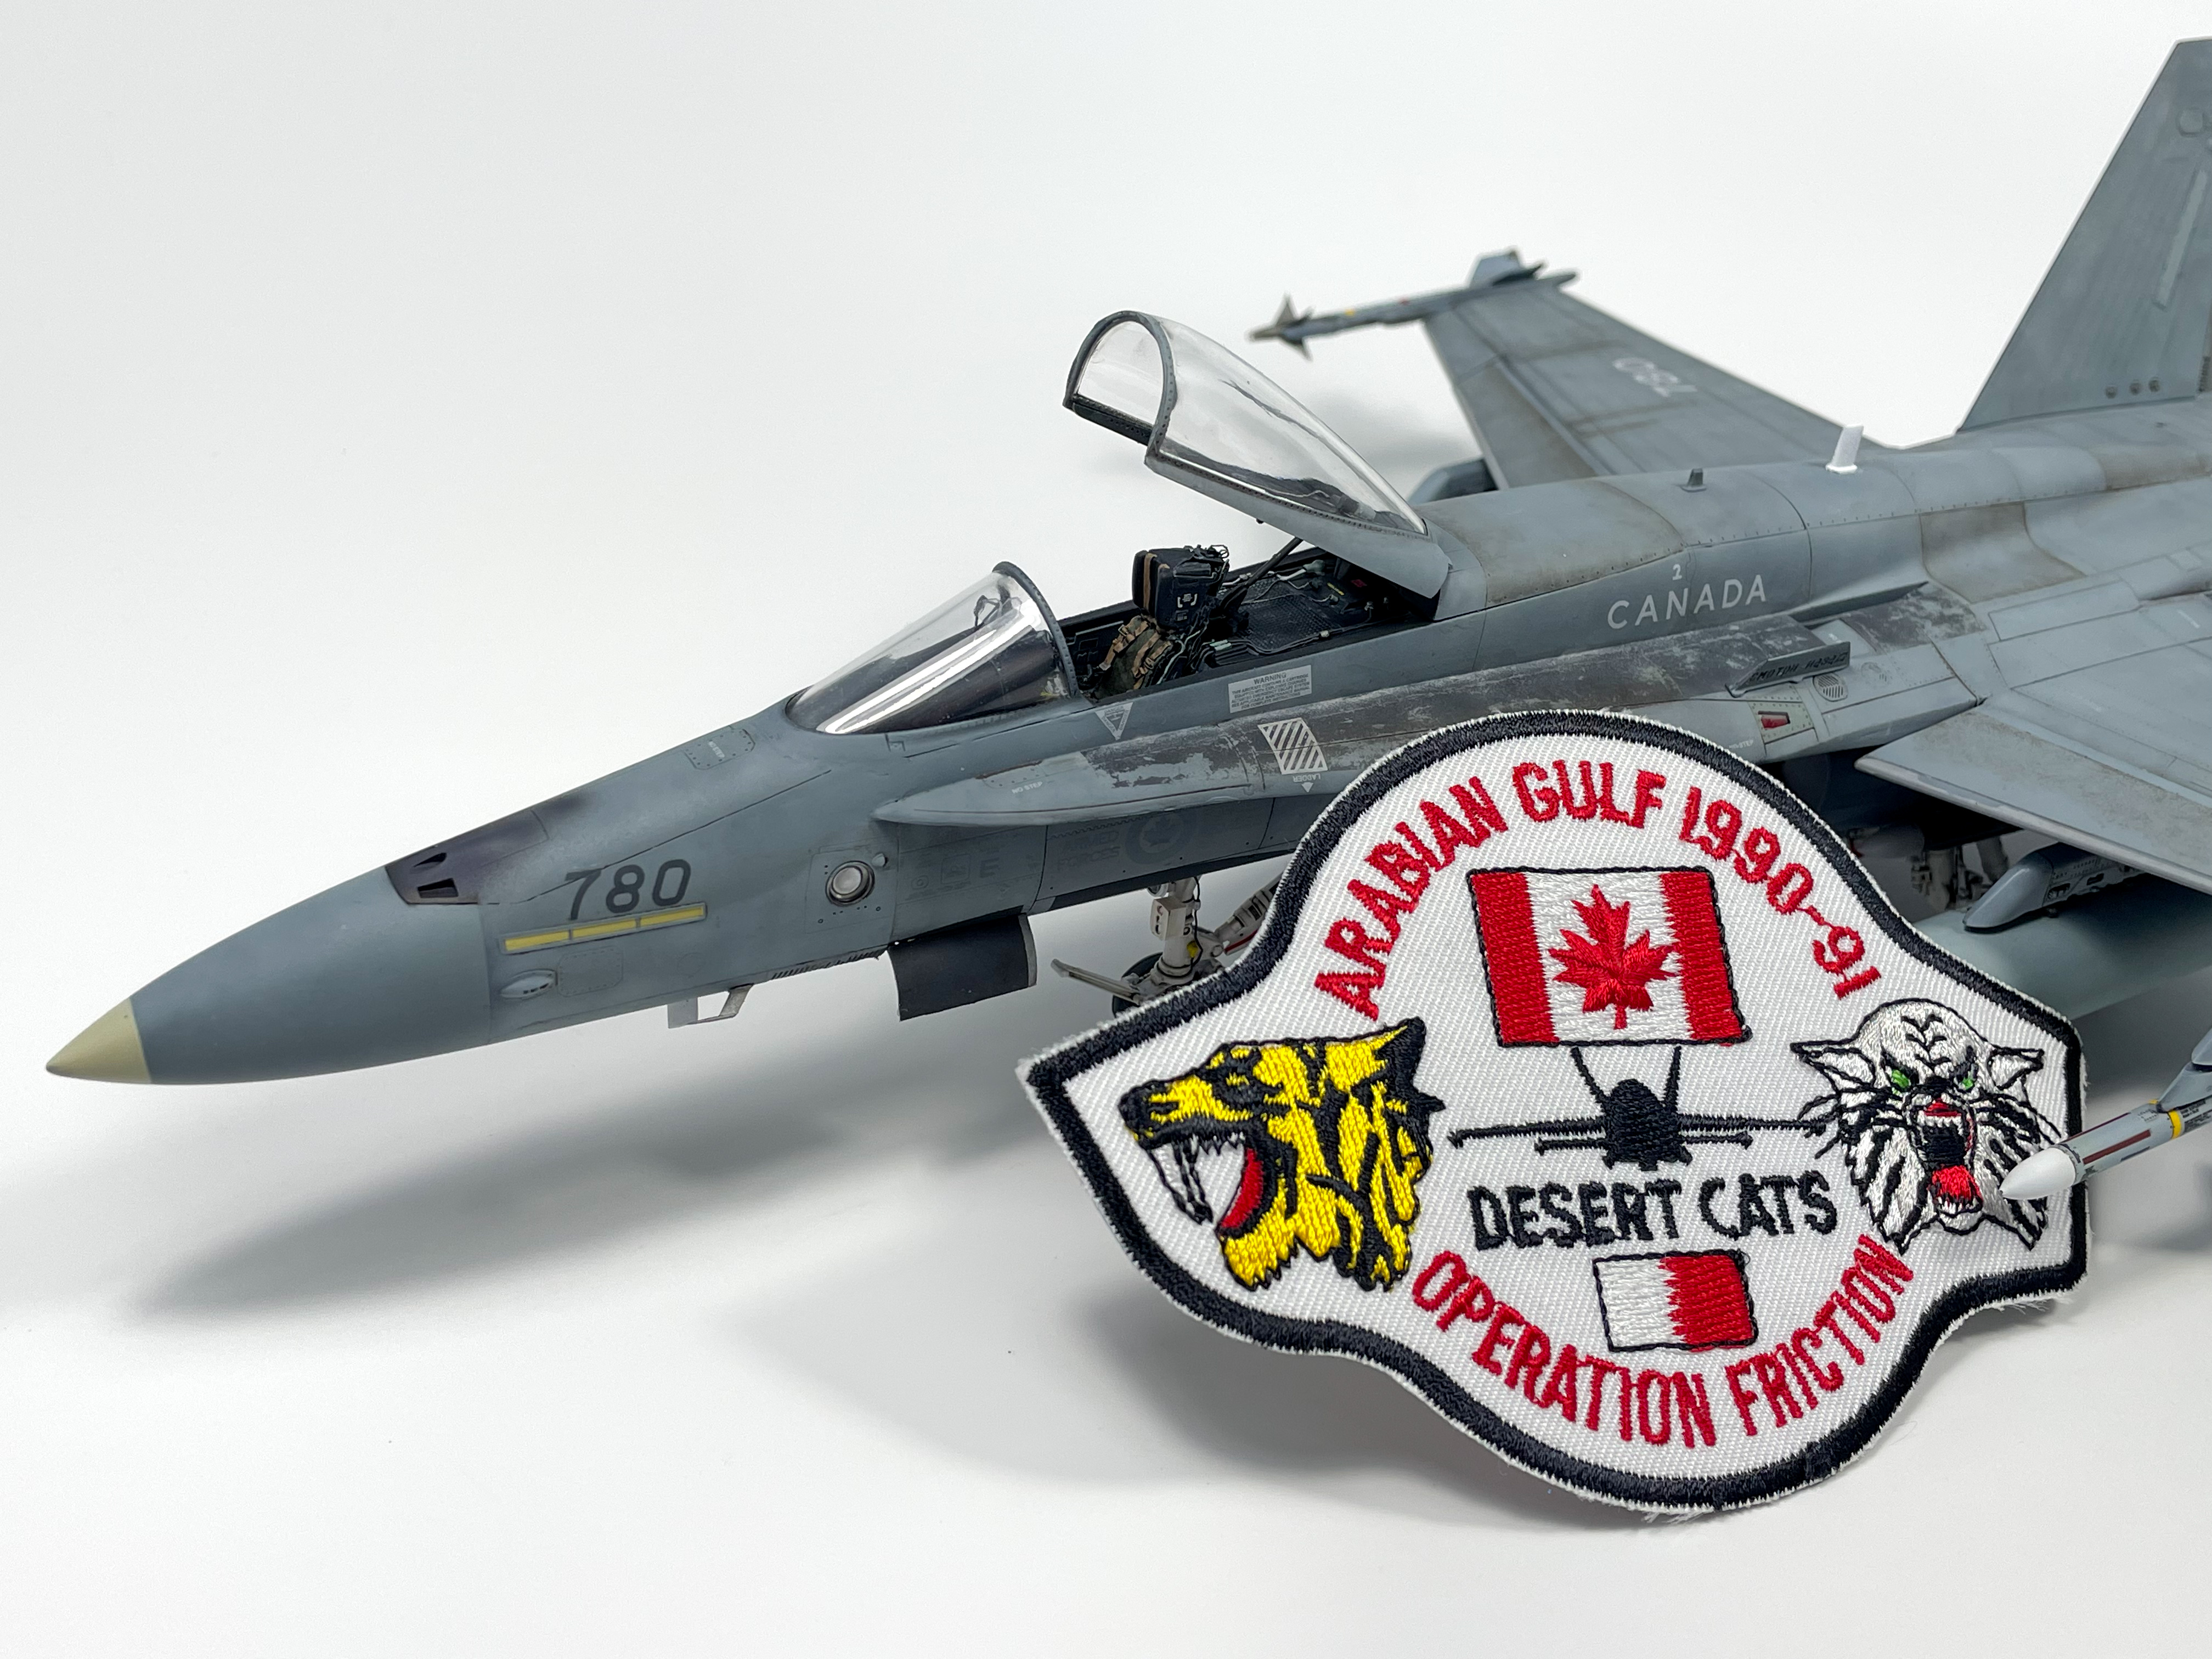
    This past week I was able to finish Kinetic’s 1/48 CF-18 and just in time for the holidays! (currently finishing this write-up out of Toronto Pearson) This build took around 3 months to complete and although I’m definitely happy with the end result (probably my best result to date!), the build itself was challenging to be completely honest.

    The kit was plagued with rough fit and unclear instructions. The infamous nose/windshield assembly lived up to its reputation and fought me the entire way.

    As I had been thinking about this build for the better part of this year, I spent the months leading up to it gathering various aftermarket pieces to enhance the build. The full list is as follows:

    • Leading edge “Combat Hornets” decal set
    • Aries Resin ejection aeat
    • Flying Leathernecks 3d printed accessories
      • Wheels
      • Hud
      • Pitot tubes
      • Weapon pylons
    • Eduard Resin Aim-9 Sidewinder and Aim-7 Sparrow missiles
    • Anyz decals and 3d printed parts
    • Various scratchbuilt wiring and tubing

    The Leading Edge decals really were the catalyst for the build, I knew I wanted to build a Canadian Hornet but that I also wanted build a specific aircraft, No. 188780, one of the participants of Operation Friction, Canada’s contribution to the 1991 Gulf War. This aircraft stood out because of the Cyrillic writing “oсмотри назан” on the Lex fences, with some sources translating the text as “check six”. This marking was specific to aircraft based at CFB Cold Lake which were responsible for “greeting” Russian aircraft over the arctic. As far as I can tell 780 was the only aircraft with the Cyrillic writing present in Desert Storm.

    Refocusing back to the build, I tried to scribe my own panel lines for the first time along with adding rivet details. While I feel my scribing skills need improvement, I think that the rivet details I added really stand out and were a worthwhile addition to the model. Kinetic is missing some pretty prominent rivet details on the wing and vertical stabs and the custom detail really enhances the area IMO.

    A more detailed breakdown of the painting and weathering stage can be found on that phases’ separate post but the basic overview is as follows. I primed the model in black, added an initial marble coat, followed by a blend coat and detail coat before tying the entire finish together with a final blending coat. I really do enjoy this technique, the method of slowly raising the opacity of paint layers comes very natural to me and is a straightforward (if time consuming) process. That said I do think I need to experiment in this area, and possibly start to add more post-shading to my workflow. As it stands now I see two distinct disadvantages to my current process, the first is that this is a very “dark” method in that since the model is being primed black I often need to finish the model in a shade lighter so that the end result is tinted the correct shade. The second issue is that the best gloss varnishes like to burn hot and will reduce the opacity of the paint by about 5% or so which needs to be taken into account when spraying the final blend coat.

    One area I wanted to pay specific focus on was the cockpit, and took extra care and time to get it looking how I wanted. Of immense help was Kris Sieber’s book, “Superdetailing the F-14 Tomcat” which is a must buy for anybody serious about building modern jets. Even though the book is about the process of detailing a Tomcat the techniques can be applied to any ghost grey jet.

    All in all however, I really do feel that this is the best kit I’ve built so far and I was able to use everything I’ve learned over the past year or so to really enhance both the building process and the painting/weathering process. Enjoy the final build photos below!

  • CF-18A: Decals and Weathering

    CF-18A: Decals and Weathering

    After the paint was down, it was time to clear coat. I’m always on the hunt for a better product or method for sealing a model as it’s my least favourite part of model building. I find that adding a gloss coat is the step I always have the least control over and it has the most ability to fuck up all the hard work I’ve put in the model, I learnt this the hard way when I built my Mp4/13 a few years back:

    What happens when you put a Laquer clear coat over Enamel paint.

    As such, I’ve always tended to choose a “low risk, low reward” method for clear coating. For the longest time that was Tamiya clear + Mr. Color levelling thinner (MCLT) as it was always a pretty safe way to get a clear coat on the model and didn’t take too much thinking beforehand. I switched to VMS clear a little while ago as the application was even more simple, just drown your model in it and it’ll shrink down into all the panel lines no problem. For a while VMS was my go to but I found it wasn’t the most chemically stable, it frosted very badly over a week-old layer of paint and nearly ruined a Spitfire I was working on:

    Had to remove paint in some areas down the primer, I was luckily able to salvage the build.

    As a result I switched back to Tamiya clear but still wasn’t quite happy with the results I was getting out of it. I found that I wasn’t able to get as smooth surfaces as I’d like with it. I then discovered Mr. Hobby GX 100 Super clear III. GX 100 is to other clears as what MCLT is to other thinners, the stuff is absolutely fantastic in so many ways. Easy to apply, durable, chemically neutral, and most of all a fantastically smooth surface.

    I shot a layer of 50/50 Gx100/MCLT then misted straight MCLT over the still drying first layer. This technique can be a bit difficult to achieve but basically you want to spray the straight MCLT on the model until the very point in which the surface becomes “wet”. You want to avoid drenching the model because you are spraying straight thinner onto the finish and can burn through the paint if you’re not careful, this is a very “hot” method of painting. The end result looked a little semi-gloss rather than gloss in the final result but it was still the smoothest (in terms of feel) finish I’ve ever had, which is what really matters for the decals.

    Speaking of decals, I used the “Combat Hornets” set by a local company, Leading Edge Models. If you want to depict a combat Cf-18, this is the set to get. You get options from the early 90’s to present day and enough stencils to build two jets. It includes specific markings for almost two dozen aircraft and the ability to depict any Cf-18 with the assorted numbering (which is what I did) They are durable and settled down excellently there is no competition in this category right now, These are the best Cf-18 markings out there right now hands down.

    Oil paints, as always, were used entirely for the weathering process. I first hit the model with a mixture of very dark brown and dark grey oil wash. This mixture had the intended effect of not being super noticeable over the grey finish, which is typically desired for more modern aircraft finishes. I sealed the initial wash with VMS Satin before moving on more detailed oil work. I used Abteilung Bitume oil paint in this stage, it’s by far my favourite oil shade to work with. I taped off where I didn’t want the oil effect to appear and stippled the paint in order to get a smooth transition.

    I like to use this tactic because it’s so versatile IMO. If you want only a very subtle effect you can load your brush up with thinner and blot out 95% of the paint. On the other side you can leave most of it and it’ll create a very striking contrast. After that I also did some various streaking effects on the wing. This is a common effect to create for Cf-18’s as the streaking fluid is typically very visible in a lot of reference photos. I hit the model with a coat of VMS Matte and the weathering stage was complete!