Categories
1:48 Aircraft Projects

CF-18A Hornet: Main construction and Painting

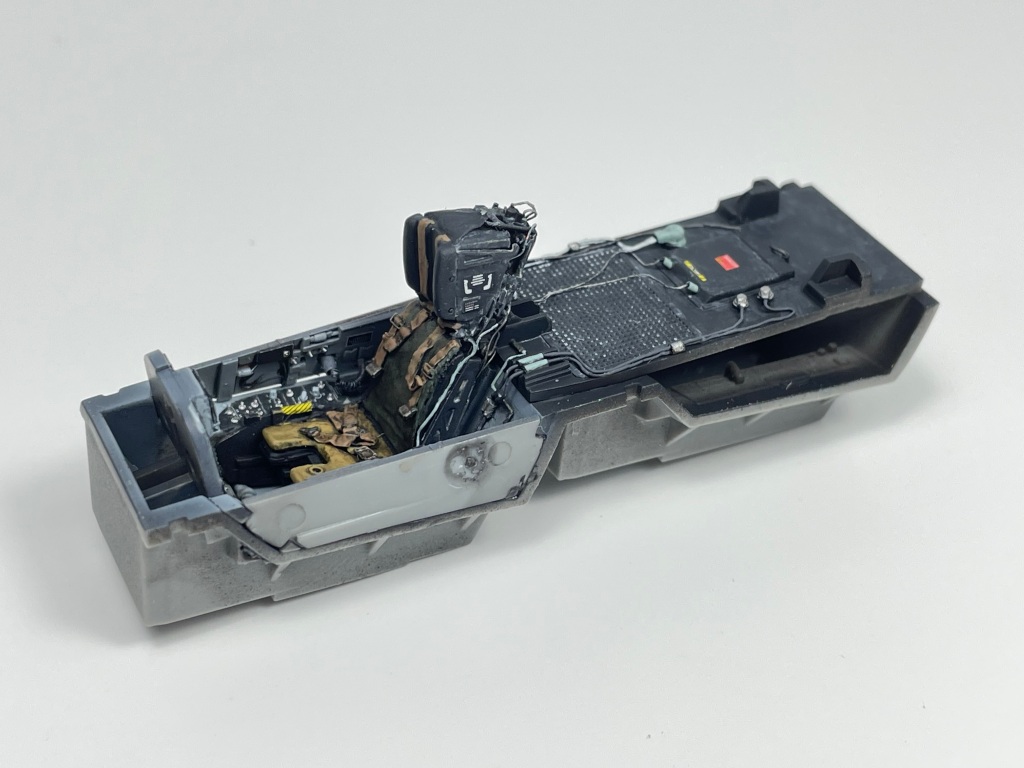
With the cockpit and gear bays completed, work could get started joining the two fuselage halves and other assemblies before spraying paint. I have to admit, I wasn’t looking forward to this part as Kinetic’s nose assembly is rather infamous for it’s fit and this build is no exception.

The whole nose and front windshield assembly is such a bear to build, It’s really quite frustrating that they built it the way that they did. none the less I was able to complete it after a lot of sanding and swearing and got it to a place where I was reasonably happy with it.

almost ready for paint!

Seeing as I’m opting to represent a early 1990’s Hornet, I also removed the nose antenna and opted for the early style antennas on the spine of the aircraft. Mr. Finishing surfacer black was the primer of choice (my default choice) and I got to work on the main painting process.

I also started with the main painting process by marbling the control surfaces. They are all being painted separately and I typically use them as a test bed for practicing before committing to the main body. I chose three main shades for the marbling xf-23 light blue and xf-65 field grey were used as the grey and green shades along with a mix of xf-10 flat brown and xf-57 buff for a brown shade. Both the xf-23 and xf-65 were lightened with white before applying them to the model. It’s important to lighten the marble colours before applying them in my opinion as if they are took dark then it is difficult to get coverage with the main coats and as a result the main coat must be a shade lighter. By preshading and marbling with a slightly lighter shade you can avoid this and spray the exact desired final colour.

For the first blend layer I used Mr. Color 308 (FS36375) and 337 (35237) for the lower and upper surfaces respectively. I sprayed a very thinned mixture as I really didn’t want to overpower the pre-shading/marbling. After blending the finish I sprayed Tamiya flat white through a torn up scour pad to get some surface highlights and additional variability. The end result set me up quite nicely for the final coats of paint.

After unifying the surface I was left with the finish below. I’m quite happy with how this main round of painting has gone although I do want to go a bit further with various post shading effects. This was my first Cf-18 and all in all this was the overall effect I was searching for.

Categories
1:48 Aircraft Projects

CF-18A Hornet: Cockpit and Gear bays

For my next major project I decided on building a CF-18 Hornet, I’ve always wanted to build one and really wanted to utilize everything I’ve learned over the past year.

After doing some research on the available options, I settled on the 1/48 offering from Kinetic. The brand wasn’t my first choice, but they are the only manufacturer that has a somewhat new mold of a legacy Hornet.

I wanted to do a somewhat fresh take on this subject and so opted to build an early 90’s bird that participated in the 1991 Gulf War and in the scheme prior to the distinctive “Canada” wordmark (fellow Canadians will know what I’m talking about this logo is everywhere).

A CF-18 sits on the ramp in Doha, Qatar as part of “Operation Friction”

Construction unsurprisingly starts with the cockpit. I took my time here, spending a few extra days to get all the details I wanted added. Lots of extra wiring was added to the resin Aires seat and the end result really paid off. Lead and copper wire was used (0.1, 0.2 widths ) along with brass micro-tubes from Albion alloys. Some 3d Printed avionics from Anyz were also used. I coiled 0.1mm copper wire to create a avionics cable in roughly the same position it is in real life.

The cockpit was painted over a few days, It was surprisingly straightforward. After adding the X-22 clear coat, the real fun could begin, dealing the cockpit. For this I used Anyz and Airscale decals. Anyz makes really great “miscellaneous” decals and cockpit switch selector indicators. Airscale has good warning and dial decals.

Overall I’m very happy with how the decaling went for this project, it’s time consuming work, but not difficult by any means

For the weathering, I wanted to keep it restrained but obvious that the jet was working in a desert environment. I felt that it would be reasonable for dust to accumulate in areas of the cockpit. The key would be to keep it very subtle. I used dusty shades of oils to brighten up the surface and pickout highlights.

Kinetic’s gear bays are quire well detailed OOB. None the less, I still wanted to add some extra detail here for the experience. After looking at various reference photos I could tell that they were incredibly busy and complicated, and the extra piping would help increase the realism. I found it difficult to work in the nose gear wheel well as there really isn’t a lot of space to work in. As such, most of my detailing efforts went into the main gear bay. I painted the bays in standard Tamiya white and picked out details with various metal shades along with Tamiya black.

I added various Anyz and Airscale decals to the wheel wells and I feel that having lots of placards in the area really adds to the realism. For the weathering I think that I may have overdone it in same regards. I first did a very light brown (tan coloured really) oil wash in order to simulate dust buildup. I then followed that up with a very dark brown/black pinwash in crevices to pickout all the details. I then spreckled the surface with MIG’s oil and grime effect to simulate oil spots. Is it overdone? yup, that’s ok though it not too off the mark IMO but this result is on the dirtier end of the spectrum for sure.

To return to the cockpit, all that was left to complete on it was to add the sidewalls and Anyz dials to the build. Suffice to say I’m very happy with how the cockpit turned out.

Categories
1:48 Aircraft In Box Reviews

Tamiya Bf-109 G-6 In Box Review

Kit Features: 15/20

Tamiya’s 2017 G-6 is an excellent baseline as to what we as modellers should be expecting in 2023. Tamiya includes a well-stocked kit that is as equally perfect for a new builder as is for someone experienced in the hobby. The only features missing from this kit would be photo-etched parts or possibly resin inclusions as found in Eduard Profipack releases. What is included is a full DB 605 engine that can be built displayed or not (and crucially changed after completion between the two), a pilot figure, canopy masks and various other variant-specific options for building. In my opinion the inclusion of the masks and engine are significant, masking canopies for me is one of the more tedious parts of the hobby and I welcome the inclusions. Many kit builders will “include” an engine in so far that since the engine will be visible when completed, so something has to be there to take up space. Tamiya’s offering is the real thing. Kit features are rated as a 15/20, Tamiya includes a lot and there really isn’t much missing here.

Quality of Molding: 34/50

Tamiya’s new tool kits really are quite special, and the molding is an example of why. panel lines are very clear and the kit is the definition of “crisp” no flash is present at all. The only points that Tamiya looses out on is the fact that there are some rivet details missing that will need to be added if the modeller desires. As a counterpoint, Eduard is able to include all of the rivet details in their new tool Bf-109’s. Tamiya losses more points due to the fact that ejector pin marks are visible in prominent locations in the cockpit that will need to be filled. None the less, this 109 will build up to an excellent looking model and has a level of detail where I’m looking forward to getting a wash down into the surface details.

Instructions: 14/20

The instructions are perfectly workable and do offer some comforts to the builder. They are unfortunately not in colour and printed on cheaper materials but this downside is mitigated by the fact that the important colour profiles are in full colour and blow up much larger. I do wish that Tamiya included more information about the subject rather than the standard: “9/JG54, February 1945” It feels lacking compared to what Eduard is doing in this space in regards to the historical background of the subject. Despite these shortcomings the Tamiya instructions really are quite clear in what the modeller is required to do in each step with important parts clearly labeled.

Miscellaneous: 6/10

The kit includes 3 options for markings although it could be said that there is really only one option, the standard “grey 109”. I wish Tamiya included at least one other interesting option as G-6 109’s did come in several other schemes. The decals are perfectly printed and very clear, especially with the bright colours, no points lost here. The markings overall are a bit meh, you could say they’ve done a good job with mediocre subjects. As a final point I am docking them a score due to the fact that they use staples to seal the parts bags which can damage sprues unless completely removed, something a new builder might not realize.

Total: 69/100

Tamiya’s G-6 is a great kit, although this score may be deceptivley low the fact is, part of the “Tamiya Tax” is the fact that the modeller pays for the the engineering and fit of a Tamiya kit (and the brand!) and not necessarily the detail or what’s inside the box. In contrast to my previous reviews it may seem that this kit is only marginally better than Eduard’s Hellcat or Tamiya’s 20 year old Mosquito, and to be fair that’s not far off the mark here, but it’s an objective fact that this G-6 is a great kit when competitively priced between 60$-70$ CAD.

Categories
1:48 Aircraft In Box Reviews

Eduard F6F-5 Hellcat (Late) In Box Review

Kit Features: 16/20

As a typical Eduard Profipack kit, Eduard has well furnished this kit. It includes quite a lot of bang for your buck, coming with two frets of photo-etched parts, resin wheels and a complete mask set for the model. The resin wheels Are greatly appreciated and are often a very useful improvement over the stock wheels. The kit includes some armament options in the form of rockets or bombs as well should the builder choose to include them. Overall the kit is well stocked compared to older releases but it should be kept in mind that you are paying for these extras in the overall higher list price of the kit.

Quality of Molding: 24/50

Eduard’s Hellcat offers basic panel-lining and riveting, as expected from the manufacturer. It should be stated however that the detail present in the molding does leave some to be desired. I was surprised by the lack of crispness in the molding details. looking further, the build does lack the extensive riveting found in newer tool Eduard kits. I could be wrong, but when tracing back this kit’s tooling on Scalemates.com, it indicated that this is a re-box from 2008 originally. This isn’t especially surprising to be honest, Eduard frequently re-boxes and re-releases kits but it’s not always clear when buying kits when the molding was first produced. I compared the molding on this kit to 2017’s Tamiya’s Bf-109G-6 (of which a review should be up soon) and it’s clear that the Tamiya kit’s lines superior in every way. The one aspect of the molding that goes in the Hellcat’s favour is the inclusion of the “layered” skin on the fuselage. The vertical panneling is molded so that ever so slightly the panels overlap as seen in the real fighter. All of these issues together paint a unfortunate picture and the fact that this kit is priced as if it is a new tool build while not including the level of detail found in Eduard’s new tool kits.

Instructions: 18/20

Eduard claws back some points in this section as their instructions have always been excellent. In colour and clearly printed they offer more than the bare necessities. Eduard instructions have always been well done and this is no exception. As a matter of personal preference, I prefer instructions in the form of a booklet (stapled together) rather than the type that just fold out (like Tamiya’s). One high point of Eduard’s instructions are the full colour profiles and the details provided about the markings. I for one like knowing the details about the aircraft I’m building and Eduard goes so much further in giving us those details than other manufacturers, they’ve clearly done their research! I love reading about the bird I’m building and the story of the person who flew it. Eduard gets a monster score in this regard, and well deserved.

Miscellaneous: 7/10

Included in the kit are 6 different marking options. I do like the variety of options included, however I feel that they could have gone a bit further in the width of what was offered. I don’t mean that they need to have offered even more options, however more colourful options would have been appreciated. They do offer a French variant which helps to increase the score, and the fact that late war Hellcats were pretty universally dark blue also mitigates it. They do loose points on the quality of the decals however, as Eduard has struggled to print vibrant colours on thier decals, with the reds on this sheet being a particular example.

Total: 65/100

Eduard’s Profipack Hellcat is in an interesting space. Nearly everything about it is excellent, save for the molding. for 62$ CAD it’s not an inexpensive build. As a lover of naval aviation subjects I’m biased but it’s an undeniable fact that the molding is disappointing. My honest recommendation? If you’re planning to build a late Hellcat either OOB or super detailed stick to the weekend edition of this kit. It’s a third cheaper and offers more flexibility for adding aftermarket parts (like a resin cockpit or engine). If you’re going to buying a kit with below average molding you may as well buy the cheap option.

Categories
1:35 Armor

RFM Pz.III Ausf. J

Want to see my review of this kit? Click here: nomadmodels.wordpress.com/2021/04/04/rfm-panzer-iii-ausf-j-in-box-review/

Returning to armour, this past summer I completed RFM’s excellent Pz.III Ausf J in a North African Scheme. I had been meaning to do a DAK scheme for a while now as I find it’s a very interesting look and difficult to pull off effectively. Construction started smoothly and I had the pleasure of using quite a few accessories for the built that I’ve collected over time. As is normally the case, construction started with the lower hull and then moved on to the fenders. I used Eduard PRINT tools and ROCHM jacks for the first time and was very pleased with how they came together.

Construction progressed very smoothly after that, with the minor exception of how the fenders interacted with the top part of the hull.

RFM has you attach the fenders separately from the lower hull and then attach the upper hull on top of the fenders. This was fiddly to complete and the only downside of the kit worth mentioning. I added Accessories from Panzer Art, DEF Model and RFM’s own set for detailing the model.

Of particular note are the tracks by T-Rex. They are by far and away the best tracks I’ve worked with. They are very well detailed and extremely easy to put together. If T-Rex offers a set for a subject I’m building, I’m using them from now own.

Painting came next, I attempted to mottle my chosen colour for the kit over a panzer grey base but found that it didn’t work quite right IMO. I used an unconventional colour, Sail (for ships) by Mr. Color’s aqueous line. I wanted a very faded colour and not something that just looked like lighter dunkelgelb. In this regard I think it did go a bit too far and for my next DAK subject I’ll darken it ever so slightly I think.

For weathering the standard dark brown oil wash was used. For chipping I took a slightly new approach, and used the technique shown in the book “Tank Art 1” (which is fantastic btw). While I thought my attempts at chipping using lacquer thinner (which tends to melt the paint instead of chipping it) were passable, I do feel like I need more practice in this area. I also used various streaking effects and pigments on the lower surfaces to really sell the fact that this was a desert vehicle and was exposed to harsh elements.

All in all this build took a little over a month to complete and I quite like how my first DAK vehicle came out! This won’t be the last I complete.