Categories
Uncategorized

2023: Year in review

With the completion of my Cf-18 build, It’s safe to say that that’ll be it for my model building year, and what a year it’s been! 2023 has been my most productive year so far in terms of builds completed, with seven total completions since January.

When I started Tamiya’s P-38 in February, I wanted to commit myself to build as many models as a could over the coming year. I had a few personal reasons for setting this goal. The first was that I was now five years removed from my next most prolific year of building, 2017, with four builds completed that year. A lot has happened in those five years, I moved out of the home I grew up in, graduated from University, and moved on to starting a new career.

These changes in my life are seen in my build progress since 2017, I only completed three builds between 2018-2022 and didn’t do any building at all while on lockdown in 2020. Looking back, I wish I had used that time to develop my skills further and gain more experience. With this in mind I was committed to maintain a steady build pace throughout the year and set some pretty aggressive deadlines as to when I wanted to complete my models. Looking back now, these are all the builds I completed in 2023:

Tamiya 1/48 P-38G lightning

I chose Tamiya’s excellent new P-38G for my first build of the year and I’m glad I did, the entire build was very enjoyable. The engineering of the kit was perfect and practically fell together. This was my first time doing an olive drab finish and I really like how it came out. I particularly enjoyed the chipping process and the end result I was able to achieve. I do feel however that I didn’t push myself as much as I did in later builds, although that can partly be explained by me needing to shake the rust off.

Ranking: 3rd overall

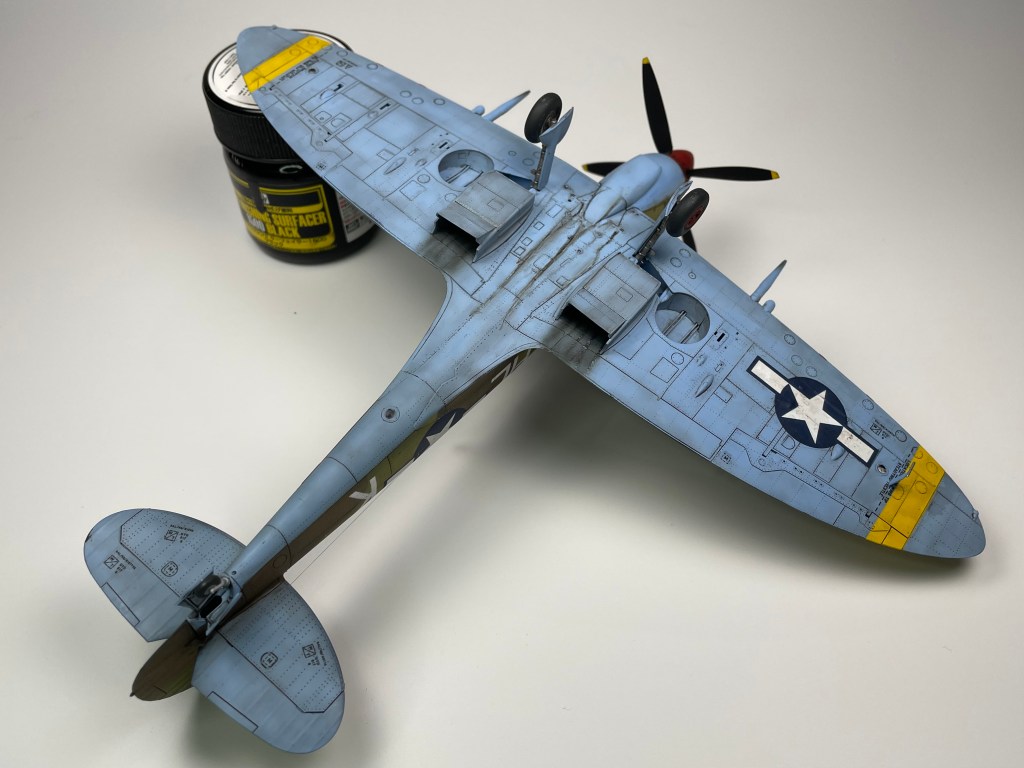
Eduard 1/48 Spitfire Mk.VIII

The Eduard Spitfire, boy where do I begin? This kit was a landmark for me for so many reasons. My second build of the year came out better than I possibly could have imagined. Out of all my builds this year, the Spit ranks first no question. I pushed myself with this build, when I was halfway done the weathering process I wanted to quit and move on to the bf-109. I’m really glad stuck with it and continued trying to find ways to add detail in the weathering phase. It’s not perfect by any means (the wing root chipping stands out) but this build served as a template for the Cf-18 later in the year.

Ranking: 2nd overall

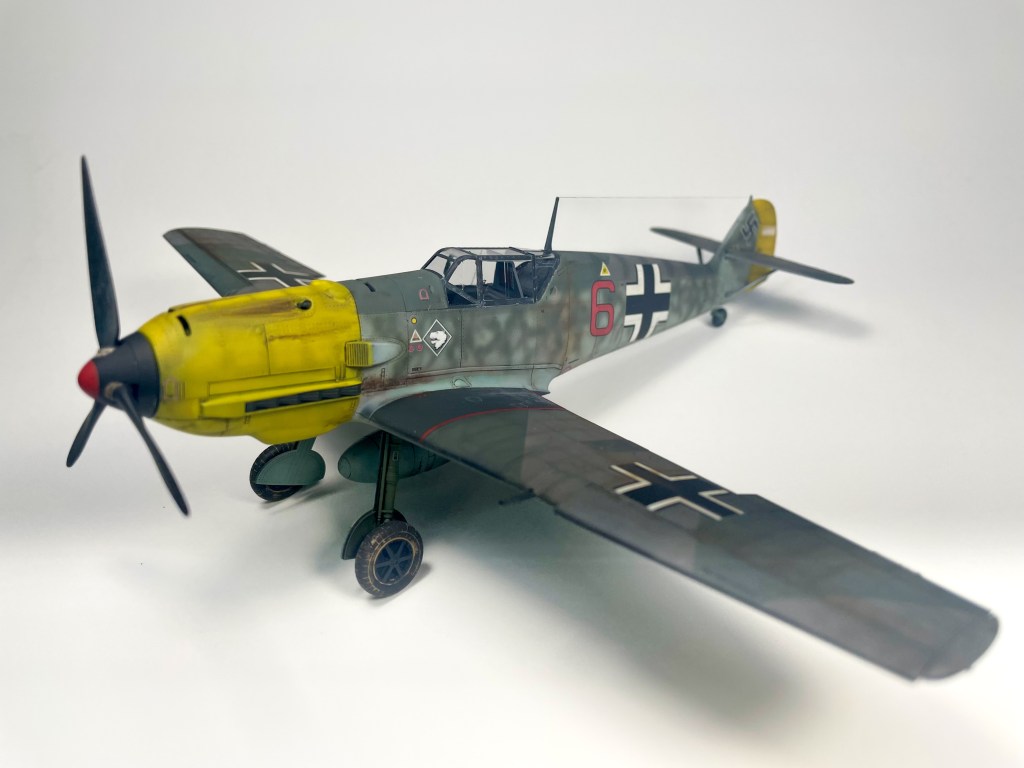
Eduard 1/48 Bf-109 E7

While I had a clear vision as to what I wanted my Mk.VIII spitfire to look like, the same cannot be said for the only 109 I finished this year. Eduard’s weekend edition kit was a struggle to build and finish. I will fully admit I was uncommitted and lacked a proper vision as to what I wanted the final product to look like. This was an important lesson to learn I believe as this lax attitude left the final result uninspired imo. I’m not unhappy with the end result but I definitely feel like it’s uninspired.

Ranking: 6th Overall

RFM 1/35 Pz.III Ausf. J

The RFM Pz.III was my only Armor subject this year and that’s something I want to change going into 2024. I really do like where I went with this build, It was my first DAK vehicle and I like the complexity of finishes that they require. I really like the look of this tank and how “busy” the stowage makes the vehicle look.

Ranking: 4th Overall

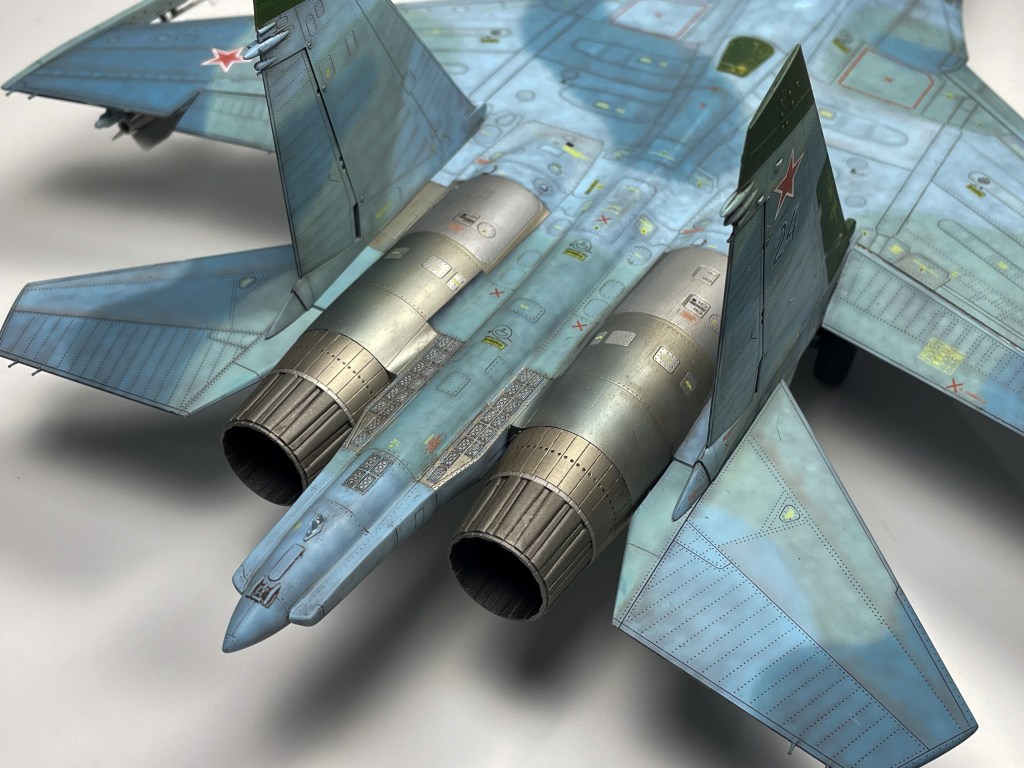
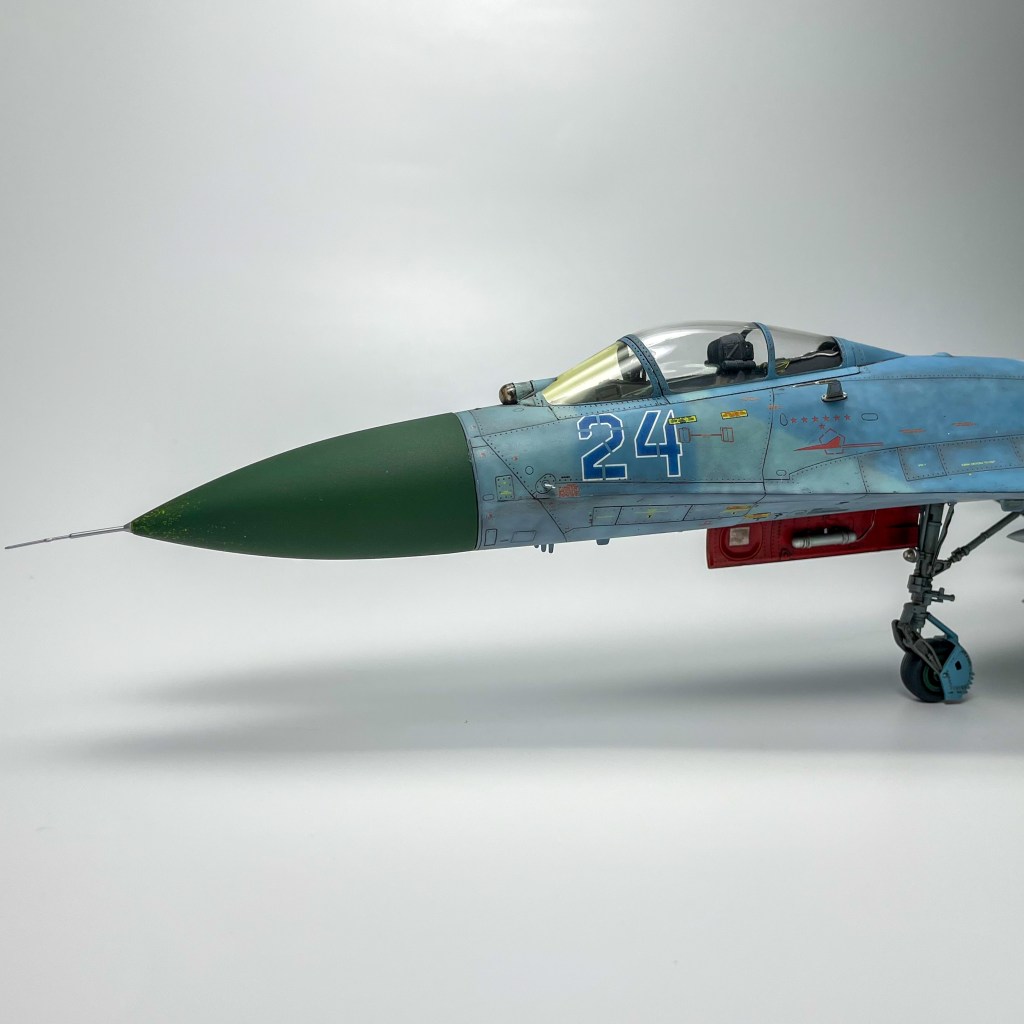
Hobby Boss 1/48 Sukhoi Su-27

As part of the r/Modelmakers VERSUS groupbuild I built this kit along with the Kinetic CF-18. I knew I was building the Hornet for the longest time so I had to chose an appropriate adversary in order to participate. I initially chose a 1/48 Mig-29 but this Hobby Boss kit was in stock at my LHS and crying out to me. I do have to admit I really didn’t know what I was getting into when I picked this subject, a 1/48 Su-27 is LARGE. The kit is more akin to a 1/32 warbird, the Su-27 is just one metre shorter than the Su-24 which is a tactical bomber. I won’t lie, this kit was a bit of a slog just due to the sheer size of it. The kit is a huge canvas to paint, decal, and weather.

Ranking: 5th Overall

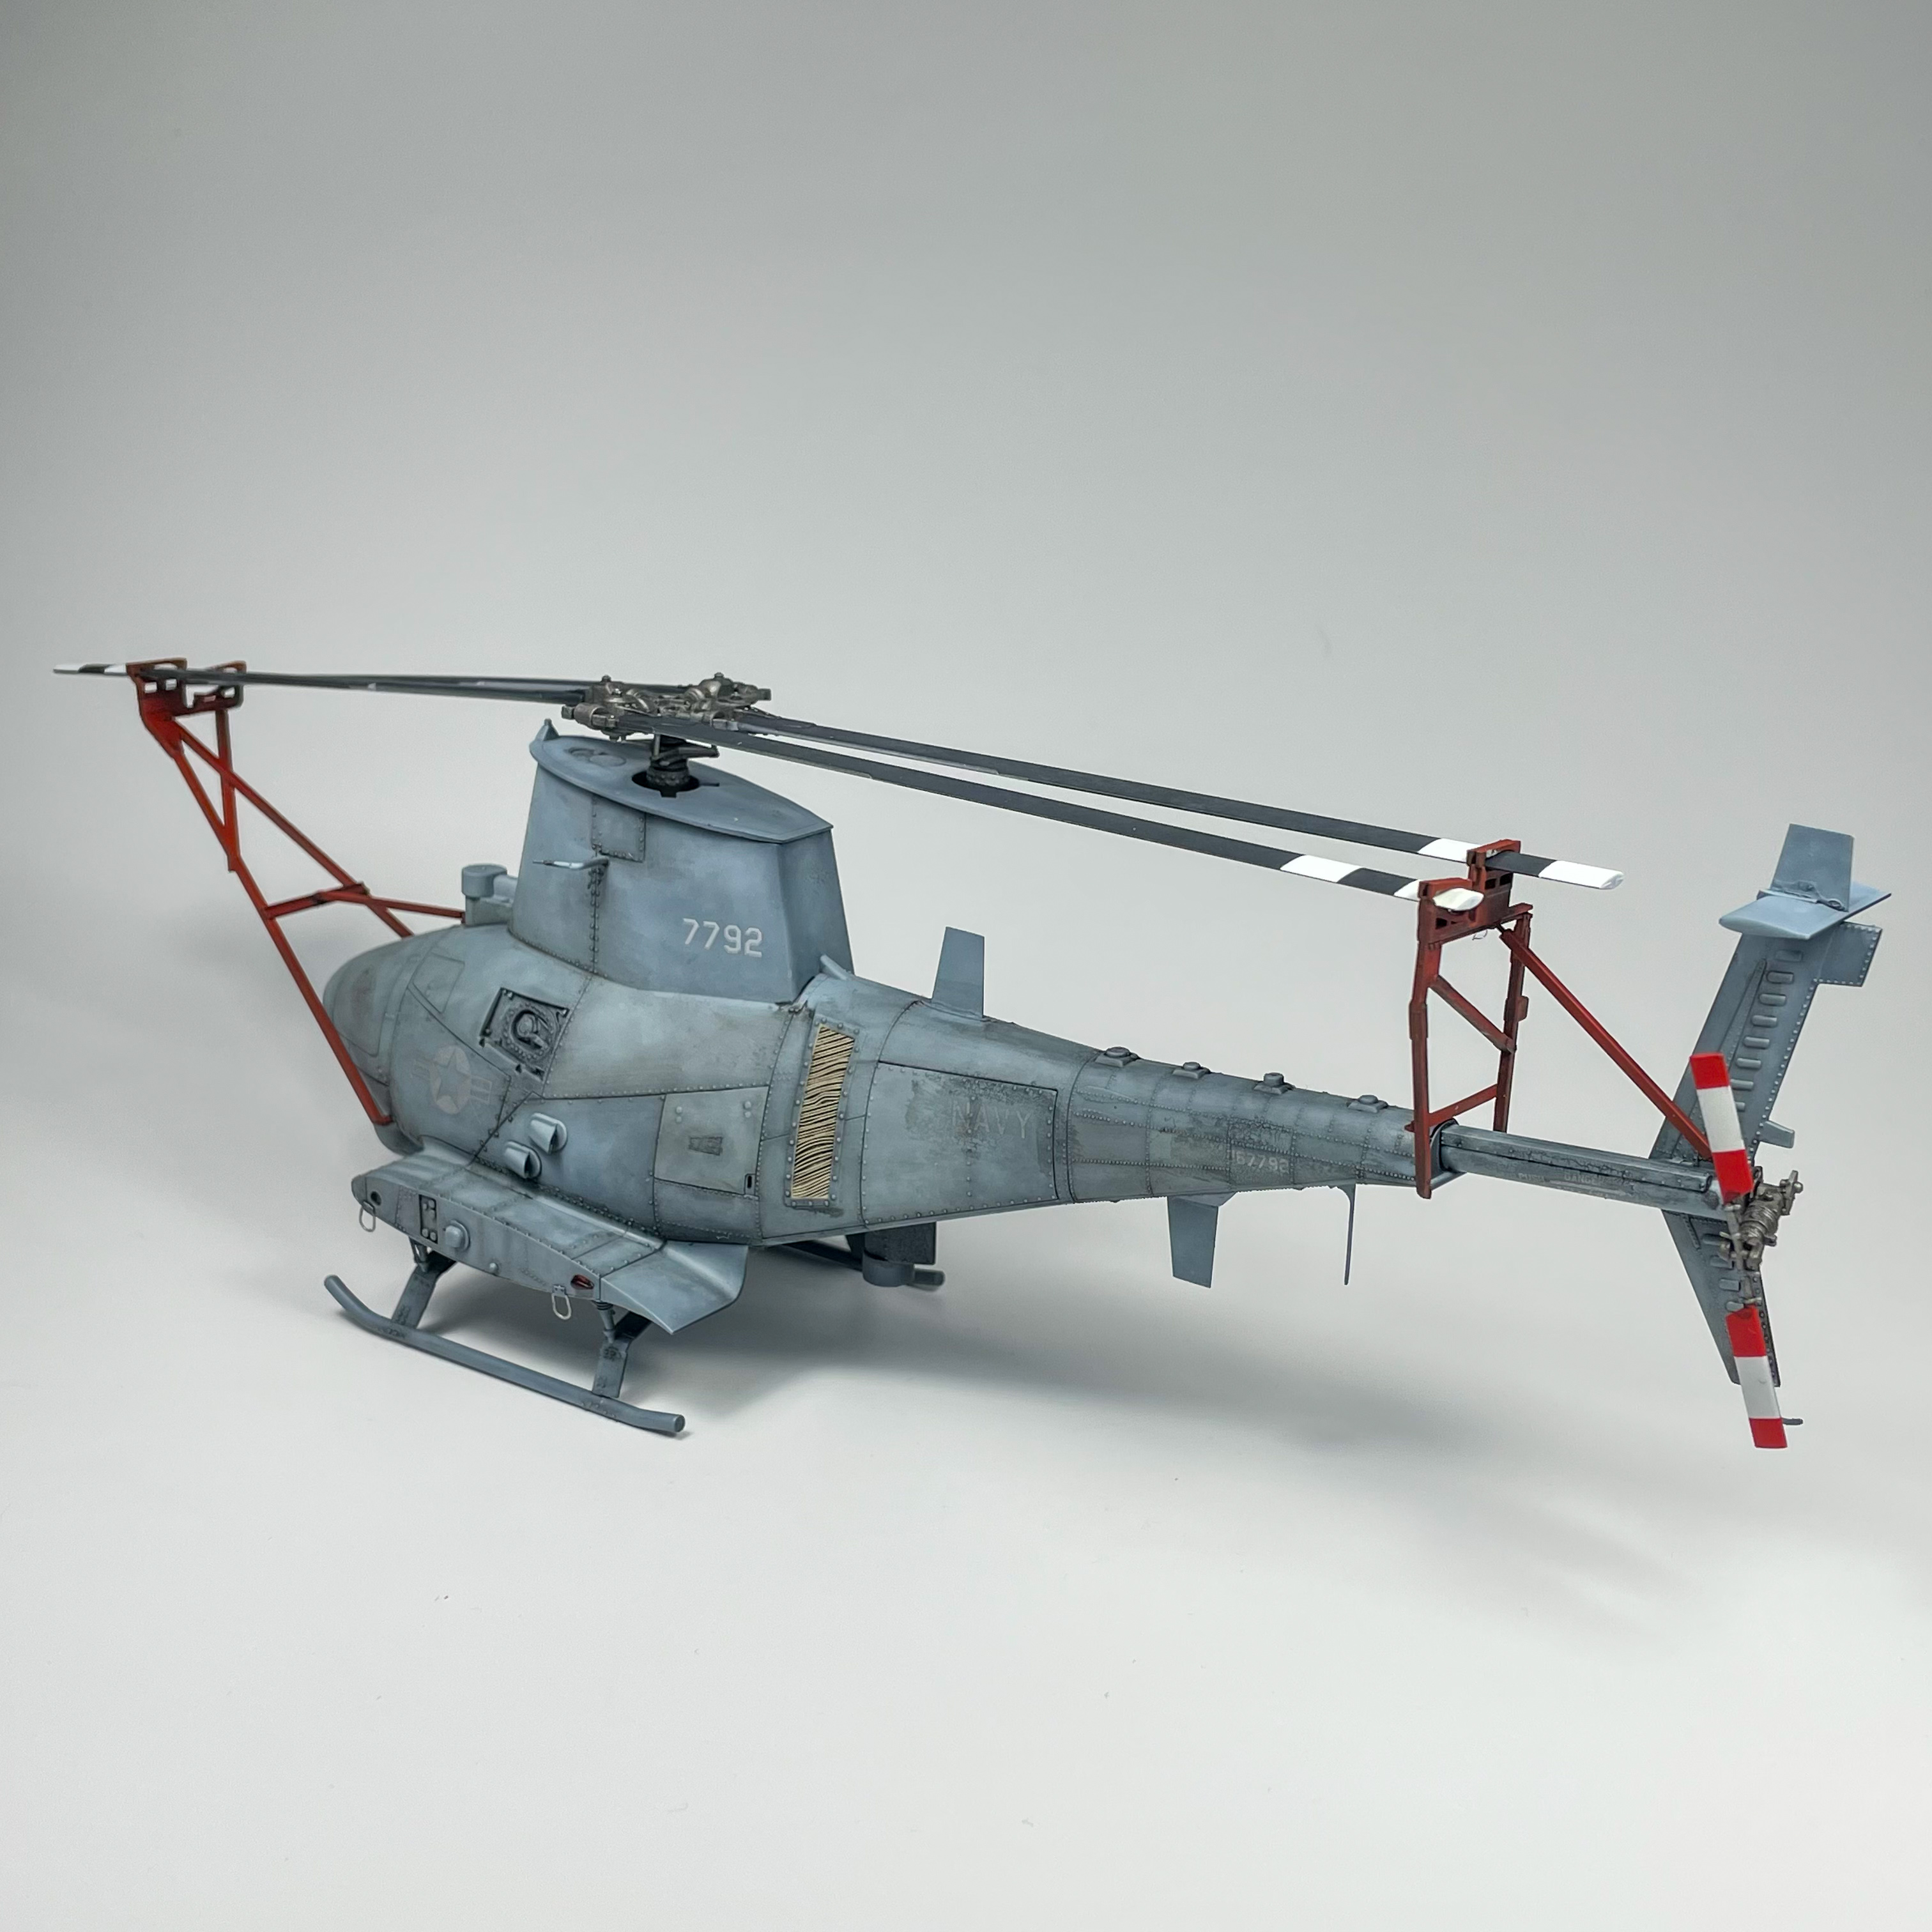
Takom 1/35 Mq-8B Fire scout

Takom’s 1/35 Fire scout was meant to be a nice reset between the Flanker and the Hornet. I definitely treated it as such and sped through the build. This was easily my worst build of the year even if the final photos look somewhat respectable. I used the kit to experiment with ghost grey shading techniques prior to building the Hornet and feel that the experience I gained really helped in this regard.

Ranking: 7th Overall

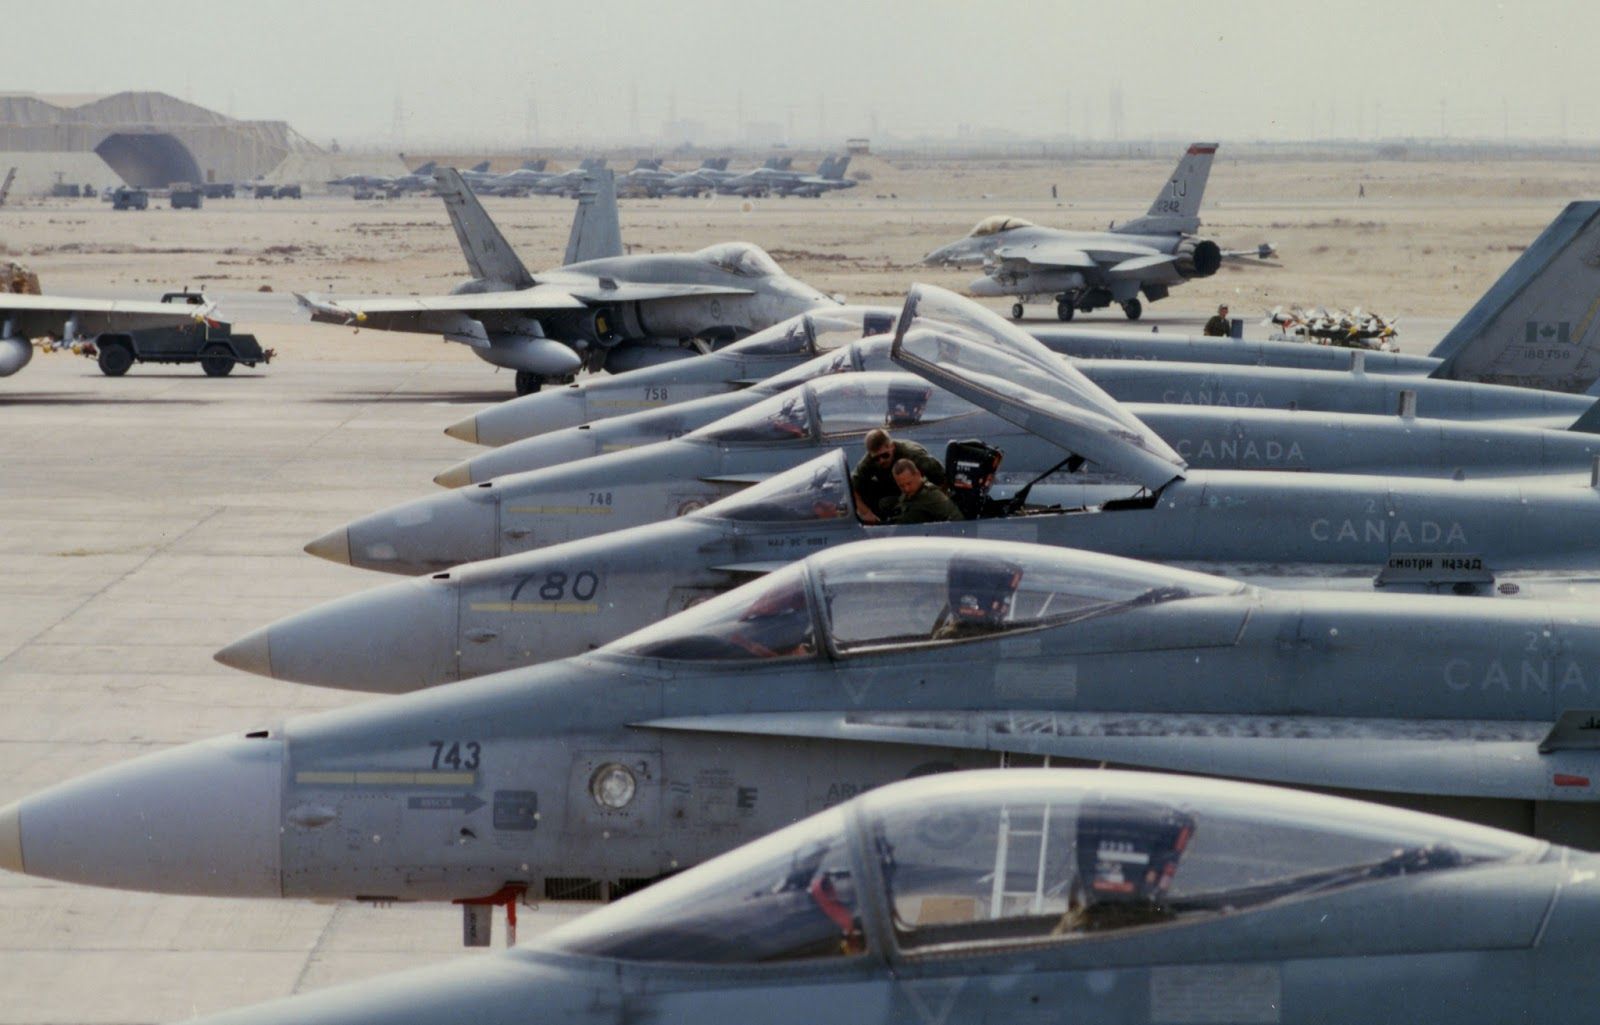
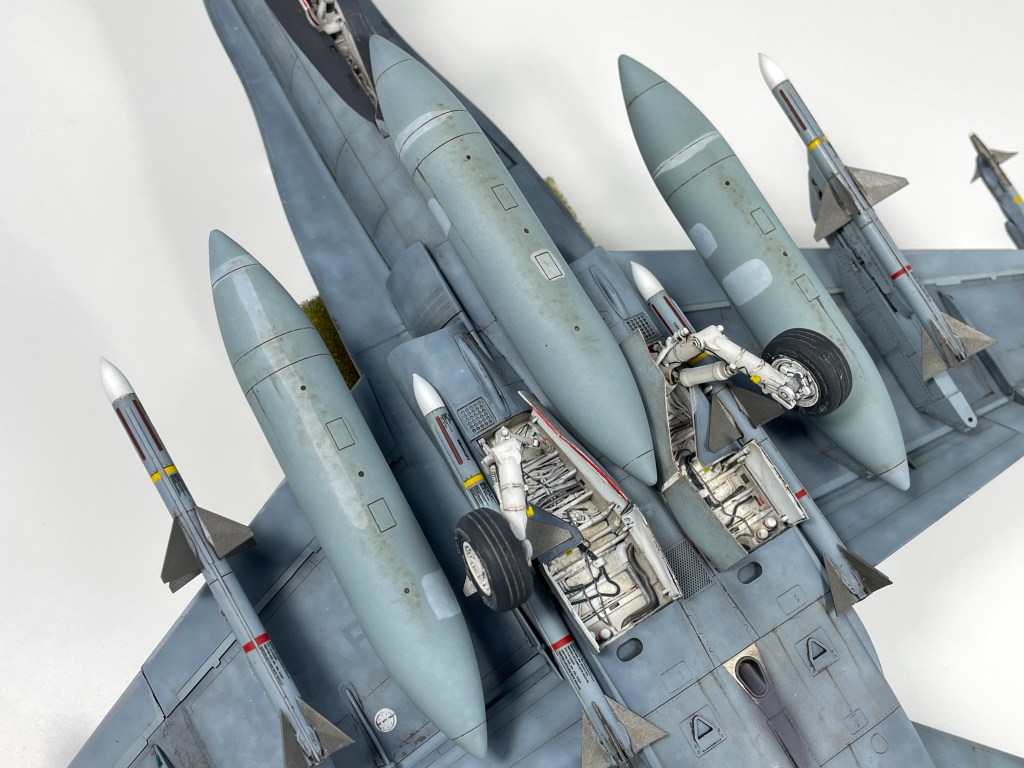
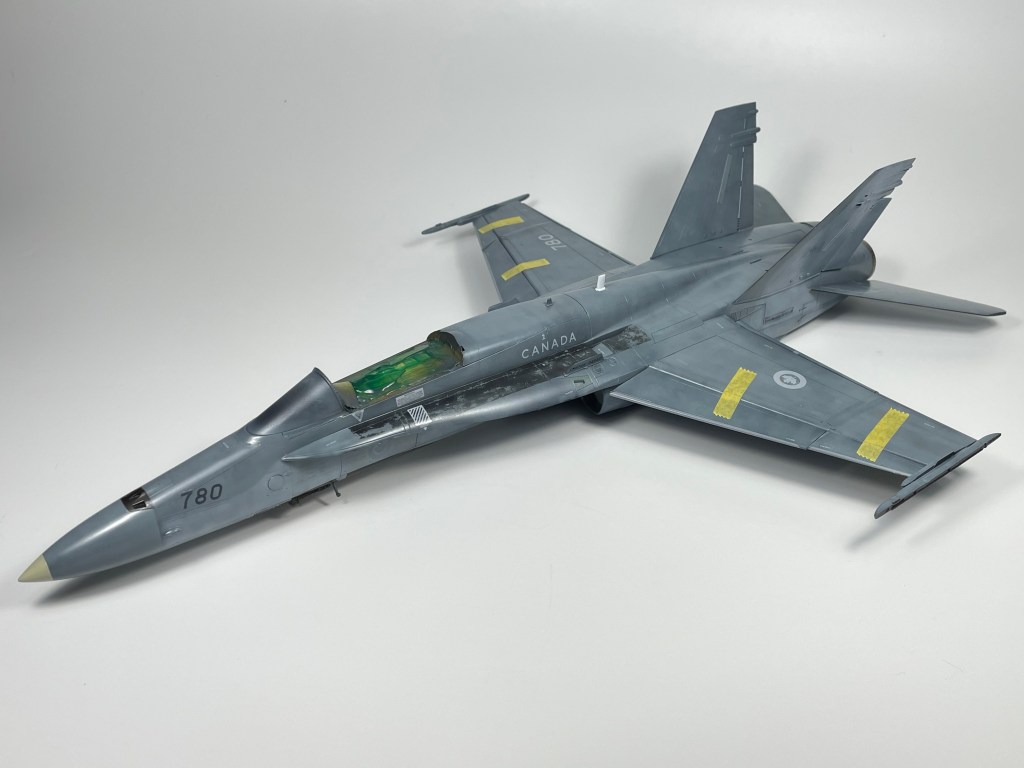
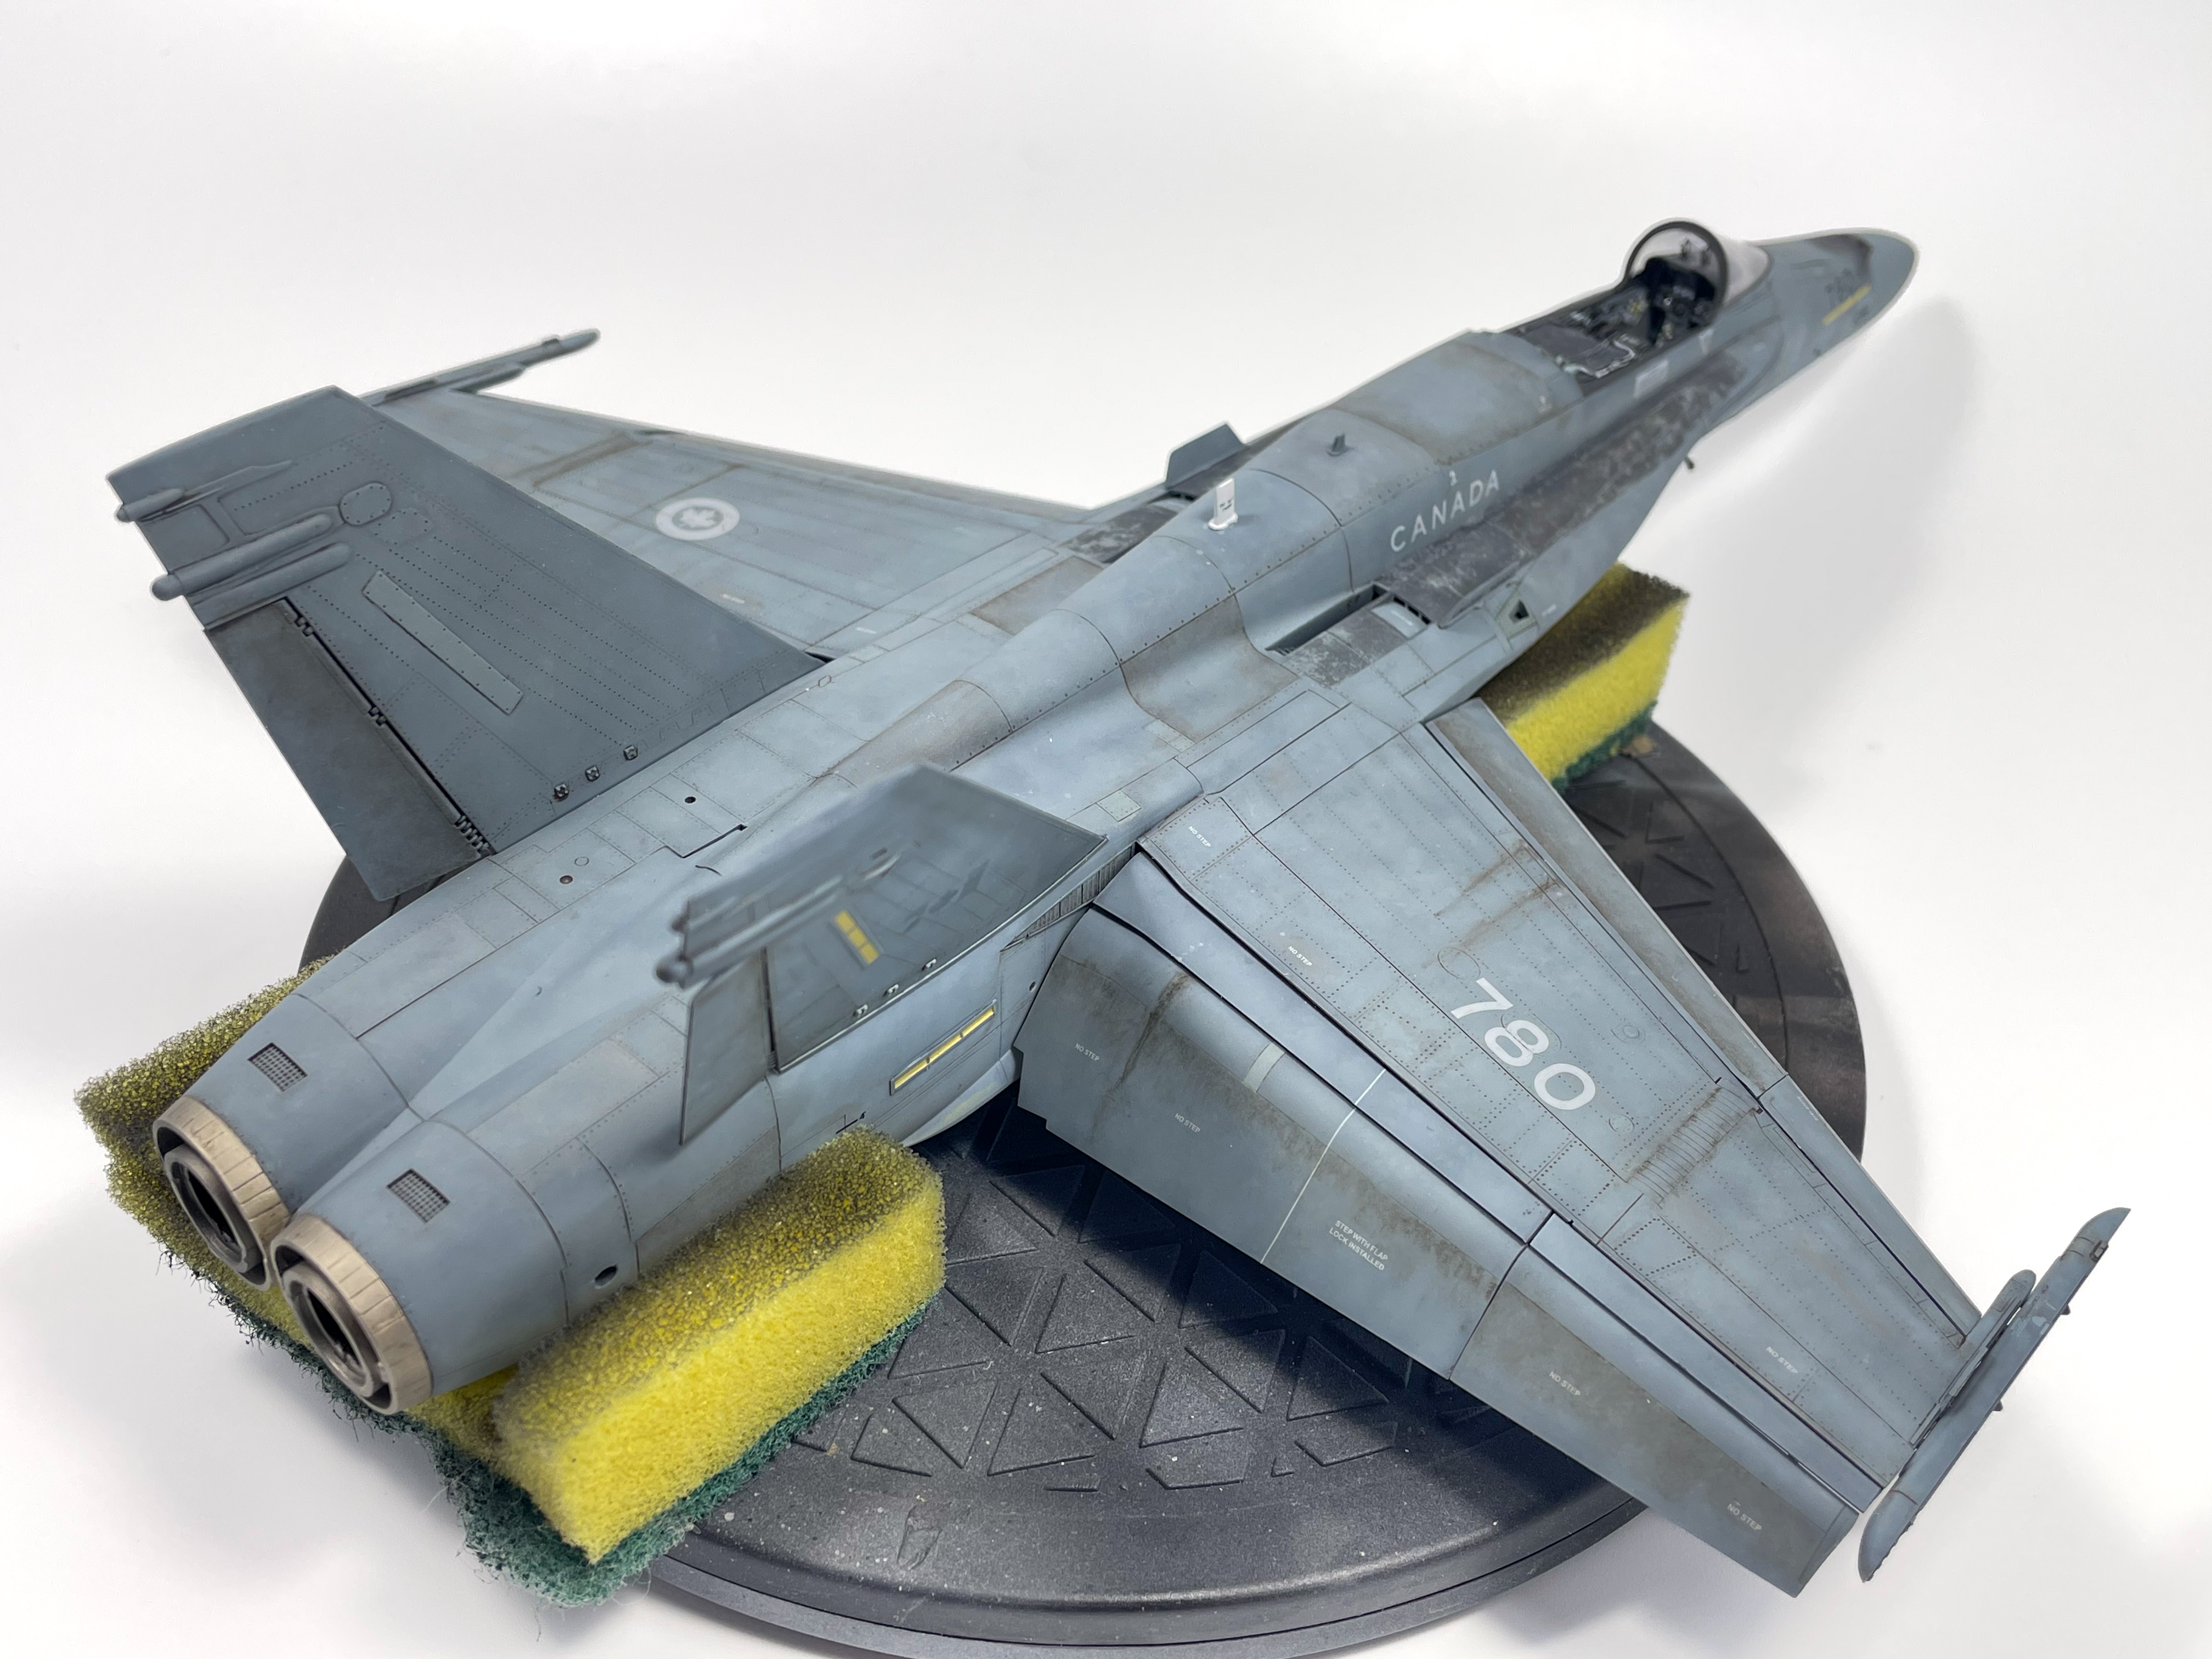
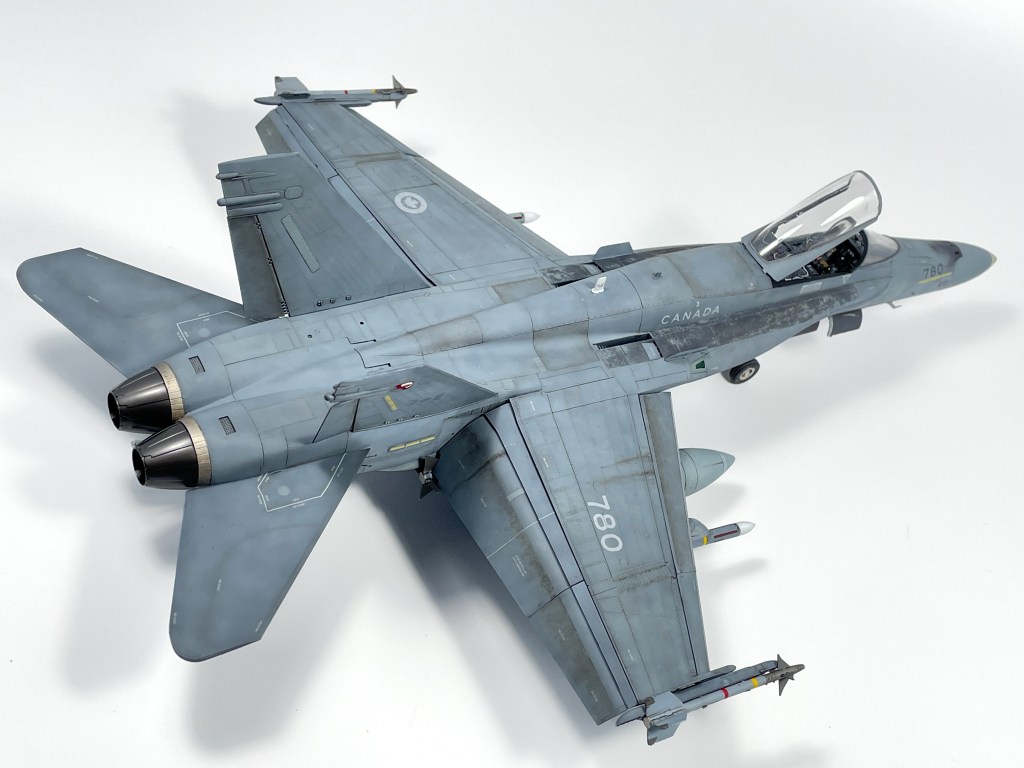
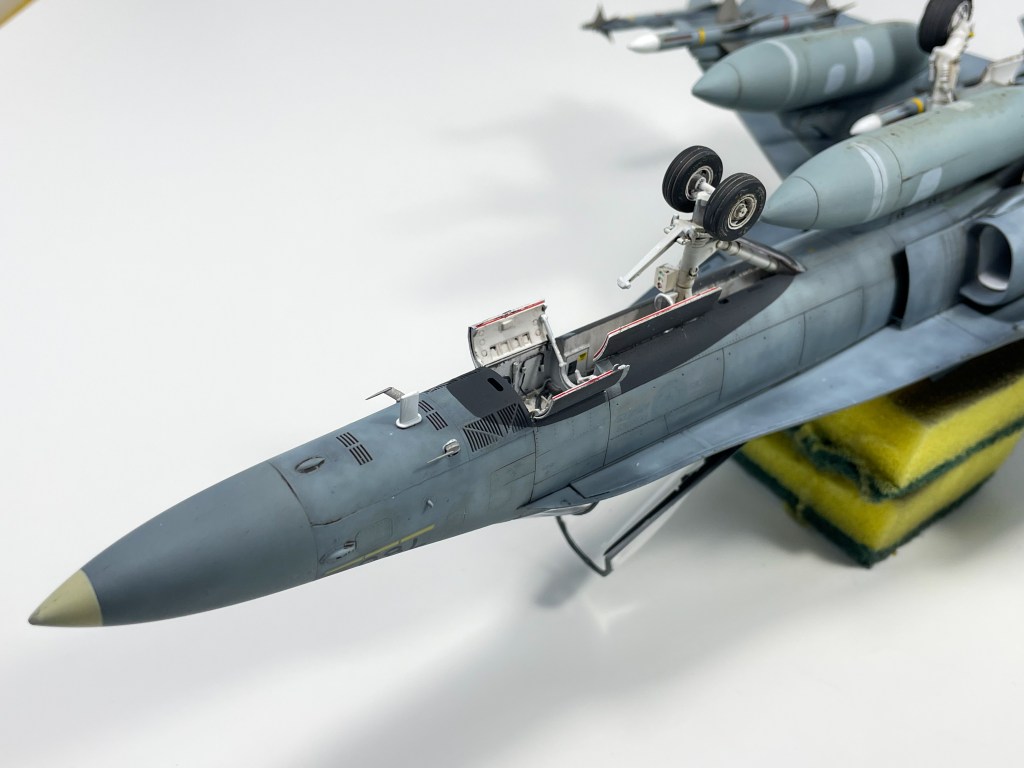
Kinetic 1/48 Cf-18A Hornet

My Cf-18 Hornet was very much the project I was working all year towards as I had first decided to build one in March. I’m very happy with how this build turned out and I think this kit was a major milestone for me. I made an effort to make sure I was spending sufficient time on the various build stages and not rushing through to get to the end. I think that this shows in the final product as everything from the cockpit, gear bays, and final surface is appropriated detailed and weathered.

Ranking: 1st Overall

As to what 2024 will hold, I do have some goals for this upcoming year, primarily to build more armor. I want some more German armor (how original!) in my collection and thus plan to build at least one Panther and one Tiger in the coming year. I also plan to finally finish the Miniart T-55 that survived a move across Canada last year and has been a shelf queen even before that. I’ve got Tamiya’s 1/48 G6 and Eduard’s 1/48 F6F in the stash that I hope to get completed at some point in the coming year as well. Also, dioramas! I realized that my LHS is quite extensively stocked with this diorama making equipment and I’ve always been a firm believer that even a small base adds so much life to a scene.

Categories
1:48 Aircraft Projects

CF-18A Hornet: Completed Build

This past week I was able to finish Kinetic’s 1/48 CF-18 and just in time for the holidays! (currently finishing this write-up out of Toronto Pearson) This build took around 3 months to complete and although I’m definitely happy with the end result (probably my best result to date!), the build itself was challenging to be completely honest.

The kit was plagued with rough fit and unclear instructions. The infamous nose/windshield assembly lived up to its reputation and fought me the entire way.

As I had been thinking about this build for the better part of this year, I spent the months leading up to it gathering various aftermarket pieces to enhance the build. The full list is as follows:

  • Leading edge “Combat Hornets” decal set
  • Aries Resin ejection aeat
  • Flying Leathernecks 3d printed accessories
    • Wheels
    • Hud
    • Pitot tubes
    • Weapon pylons
  • Eduard Resin Aim-9 Sidewinder and Aim-7 Sparrow missiles
  • Anyz decals and 3d printed parts
  • Various scratchbuilt wiring and tubing

The Leading Edge decals really were the catalyst for the build, I knew I wanted to build a Canadian Hornet but that I also wanted build a specific aircraft, No. 188780, one of the participants of Operation Friction, Canada’s contribution to the 1991 Gulf War. This aircraft stood out because of the Cyrillic writing “oсмотри назан” on the Lex fences, with some sources translating the text as “check six”. This marking was specific to aircraft based at CFB Cold Lake which were responsible for “greeting” Russian aircraft over the arctic. As far as I can tell 780 was the only aircraft with the Cyrillic writing present in Desert Storm.

Refocusing back to the build, I tried to scribe my own panel lines for the first time along with adding rivet details. While I feel my scribing skills need improvement, I think that the rivet details I added really stand out and were a worthwhile addition to the model. Kinetic is missing some pretty prominent rivet details on the wing and vertical stabs and the custom detail really enhances the area IMO.

A more detailed breakdown of the painting and weathering stage can be found on that phases’ separate post but the basic overview is as follows. I primed the model in black, added an initial marble coat, followed by a blend coat and detail coat before tying the entire finish together with a final blending coat. I really do enjoy this technique, the method of slowly raising the opacity of paint layers comes very natural to me and is a straightforward (if time consuming) process. That said I do think I need to experiment in this area, and possibly start to add more post-shading to my workflow. As it stands now I see two distinct disadvantages to my current process, the first is that this is a very “dark” method in that since the model is being primed black I often need to finish the model in a shade lighter so that the end result is tinted the correct shade. The second issue is that the best gloss varnishes like to burn hot and will reduce the opacity of the paint by about 5% or so which needs to be taken into account when spraying the final blend coat.

One area I wanted to pay specific focus on was the cockpit, and took extra care and time to get it looking how I wanted. Of immense help was Kris Sieber’s book, “Superdetailing the F-14 Tomcat” which is a must buy for anybody serious about building modern jets. Even though the book is about the process of detailing a Tomcat the techniques can be applied to any ghost grey jet.

All in all however, I really do feel that this is the best kit I’ve built so far and I was able to use everything I’ve learned over the past year or so to really enhance both the building process and the painting/weathering process. Enjoy the final build photos below!

Categories
1:48 Aircraft

CF-18A: Decals and Weathering

After the paint was down, it was time to clear coat. I’m always on the hunt for a better product or method for sealing a model as it’s my least favourite part of model building. I find that adding a gloss coat is the step I always have the least control over and it has the most ability to fuck up all the hard work I’ve put in the model, I learnt this the hard way when I built my Mp4/13 a few years back:

What happens when you put a Laquer clear coat over Enamel paint.

As such, I’ve always tended to choose a “low risk, low reward” method for clear coating. For the longest time that was Tamiya clear + Mr. Color levelling thinner (MCLT) as it was always a pretty safe way to get a clear coat on the model and didn’t take too much thinking beforehand. I switched to VMS clear a little while ago as the application was even more simple, just drown your model in it and it’ll shrink down into all the panel lines no problem. For a while VMS was my go to but I found it wasn’t the most chemically stable, it frosted very badly over a week-old layer of paint and nearly ruined a Spitfire I was working on:

Had to remove paint in some areas down the primer, I was luckily able to salvage the build.

As a result I switched back to Tamiya clear but still wasn’t quite happy with the results I was getting out of it. I found that I wasn’t able to get as smooth surfaces as I’d like with it. I then discovered Mr. Hobby GX 100 Super clear III. GX 100 is to other clears as what MCLT is to other thinners, the stuff is absolutely fantastic in so many ways. Easy to apply, durable, chemically neutral, and most of all a fantastically smooth surface.

I shot a layer of 50/50 Gx100/MCLT then misted straight MCLT over the still drying first layer. This technique can be a bit difficult to achieve but basically you want to spray the straight MCLT on the model until the very point in which the surface becomes “wet”. You want to avoid drenching the model because you are spraying straight thinner onto the finish and can burn through the paint if you’re not careful, this is a very “hot” method of painting. The end result looked a little semi-gloss rather than gloss in the final result but it was still the smoothest (in terms of feel) finish I’ve ever had, which is what really matters for the decals.

Speaking of decals, I used the “Combat Hornets” set by a local company, Leading Edge Models. If you want to depict a combat Cf-18, this is the set to get. You get options from the early 90’s to present day and enough stencils to build two jets. It includes specific markings for almost two dozen aircraft and the ability to depict any Cf-18 with the assorted numbering (which is what I did) They are durable and settled down excellently there is no competition in this category right now, These are the best Cf-18 markings out there right now hands down.

Oil paints, as always, were used entirely for the weathering process. I first hit the model with a mixture of very dark brown and dark grey oil wash. This mixture had the intended effect of not being super noticeable over the grey finish, which is typically desired for more modern aircraft finishes. I sealed the initial wash with VMS Satin before moving on more detailed oil work. I used Abteilung Bitume oil paint in this stage, it’s by far my favourite oil shade to work with. I taped off where I didn’t want the oil effect to appear and stippled the paint in order to get a smooth transition.

I like to use this tactic because it’s so versatile IMO. If you want only a very subtle effect you can load your brush up with thinner and blot out 95% of the paint. On the other side you can leave most of it and it’ll create a very striking contrast. After that I also did some various streaking effects on the wing. This is a common effect to create for Cf-18’s as the streaking fluid is typically very visible in a lot of reference photos. I hit the model with a coat of VMS Matte and the weathering stage was complete!