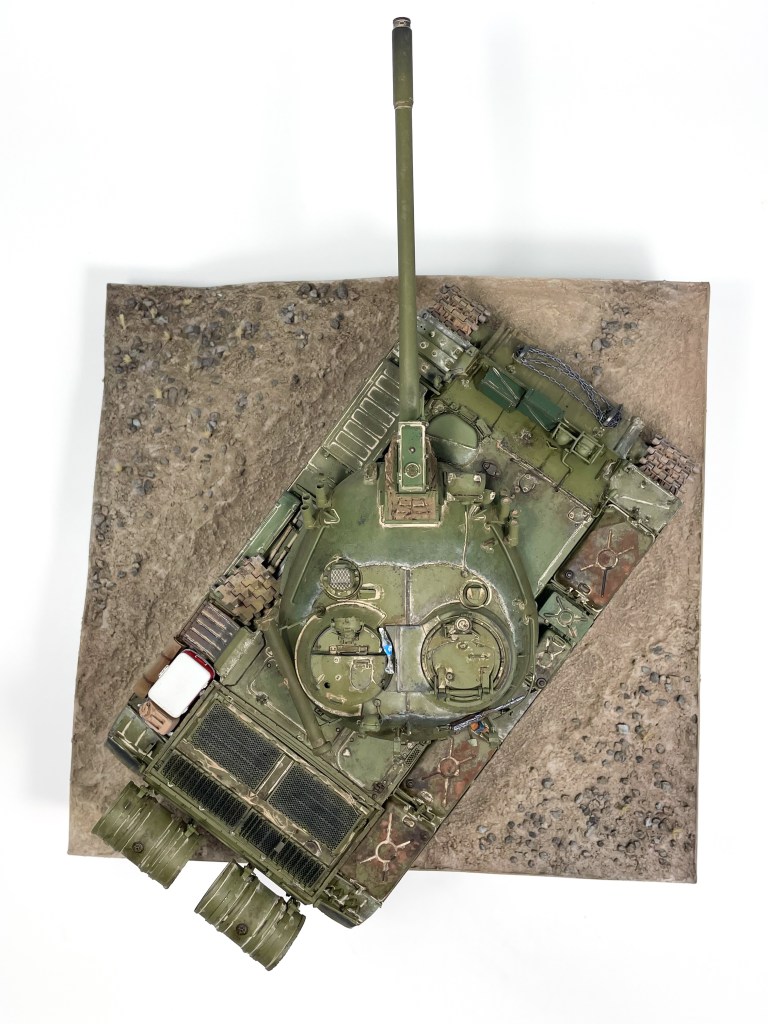
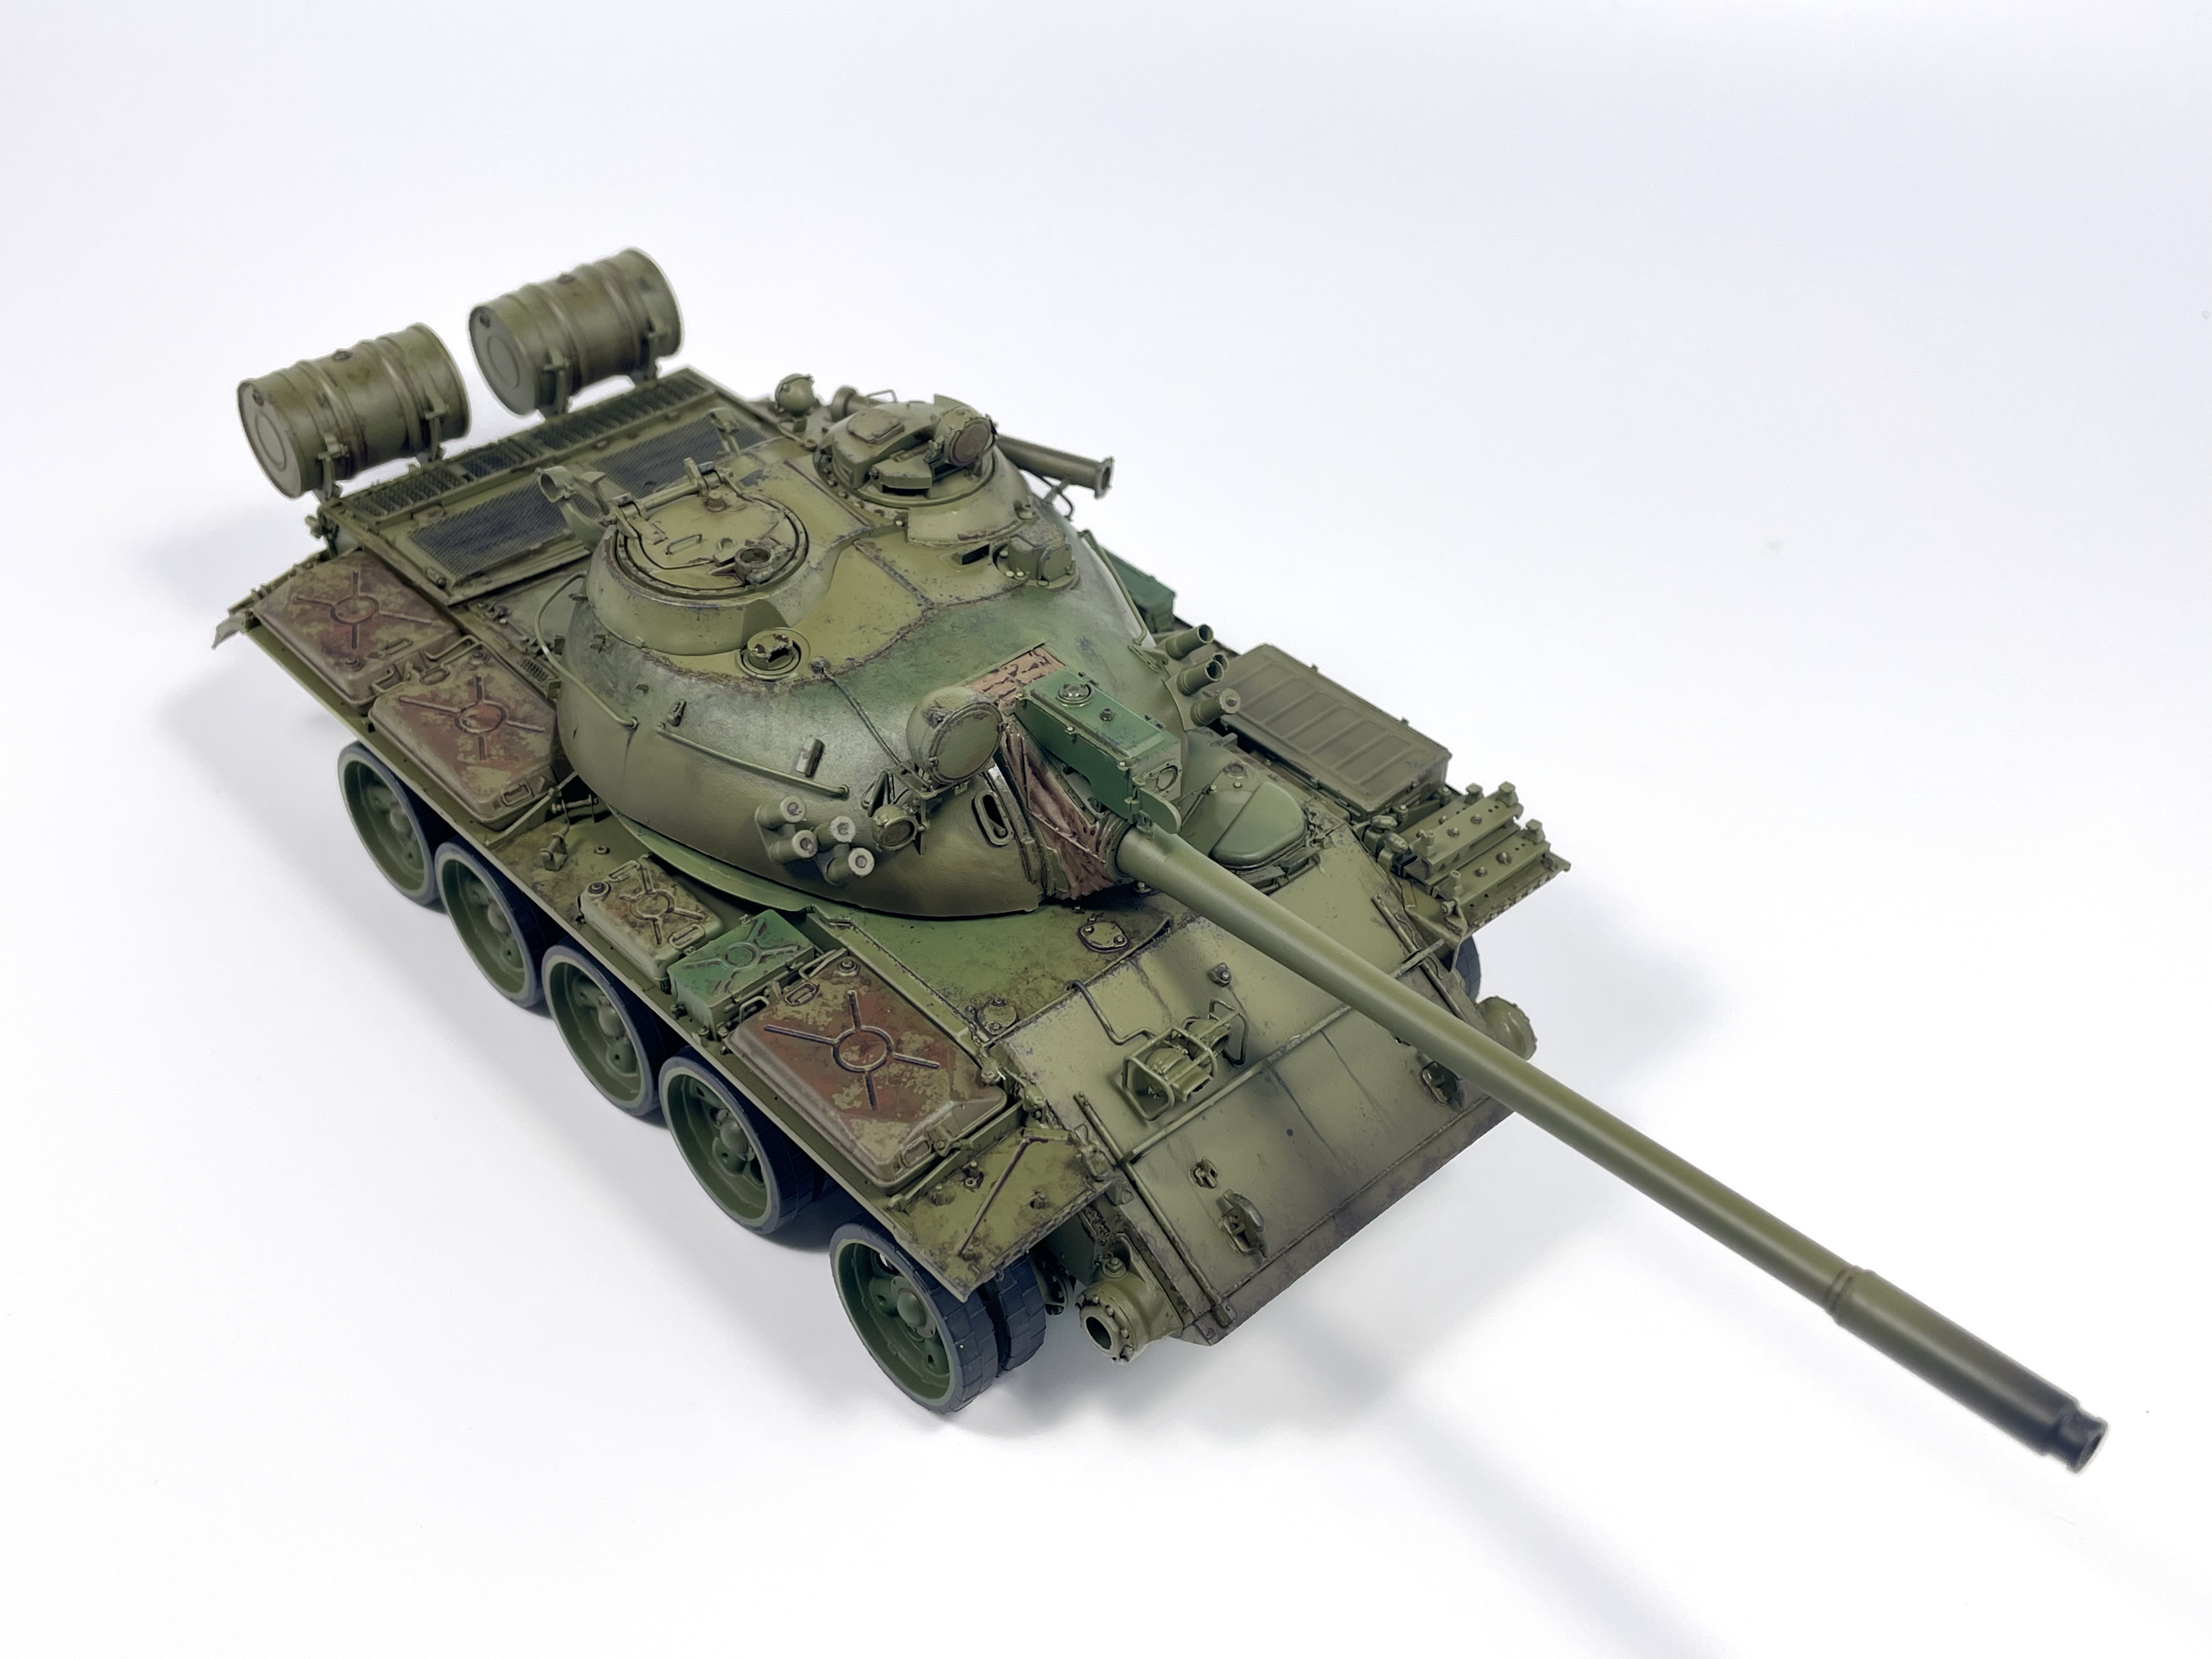
After almost three years in the making Miniart’s T-55 has been completed! This kit has been sitting in my “in progress” drawer for well over a year now and it feels great to finally have it completed. I decided to try to push myself and try out new techniques in completing it and I’m glad I did. One goal of mine was to not use any pre-shading at all in the painting process, a technique that is very familiar to me and I use in a lot of my builds. Instead I used the dullest coat of Russian 4bo as the main base coat and tried post shading the model to create colour modulation.
I’m glad I placed these limitations upon myself because I’ve felt that when I have a technique or process that I like I can tend to stay entrenched in said process and not grow as a modeller. I definitely feel like this build exposed me to new ways of doing things that I’ll be incorporating into future builds. One new technique I tried out was weathering over a matte coat. In prior builds I had always done my weathering over a gloss or satin clear coat and left the matte coat until the end to tie things together. I decided to stray from this process in this build with the majority of heavy weathering being doing over the final matte clear coat. It went better than I expected and it’s something I’ll be doing going forward.
I also made an effort to use a lot of different weathering products and mediums together. In prior builds I may have just stuck to one specific type of medium in my weathering and as a result I may have not been as familiar weathering with enamels or pigments for example. For the T-55 I made heavy use of these mediums with the various fuel and oil stains being created with MIG enamel products. I also used quite a bit of pigments and applied them basically where I felt dust and debris would collect on the vehicle. In short, I think that the three pronged approach to the weathering on this build (Oils for a general wash and streaking, Enamels for fuel stains, oil leaks, and rust effects, and pigments for dust and dirt deposits) worked well and it’s a process I’ll keep in mind for the future.
That’s it for now! Enjoy the final build gallery below!
Miniart’s T-55 has been in progress in one form or another for almost two years now. It’s survived being stuffed in a box and a move across the country. There’s a few reasons why I’m only getting around to finishing it now, namely that I was more interested in other projects and that it’s a complex kit and not one you’d try to finish when being away from the hobby for a sustained period of time. I’ve slowly picked away at it for the past year but with a new year returns an old build as I’m determined to start the year by finishing off this shelf queen.
In starting the weathering process I’m reminded that conceptualizing the final result *before* beginning the painting process is needed for a good result. In slowly chipping away on this build I painted a layer of 4BO with no real direction as to what I wanted the final result to look like. Looking back this was a mistake, as I would have liked to add some chipping effects via the hairspray method. This mistake could be salvaged however and I decided to use this build to experiment with post shading, colour modulation and other heavy weathering effects. Basically I want to push this build and really go far with the weathering and pigments to get a better understanding of what works and what doesn’t. I settled on a dusty finish of a vehicle set in a desert environment and I think the green of the tank will contrast nicely with the brown environment it will be set in.
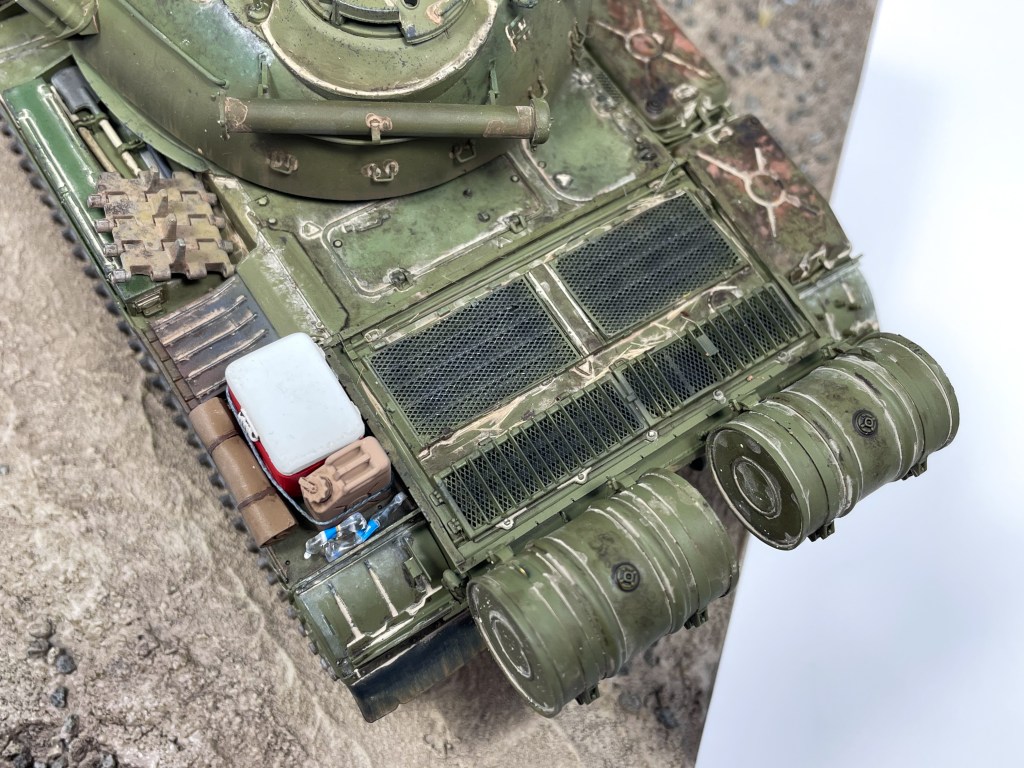
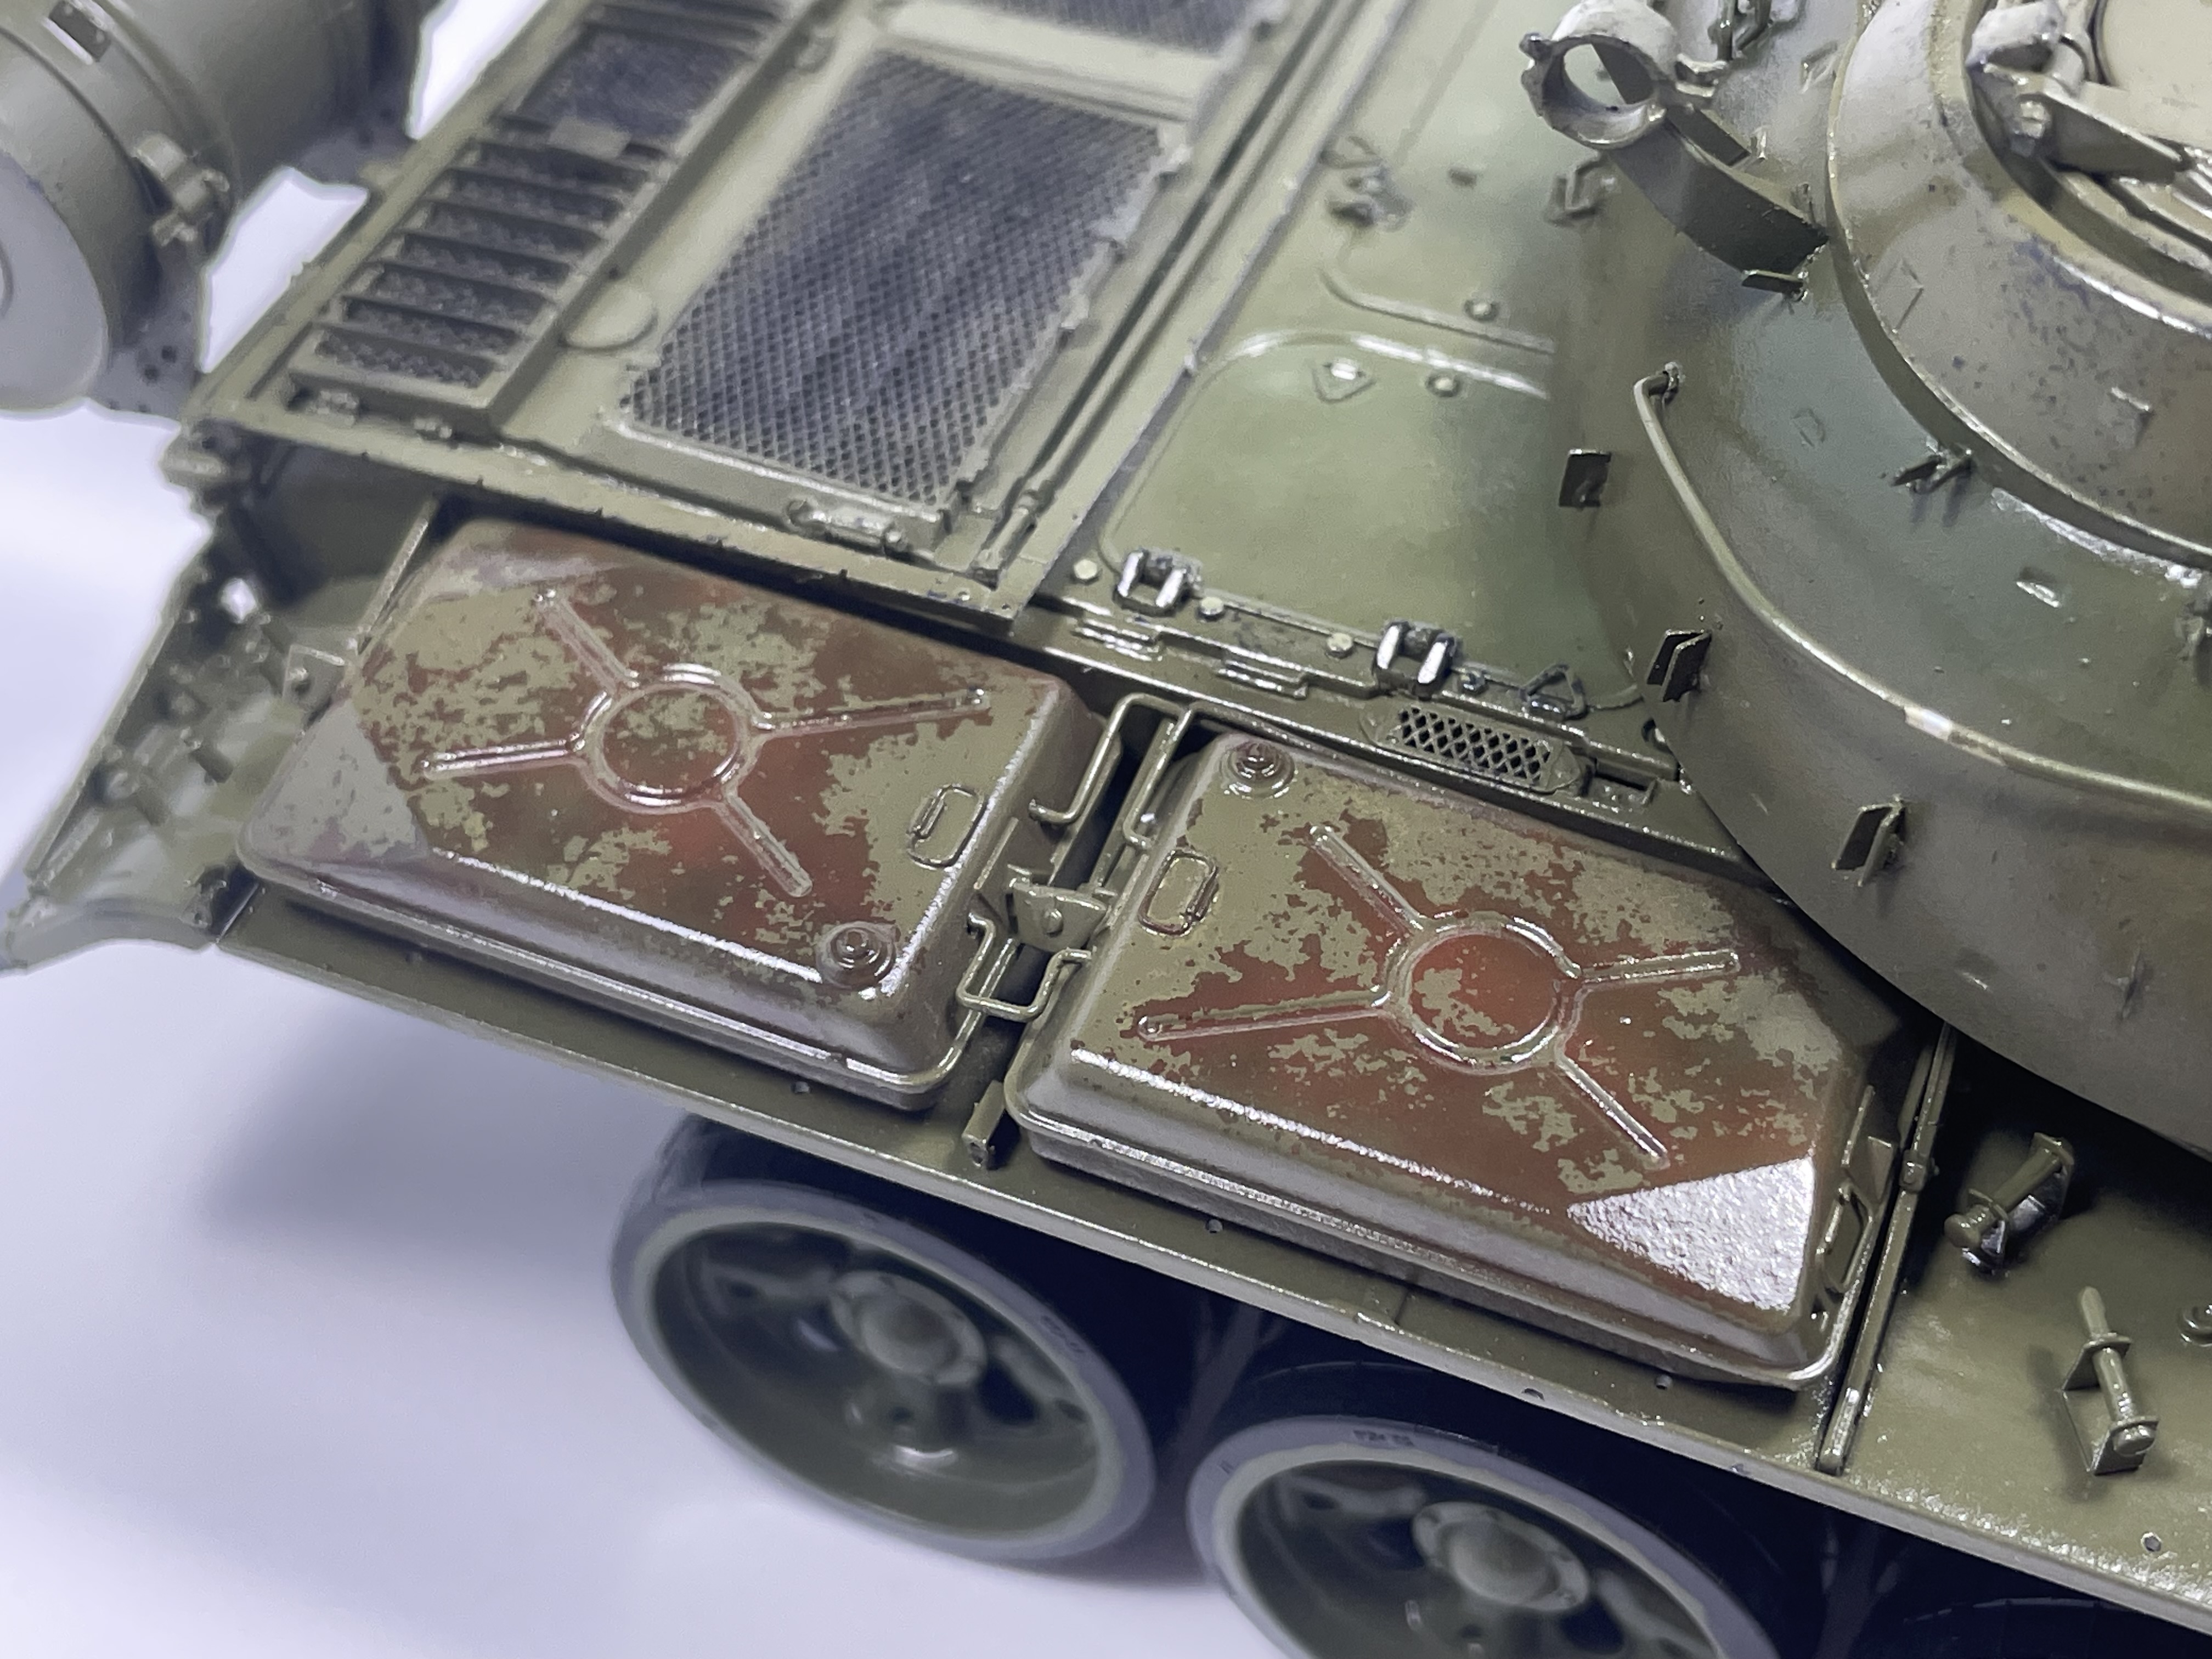
The weathering process started with adding some rust highlights by spraying some various rusty shades on the fuel tanks to create some contrast between the tanks and the vehicle hull. I then opted to treat the fuel tanks to a chipping effect to simulate areas where the paint has peeled away and exposed the rusted metal underneath.
Hairspray chipping helped to start a rust effect on the fuel tanks.
After getting the tanks where I wanted them, I hit the model with a gloss coat to seal the paint prior to an oil pinwash. Normally I’d stick with satin finishes on armour but seeing as there were a lot of details for a wash to skink into I opted for the gloss coat in this stage. After the pinwash I used VMS Satin to seal the model again before moving onto further effects. I opted for a satin coat instead of working over a gloss surface because it would allow for easier blending between the various effects I wanted to use.
Initial weathering was comprised of enamels from MIG using various grime and fuel stain effects. I like how this initial stage turned out although I think I need more practice with enamels as they are not my go to as much as oils are. That said, I like how “grimy” I was able to make the surfaces look and how the staining interacts with the colour modulation. This phase was only meant to be a base for the pigment work which will come next.
Since I knew I wanted to pose this vehicle in a Desert or Arid setting, I wanted a significant amount of dusting done to the model. I started on the running gear and underneath the fenders and stippled on AK’s “Kursk Earth” along with various other pigments. I also utilized a “light mud” product from AK to get very light splashes to add contrast. With it having been quite a while since I had really dirtied up a tank much of this process was experimenting to see how I liked the end result. I also cut up some static grass and mixed it with a light pigment before applying it to the model to simulate foliage being stuck to the underside of the vehicle.
For the initial dusting I utilized two pigment shades with pigment fixer and while I think it was good experience to practice with using pigments I think my application of this medium would use some refinement. I do think I need to slow down a bit and put more effort into blending while the pigments are still drying which is something I’ll need to keep in mind for the next build.
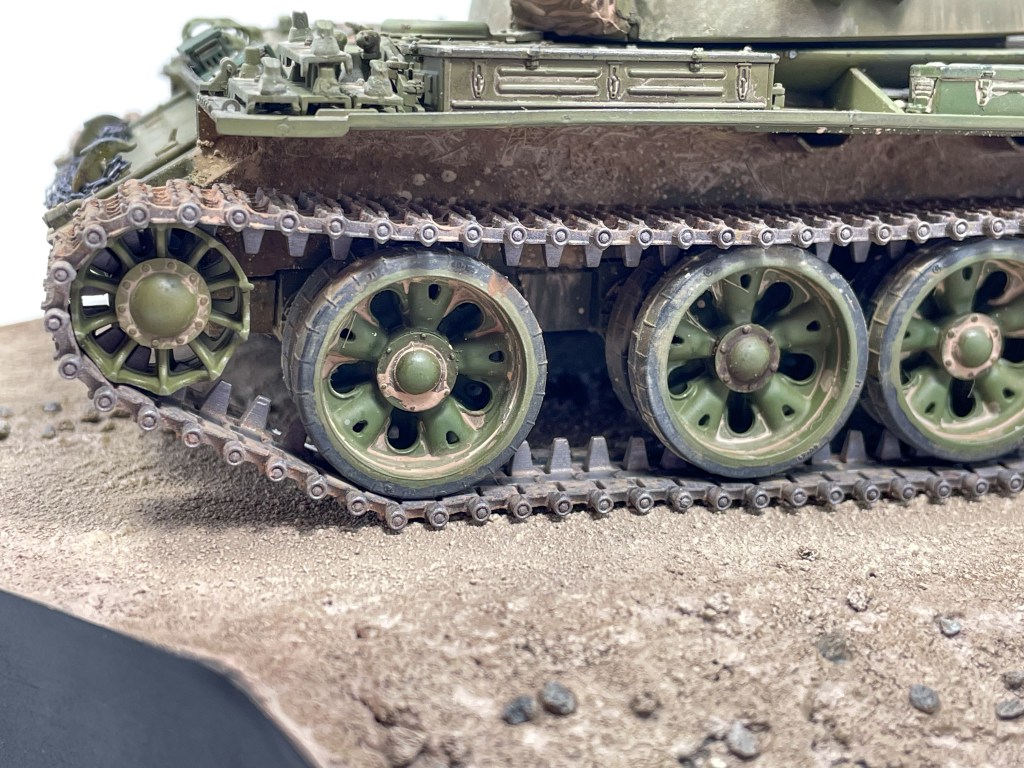
I used T-Rex tracks for this build and couldn’t be happier with how they turned out. I painted them in Gunze Mr. Metal Color “Iron” which if left unbuffed will remain a dull dark grey but will result in a really great shine if you rub the surface. I added some more “Kursk Earth” long with several different pigment shades to create a dusty weathered look. I then used several q tips to wipe away the pigments where wear would occur and revealed a nice shine to represent polished metal. I also added graphite onto the cleats on the reverse side to represent where the track would contact the ground the hardest and buff them metal.
This is where I’ll leave this update for now but there are sill a few things I’d like to do before declaring this one complete. I’d also like to put this one on a proper base so I’ll need to get that completed as well. Hoping to get the T-55+Base all done by the end of February so not a whole lot of time left!
This past January I was lucky enough to have some time off work and made the most of it by visiting Japan. I chose the country for two main reasons, to experience Japanese culture, and to check out the amazing hobby shops. For all the talk about “the hobby is dying” I’d argue that Japan alone could self sustain the hobby, the demand here is insane. Every shop big and small was packed with all ages, It’s such a night and day difference with North America.
To be clear, this post is not going to be an exhaustive guide to the various shops in the country. There are far better guides detailing the pros and cons of each shop along with videos on YouTube of people visiting them. Instead this post will serve a a general overview of the modelling aspect of the trip and my take on how things turned out.
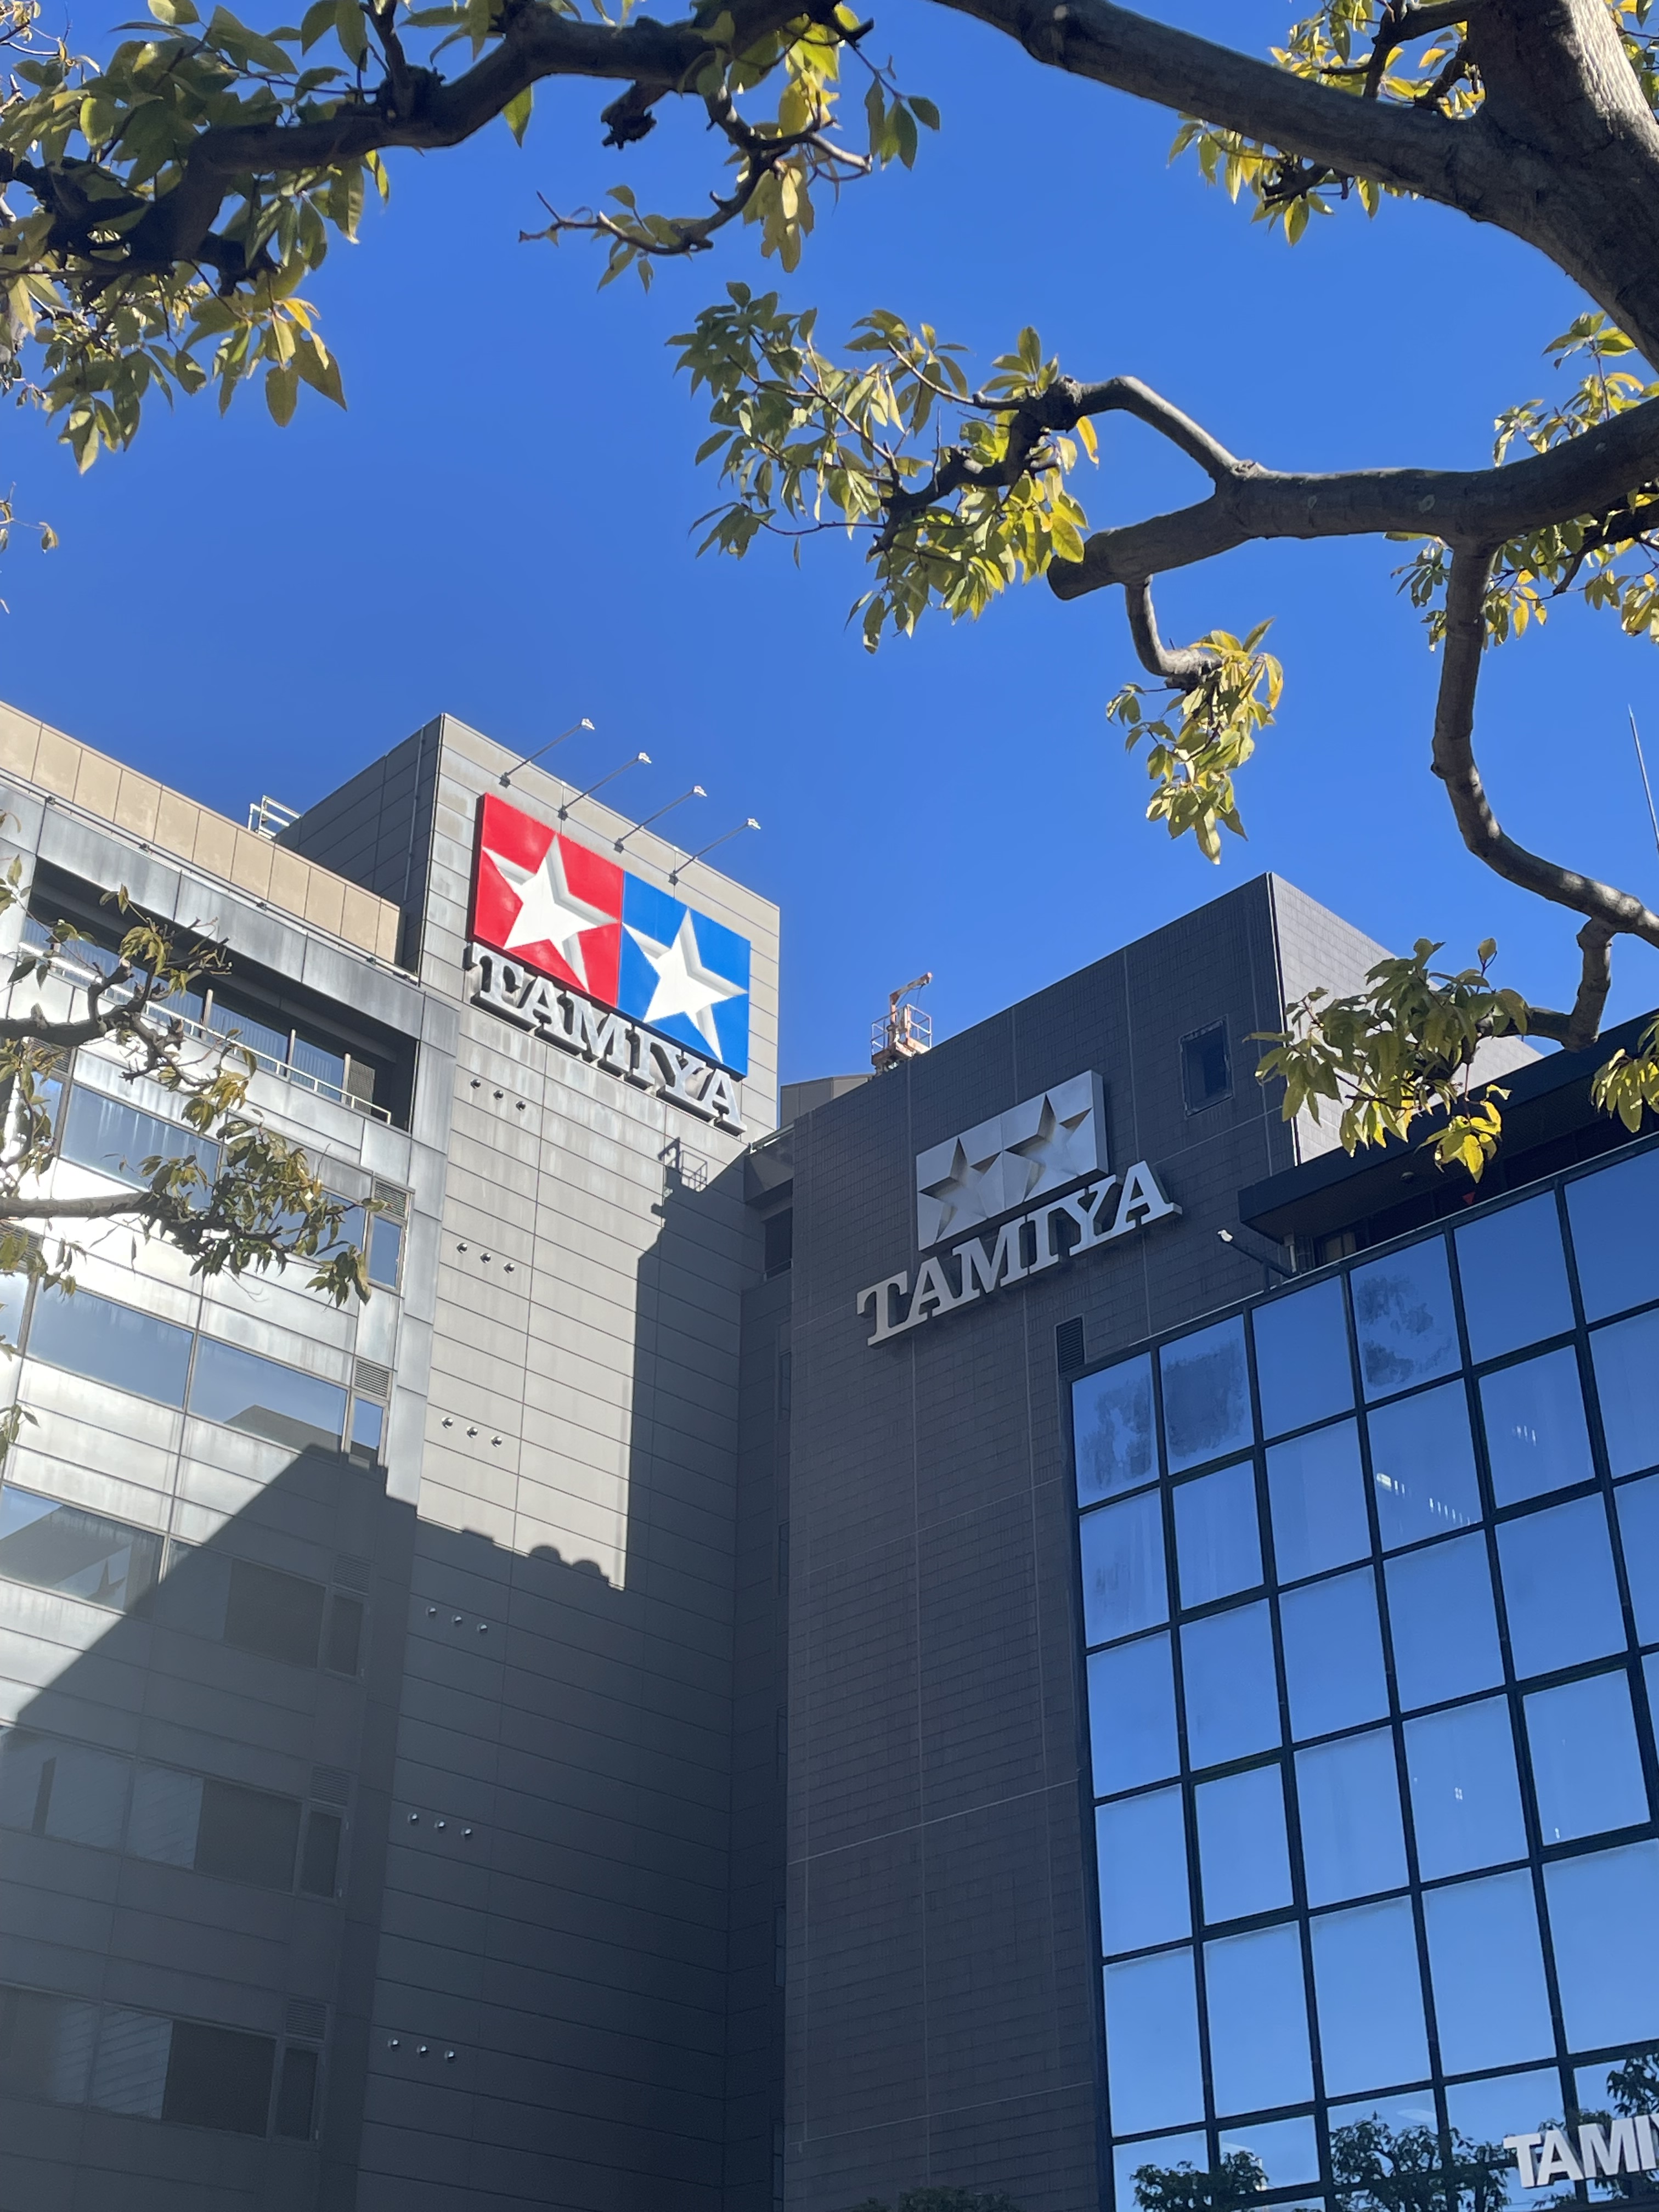
Tamiya’s Shizuoka Headquarters
To start off, I knew that near the top of my priority list was to visit the Tamiya headquarters in Shizuoka. Tamiya has a small visitors section that requires you to book in advance. Shizuoka is a relatively (compared to Tokyo) small city about a hour and half Shinkansen ride outside of Tokyo and is the home of Tamiya’s main headquarters. I’m not afraid to admit this visit meant a lot to me. I’ve been building Tamiya kits for over ten years now and to be able to visit the inception point carries a certain weight. In terms of what to see there are to main gallery rooms. The first is dedicated to historical Tamiya kits going back years and years to the 1960’s. Of particular note was a section dedicated to remembering Sheperd Paine which caught me by surprise. I grew up reading about Shep’s dioramas and this was the first time I’d ever been able to see them first hand. I can’t think of a higher honour for a modeller than having a entire section dedicated to you in Tamiya’s official showroom and if anybody deserves it, it’s him.
The other Tamiya showroom is dedicated to Tamiya’s current product line and showcases much more modern products. It’s smaller and less interesting but it’s definitely worth mentioning. Tamiya also has various vehicles on display and something that I found particularly interesting is that they have an early lathe that would have been used to make the metal molds for plastic injection, very cool! The headquarters has a small gift shop that’s worth checking out and I picked up a shirt along with some official Tamiya stickers.
“Modern” Tamiya releases
While I really enjoyed my visit to Shizuoka I won’t lie the trip absolutely wiped me out. I had booked my train ticket for pretty late in the morning and did some sightseeing prior to leaving. Looking back now this was a mistake. The Tamiya building is deceptively far the train station in Shizuoka and the city does not have as good pedestrian infrastructure as Tokyo. I was totally wiped out after getting back to the hotel in Tokyo that evening.
Sticking with the Tamiya theme, next on the list was the Tamiya Plamodel Factory which is sort of Tamiya’s factory store in Tokyo. While the gift shop in Shizuoka is good, it doesn’t have the same selection as a dedicated hobby store which Plamodel is. The next day I visited quite a few stores including: Yellow Submarine in Akihabara Radio Kaikan, Volks Hobby Yodobashi Camera, Leonardo ET and LG, and Tam Tam Hobby.
Yellow Submarine Radio Kaikan
Yellow submarine is one of the more well known stores in the Tokyo area and was fairly impressive. I’ll preface this review with the fact that they don’t have a super extensive selection of kits but are definitely well stocked. I was on the lookout for a very specific kit when I came to Japan (Gecko Models 1/35 LCA in British service) and by pure chance it was in the very first row I walked down. Tool selection is good and I picked up some scribing stencils and chisels as well. Good decal selection as well.
Volks Radio Kaikan
There is a Volks hobby store in the same building as Yellow submarine and as the retailer of Zoukei-Mura kits they have excellent selection of them available. I fully expected to be able to pickup their new Fw-190 in person but they didn’t have any for sale and no marketing material on this kit was up either. Considering that the pre-order period of this kit was spring of last year and that they supposedly started to send them to customers in October of 2023 I was very surprised to not find any for sale. Visit wasn’t a complete wash however, there are a lot of neat builds on display and a good tool selection as well. I picked up a 1/700 Akagi and an accompanying photo-etched set.
Yodobashi Camera
To start, Yodobashi Camera is a big department store of which one section of one floor is dedicated to scale models. Despite this, Yodobashi Camera has the most extensive selection of tools I have ever seen. The entire back wall of the store is filled with a wide variety of modelling tools that I didn’t know I needed until now. Yodobashi Camera is a cut above the other stores because in addition to the great tool selection, the kit selection is fantastic as well with a lot of brands available for purchase. My favourite store in Tokyo by far.
Leonardo ET and LG
I don’t know what the history is between these two stores but supposedly they come from the same person (people?). While the prior mentions were big box stores, Leonardo ET and LG exemplify the mom-and-pop shop. Very small area to move around in and absolutely packed to the ceiling with kits. I liked the atmosphere and selection but to be honest with both of them, it’s kind of too difficult to move about and see the entirety of the selection available.
Leonardo ET on the left.
Tam Tam Hobby
This one is close to the Leonardos’ and besides that was utterly forgettable. Some Tamiya selection and a few tools but nothing of substance here, won’t visit again on a repeat visit to Japan.
Hobby Land Osaka
And last but certainly not least is Hobby Land in Osaka. Out of all the hobby stores I saw in Japan Hobby Land was by far my favourite and did the most to bankrupt me. The store is not large by any means, but has a *insane* selection of aftermarket accessories. Virtually every AM brand is represented in this store. A huge quantity of Eduard and Aires resin sets were available along with Voyager, Legend, T-rex and many other AFV detail sets were also available. Hobby Land does not stock these brands in limited numbers either with a large number of products per brand available. Also available was a large number of reference books for modelling as well as modelling how-to books showcasing various builds. Really great selection of books to choose from and I picked up a few.
Pricing
before my trip I was having issues nailing down how much exactly to expect kits to go for. Typically people will say that kits in Japan are X or Y percent cheaper but no actual prices. It’s dependent on the store you visit as well and boxes with a little damage will be discounted. Here’s what I picked up and what I paid on my trip:
Overall I’m pretty happy with what the kits cost and I’m happy I went with some extra room in my suitcase. I was particularly satisfied with the selection and prices of the Dragon Armor kits as here in Canada they can easily go for $100+ especially for the German stuff.